Now that both PHP and Java have methods for embedded slide visualization, we can’t leave Python out. Originally we didn’t think there would be much need for this, but it’s at least confusing to have certain methods available in one version of our SDK, while not in others.
In addition, interactive visualization is definitely a thing in Python; just have a look at what you can do with Bokeh. Ideally and ultimately, we’d like to add digital pathology capabilities to an already existing framework like Bokeh, but in this blog post we’ll just explore how you can embed a slide into your IPython code as is.
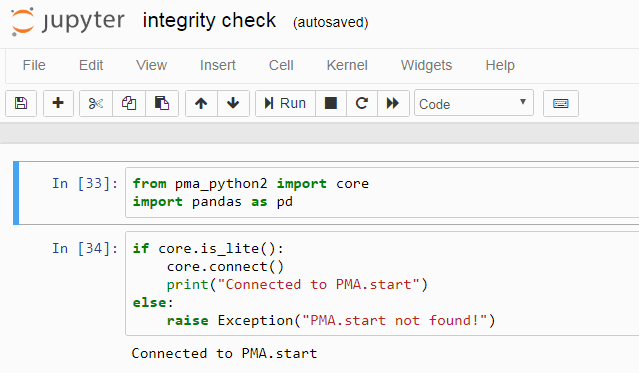
As PMA.python is not a standard library, it bears to start your notebooks with the necessary detection code for the library. If it doesn’t work, it’s bad manners to leave your users in the dark, so we’ll provide some pointers on what needs to be done, too:
try:
    from pma_python import core
    print("PMA.python loaded: " + core.__version__)
except ImportError:
    print("PMA.python not found")
    print("You don't have the PIP PMA.python package installed.\n"
        + "Please obtain the library through 'python -m pip install pma_python'")
If all goes well, you’ll see something like this:
Once you’re assured the PMA.python library is good to go, you should probably verify that you can connect to your PMA.core instance (which can be PMA.start, too, of course; just leave the username and password out in that case):
server = "http://yourserverhere/pma.core/"
user = "your_username"
pwd = "your_password"
slide = "rootdir/subdir/test.scn"
session = core.connect(server, user, pwd)
if (session):
    print("Successfully connected to " + server + ": " + session)
else:
    print("Unable to connect to PMA.core " + server + ". Did you specify the right credentials?")
If all goes well, you should get a message that reads like this:
Successfully connected to http://yourserverhere/pma.core
def show_slide(server, session, slide):
    try:
        from IPython.core.display import display, HTML
    except ImportError:
        print("Unable to render slide inline. Make sure that you are running this code within IPython")
        return

    render = """
        <script src='""" + server + """scripts/pma.ui/pma.ui.view.min.js' type="text/javascript"></script>

<div id="viewer" style="height: 500px;"></div>
<script type="text/javascript">
            // initialize the viewport
            var viewport = new PMA.UI.View.Viewport({
                    caller: "Jupyter",
                    element: "#viewer",
                    image: '""" + slide + """',
                    serverUrls: ['"""+ server + """'],
                    sessionID: '""" + session + """'
                },
                function () {
                    console.log("Success!");
                },
                function () {
                    console.log("Error! Check the console for details.");
                });
        </script>"""
display(HTML(render))
Our method is a bit more bulky than strictly needed; it’s robust in this sense that it makes sure that it is actually running in an IPython environment like Anaconda, and will also provide output to the JavaScript console in case the slide can load for some reason.
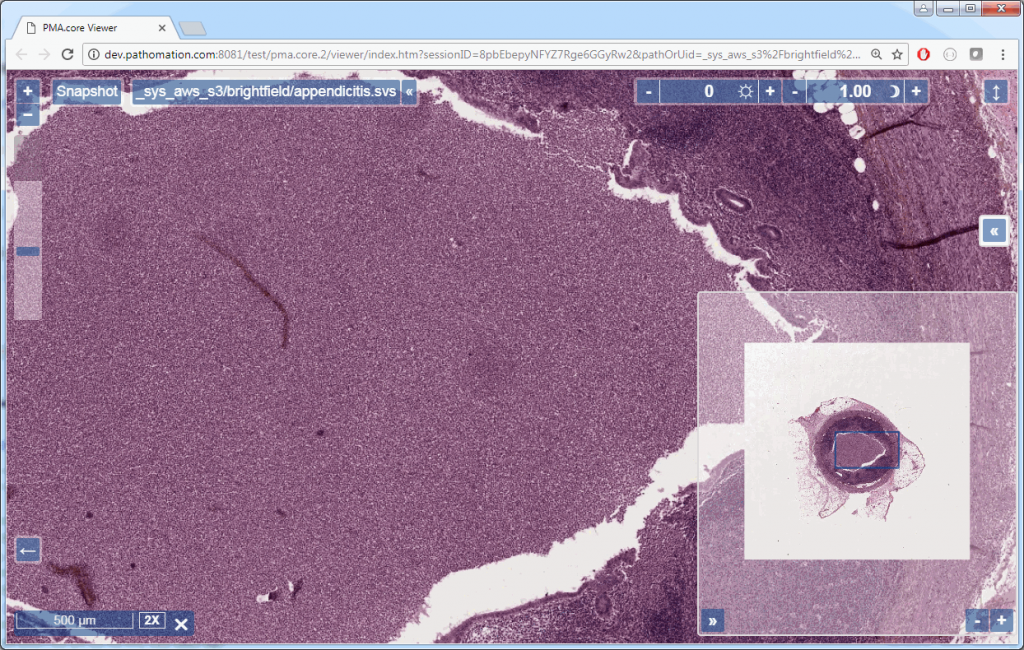
Rendering a slide inline within a Python / Jupyter notebook is now trivial (just make sure you ran the cell in which you define the above method, before invoking the following piece of code):
show_slide(server, session, slide)
The result look like this:
There is never an excuse not to use exploratory data analysis to get initial insights in your data. As switching environments, browsers, screens… can be tedious, and notebooks are meant to encapsulate complete experiments, interactive visualization of select whole slide images may just be one more thing you want to include.
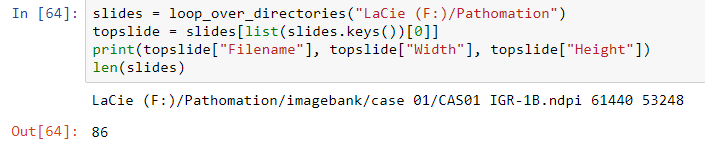
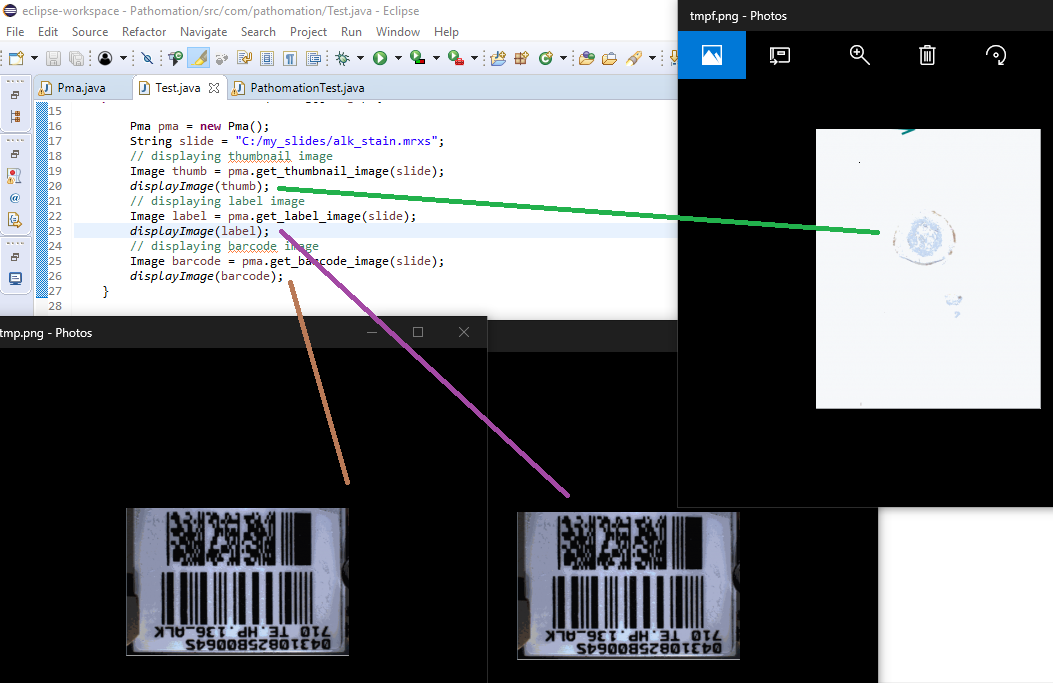
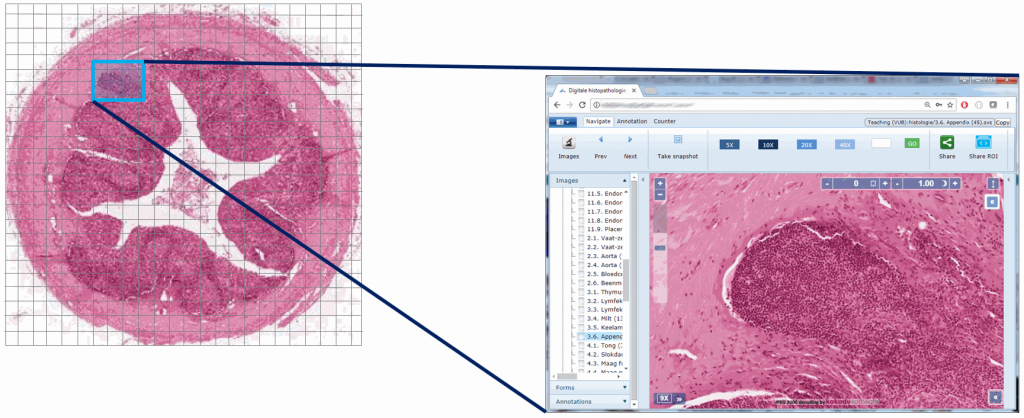
The Java Core class is part of our PMA.java API (introductory materials available here) and comes with a number of methods to navigate WSI slides on your local hard disk. Most often you’ll be alternating between getDirectories() and getSlides().
Here’s an example that will allow you to navigate your hard disk in a tree-like fashion :
import java.io.IOException;
import java.net.URLEncoder;

import javax.servlet.ServletException;
import javax.servlet.ServletOutputStream;
import javax.servlet.http.HttpServlet;
import javax.servlet.http.HttpServletRequest;
import javax.servlet.http.HttpServletResponse;

import com.pathomation.Core;

public class Test extends HttpServlet {

   private static final long serialVersionUID = 1L;

   @Override
   protected void doGet(HttpServletRequest request, HttpServletResponse response)
         throws ServletException, IOException {

      ServletOutputStream out = response.getOutputStream();

      if (!Core.isLite()) {
         System.out.println("PMA.start not found");
         return;
      }

      Core.connect();

      out.println("<html>");
      out.println("<ul>");
      if (request.getParameter("p") == null) {
         for (String rd : Core.getRootDirectories()) {
            out.println(
                  "<li><a href='?p=" + URLEncoder.encode(rd, "UTF-8").replace("+", "%20") + "'>" + rd + "</li>");
         }
      } else {
         String[] parts = request.getParameter("p").split("/");
         for (String rd : Core.getRootDirectories()) {
            if (parts[0].equals(rd)) {
               out.println("<li><b>" + rd + "</b>");
               for (String subdir : Core.getDirectories(rd)) {
                  out.println("<ul>");
                  String subdirparts[] = subdir.split("/");
                  if (request.getParameter("p").indexOf(subdir) == -1) {
                     out.println("<li><b>" + subdirparts[subdirparts.length - 1] + "</b>");
                     // keep drilling down, or see if you can retrieve slides as well
                     out.println("</li>");
                  } else {
                     out.println("<li><a href='?p=" + URLEncoder.encode(subdir, "UTF-8").replace("+", "%20")
                           + "'>" + subdirparts[subdirparts.length - 1] + "</a></li>");
                  }
                  out.println("</ul>");
               }
               out.println("</li>");
            } else {
               out.println("<li><a href='?p=" + URLEncoder.encode(rd, "UTF-8").replace("+", "%20") + "'>" + rd
                     + "</a></li>");
            }
         }
      }
      out.println("</ul>");
      out.println("</html>");
   }

   @Override
   protected void doPost(HttpServletRequest request, HttpServletResponse response)
         throws ServletException, IOException {
      this.doGet(request, response);
   }
}
Yes, this should all be in a recursive function so you can dig down to just about any level in your tree structure. However, this post is not about recursive programming; we’re mostly interested in showing you what our API/SDK can do.
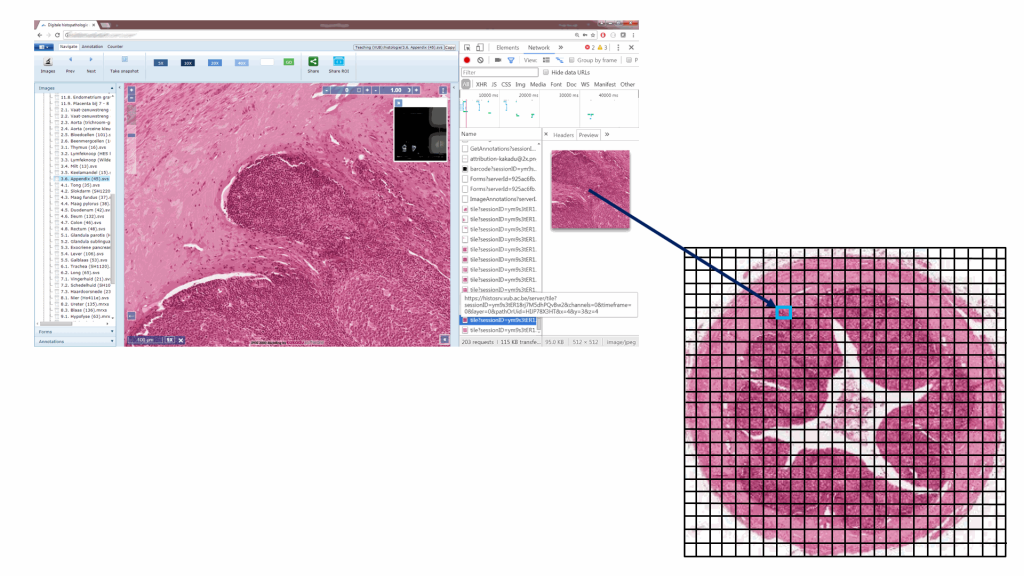
For instance, you can retrieve the slides in a selected folder and generate a link to them for visualization:
// now handle the slides in the subfolder
out.println("<ul>");
for (String slide : Core.getSlides(subdir)) {
   String[] slideParts = slide.split("/");
   out.println("<li>" + slideParts[slideParts.length - 1] + "</li>");
}
out.println("</ul>");
Introducing the UI class
We can do better than our last example. Providing a link to PMA.start is easy enough, but once you get to that level you’ve lost control over the rest of your layout. What if you make a website where you want to place slides in certain predefined locations and placeholders?
That’s where the UI class comes in. Currently, you can use it to either embed slide viewports, or thumbnail galleries in your own website.
Here’s how you can include an arbitrary slide:
import java.io.IOException;
import java.util.List;
import javax.servlet.ServletException;
import javax.servlet.ServletOutputStream;
import javax.servlet.http.HttpServlet;
import javax.servlet.http.HttpServletRequest;
import javax.servlet.http.HttpServletResponse;
import com.pathomation.Core;
import com.pathomation.UI.UI;
public class Test extends HttpServlet {
private static final long serialVersionUID = 1L;
@Override
protected void doGet(HttpServletRequest request, HttpServletResponse response)
throws ServletException, IOException {
// setup parameters
UI.pmaUIJavascriptPath = UI.pmaStartUIJavascriptPath;
ServletOutputStream out = response.getOutputStream();
String sessionID = Core.connect();
// pick a slide to embed in your page
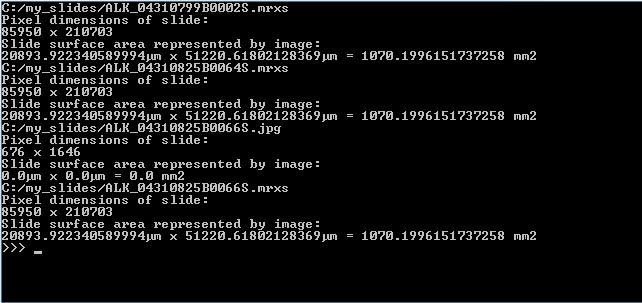
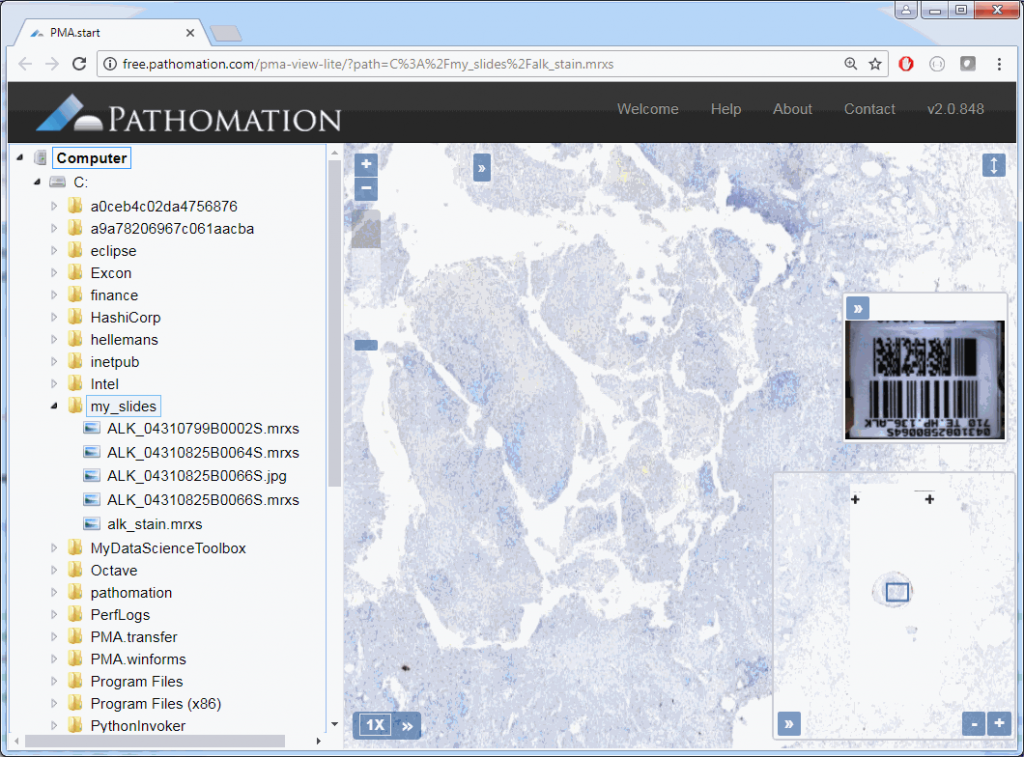
String slide = Core.getSlides("C:/my_slides/").get(0);
List<String> results = UI.embedSlideBySessionID("http://localhost:54001/", slide, sessionID);
// the first element in the list contains the generated front end code
out.println(results.get(0));
}
@Override
protected void doPost(HttpServletRequest request, HttpServletResponse response)
throws ServletException, IOException {
this.doGet(request, response);
}
}
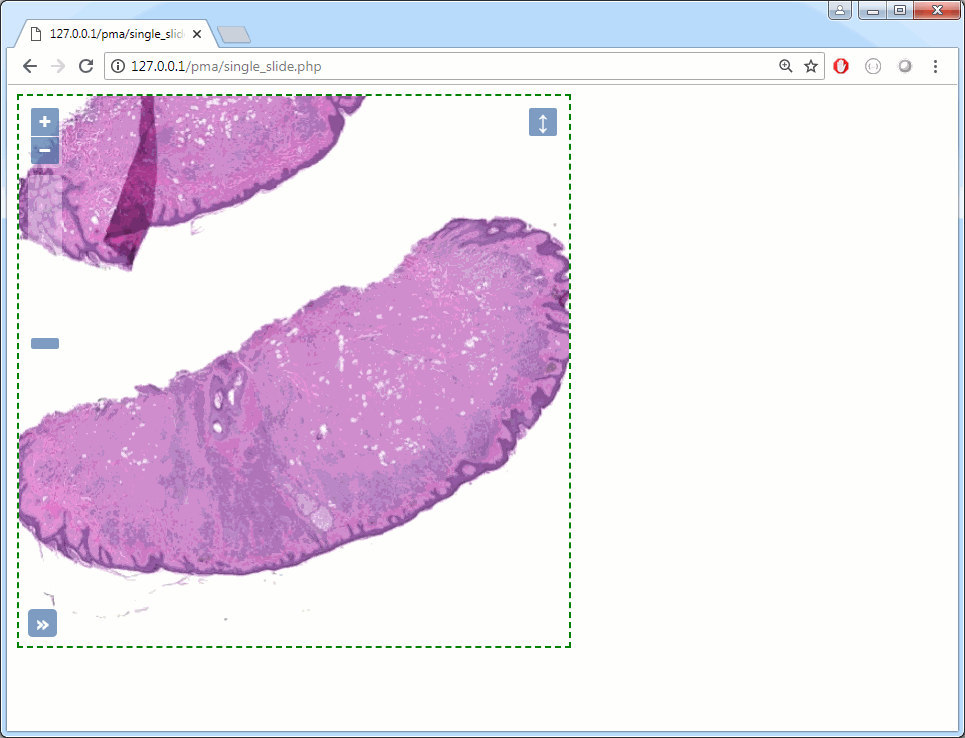
The embedSlideBySessionID() method return a string that serves as an identifier for the generated viewport. Use this identifier to subsequently define a style for your viewport:
// actually embed slide
// the second element in the list corresponds to the viewport ID
String viewport = UI.embedSlideBySessionID("http://localhost:54001/", slide, sessionID).get(1);
out.println("<style type=\"text/css\">\n" +
"#" + viewport + "{\n"
      + "width: 500px;\n"
      + "height: 500px;\n"
      + "border: 2px dashed green;\n"
      + "}\n"
+ "</style>");
The result is now a 500 x 500 fixed square (with a dashed border) that doesn’t change as your modify the browser window:
You can have as many viewports on a single page as you want; each is automatically assigned a new ID, and so you can set separate layout for each one.
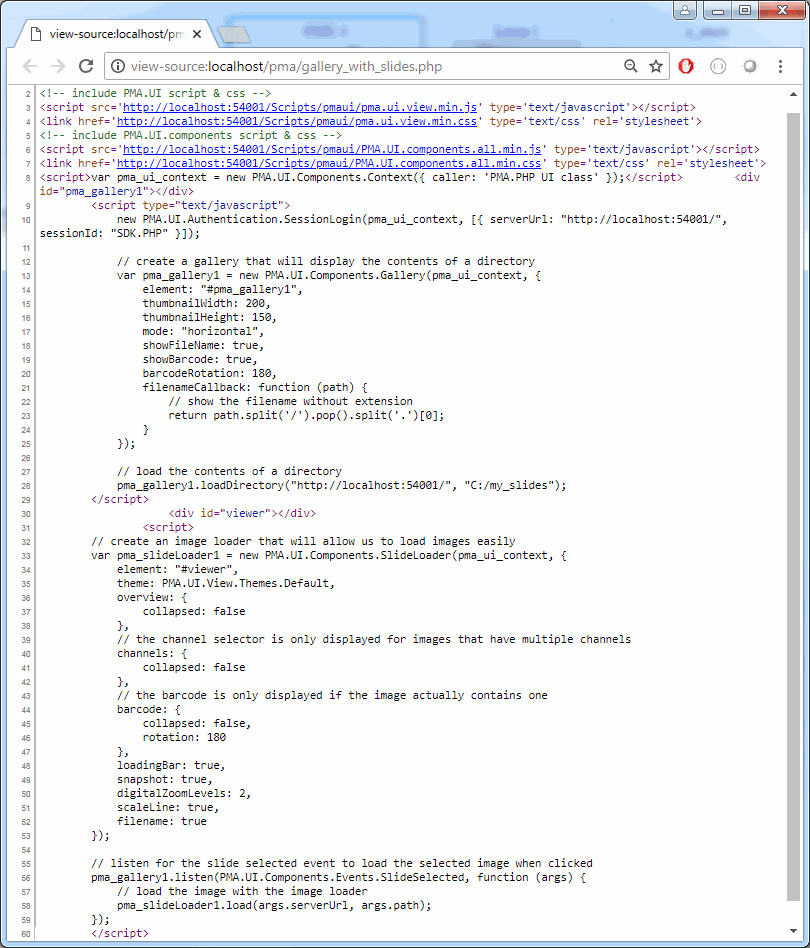
Working with galleries
What if you have a collection of slides and you want to present an overview of these (browsing through slide filenames is tiring and confusing). You could already combine the code we have in this post so far and request thumbnails for a list of a slides found in a directory, subsequently rendering selected slides in a viewport.
But what if you have 50 slides in the folder? Do you really want to handle the scrolling, just-in-time rendering of initially hidden thumbnails etc.?
Pretty early on in our Pathomation career we found ourselves facing the same problems. We re-invented our own wheel a couple of times, after which we figured it was round enough to encapsulate in a piece of re-usable code.
You guessed it: the UI class provides a way to generate galleries, too. At its simplest implementation, only one line of code is needed (setup not included):
import java.io.IOException;
import java.util.List;

import javax.servlet.ServletException;
import javax.servlet.ServletOutputStream;
import javax.servlet.http.HttpServlet;
import javax.servlet.http.HttpServletRequest;
import javax.servlet.http.HttpServletResponse;

import com.pathomation.Core;
import com.pathomation.UI.UI;

public class Test extends HttpServlet {

   private static final long serialVersionUID = 1L;

   @Override
   protected void doGet(HttpServletRequest request, HttpServletResponse response)
         throws ServletException, IOException {

             ServletOutputStream out = response.getOutputStream();
             String sessionID = Core.connect();
             out.println("<p>" + sessionID + "</p>\n");

             UI.pmaUIJavascriptPath = UI.pmaStartUIJavascriptPath;

             List<String> results = UI.embedGalleryBySessionID("http://localhost:54001/",
             "C:/my_slides", sessionID);
             // the first element in the list contains the generated front end code
             out.println(results.get(0));
   }

   @Override
   protected void doPost(HttpServletRequest request, HttpServletResponse response)
         throws ServletException, IOException {
      this.doGet(request, response);
   }
}
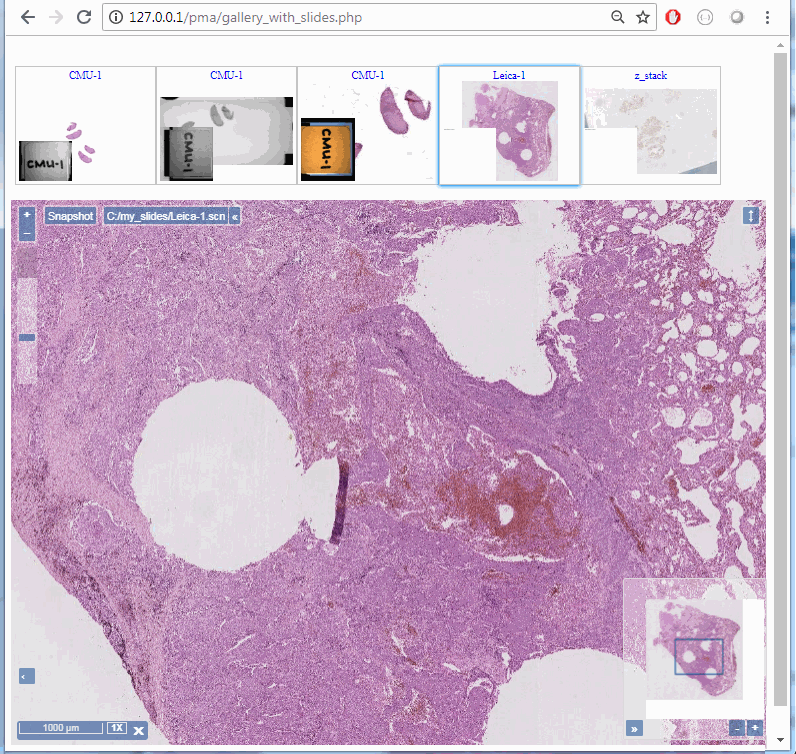
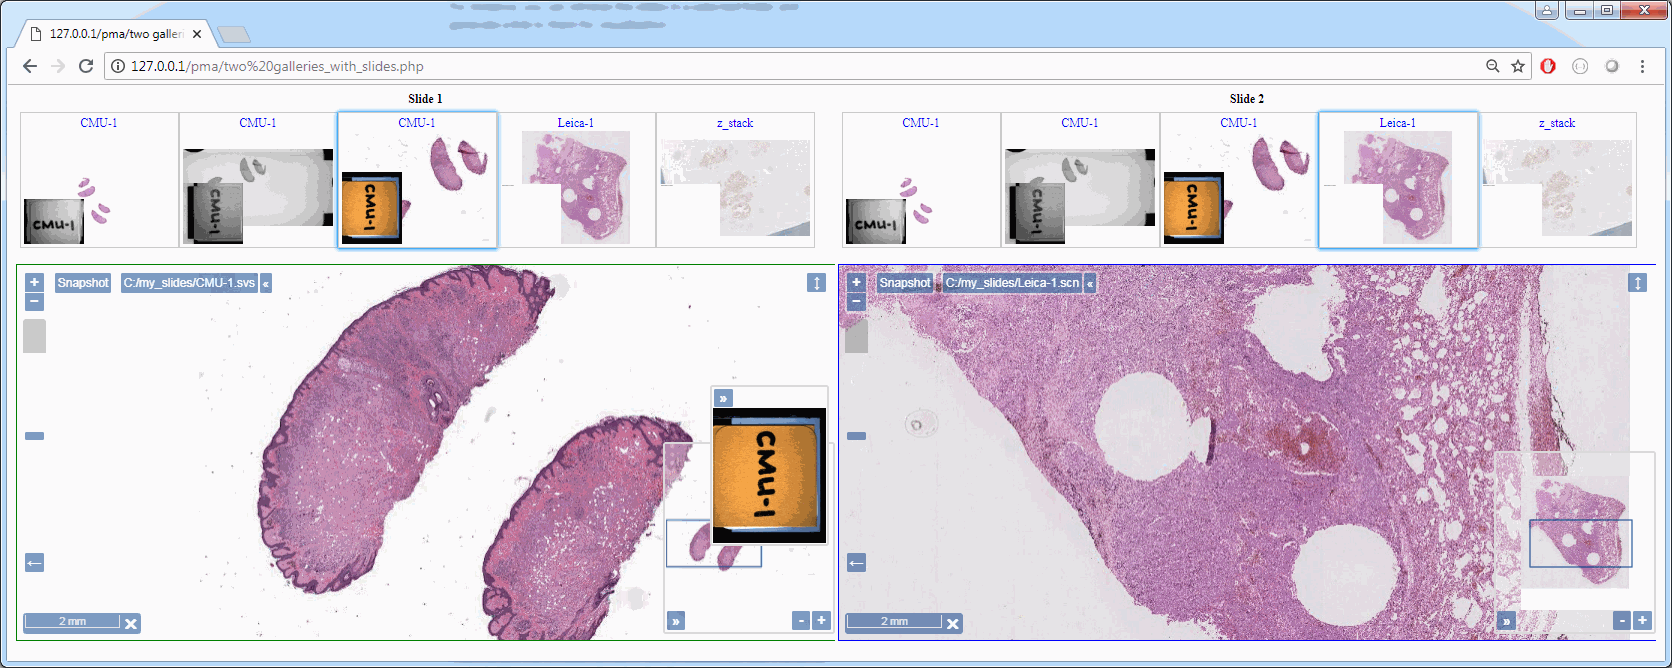
You’ll notice that you can select slides in the gallery, but they’re not particularly reactive. For that, you’ll need to instruct PMA.UI to provide a viewport as well. When a slide is clicked in the gallery, the slide is then shown in the viewport:
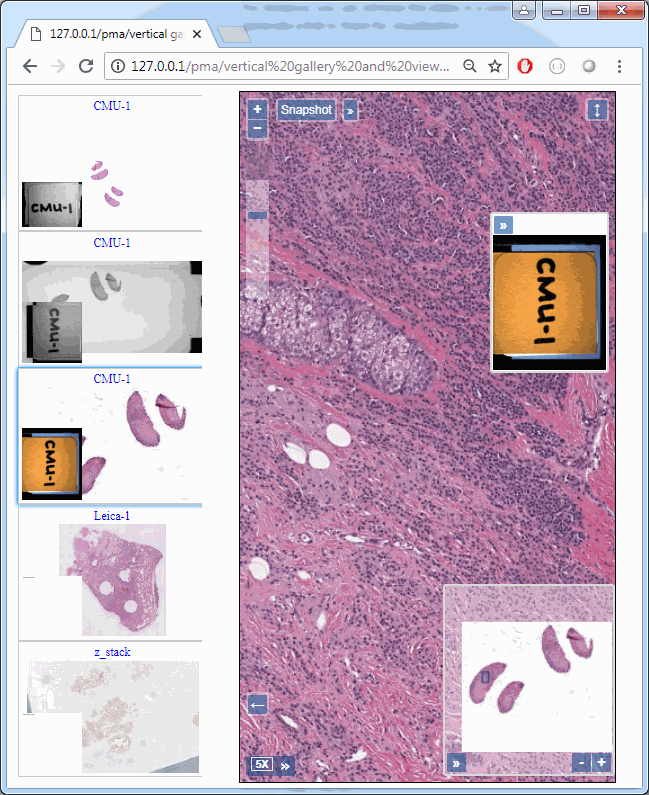
The default orientation of a gallery is “horizontal”, but you can set it to a vertical layout, too:
List<String> results = UI.embedGalleryBySessionID("http://localhost:54001/", "C:/my_slides", sessionID,
      new HashMap<String, String>() {
         {
            put("mode", "vertical");
         }
      });
// the first element in the list contains the generated front end code
out.println(results.get(0));
In which you can build something that looks like this:
Try it!
You can build pretty complicated interfaces already this way. One possibly scheme e.g. is where you offer end-users the possibility to compare slides. You need two galleries and two viewports, and that goes like this:
As demonstrated in this post through the Java SDK : simple single-line instructions in Java are translated in whole parts of JavaScript code. The UI class takes care of loading all the required libraries, and makes sure housekeeping is taken care of in case of multiple viewports, galleries, etc.
You can see this for yourself by looking at the source-code of your page, after it loads in the webbrowser.
The JavaScript framework that we wrote ourselves for browser-based WSI visualization is called PMA.UI. It comes with its own set of tutorials, and there is much more you can do with PMA.UI than through the Java SDK alone.
However, we found in practice that there is much demand for cursive embedding of WSI content in any number of places on a website or corporate intranet. In my cases, a gallery browser and a “live” slide viewport are sufficient. In those scenarios, the Java SDK can definitely come in handy and offer a reduced learning curve.
The SDK should help you get started . By studying the interaction between the Java-code and the generated JavaScript, you can eventually master the PMA.UI library as well and interact with it directly.
By all means, do send us screenshots of your concoctions (let us know when you need help from your friendly neighborhood pathologists, too)! Perhaps we can have a veritable “wall of WSI fame” up one day.
A set of code samples can come very handy to ease end users’ first interaction with both PMA.Start and its bigger brother PMA.core. A folder named “samples” was added for this purpose to our PMA.javaGitHub repository.
Introduction
For the samples we added, we create a Java HTTPServlet class that interacts with the Java SDK to generate HTML code to be displayed on a web browser.
We aim to make the samples as simple & general as possible, end users can then adapt them to their needs depending on what architecture & frameworks they rely on for their Java web application.
PMA.Start
For the following samples to be run successfully, you’ll need to have PMA.Start installed and running on your computer.
For more information about PMA.Start, refer to https://free.pathomation.com
If you don’t have PMA.Start installed yet on your computer, make sure you download it from https://free.pathomation.com/download/ for free.
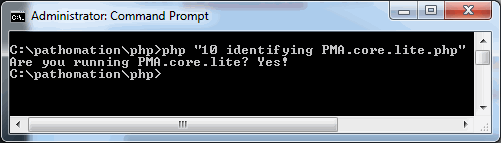
This first sample checks if PMA.Start (PMA.core.lite) is installed and running on end user’s computer :
package samples_10;

import java.io.IOException;

import javax.servlet.ServletException;
import javax.servlet.ServletOutputStream;
import javax.servlet.http.HttpServlet;
import javax.servlet.http.HttpServletRequest;
import javax.servlet.http.HttpServletResponse;

import com.pathomation.*;

public class IdentifyingPMAStart extends HttpServlet {

   private static final long serialVersionUID = 1L;

   @Override
   protected void doGet(HttpServletRequest request, HttpServletResponse response)
         throws ServletException, IOException {

      ServletOutputStream out = response.getOutputStream();
      out.println("<html>");
      // test for PMA.core.lite (PMA.start)
      out.println("Are you running PMA.core.lite? " + (Core.isLite() ? "Yes!" : "no :-(") + "<br />");
      out.println("Seeing 'no' and want to see 'yes'? Make sure PMA.start is running on your system or download it from "
                  + "<a href = \"http://free.pathomation.com\">http://free.pathomation.com</a>");
      out.println("</html>");

   }

   @Override
   protected void doPost(HttpServletRequest request, HttpServletResponse response)
         throws ServletException, IOException {
      this.doGet(request, response);
   }
}
If PMA.Start is actually running, it returns :
Version info
The second sample is quite similar to the previous one for it checks if PMA.Start is running, if yes it displays its version number
package samples_20;

import java.io.IOException;

import javax.servlet.ServletException;
import javax.servlet.ServletOutputStream;
import javax.servlet.http.HttpServlet;
import javax.servlet.http.HttpServletRequest;
import javax.servlet.http.HttpServletResponse;

import com.pathomation.Core;

public class GettingVersionInformationPMAStart extends HttpServlet {

   private static final long serialVersionUID = 1L;

   @Override
   protected void doGet(HttpServletRequest request, HttpServletResponse response)
         throws ServletException, IOException {

      ServletOutputStream out = response.getOutputStream();
      out.println("<html>");
      // test for PMA.core.lite (PMA.start)
      if (!Core.isLite()) {
         // don't bother running this script if PMA.start isn't active
         out.println("PMA.start is not running. Please start PMA.start first");
      } else {
         // assuming we have PMA.start running; what's the version number?
         out.println("You are running PMA.start version " + Core.getVersionInfo());
      }
      out.println("</html>");
   }

   @Override
   protected void doPost(HttpServletRequest request, HttpServletResponse response)
         throws ServletException, IOException {
      this.doGet(request, response);
   }
}
Making the connection
For the third sample, a connection is established to PMA.Start to retrieve a sessionID
package samples_30;

import java.io.IOException;

import javax.servlet.ServletException;
import javax.servlet.ServletOutputStream;
import javax.servlet.http.HttpServlet;
import javax.servlet.http.HttpServletRequest;
import javax.servlet.http.HttpServletResponse;

import com.pathomation.Core;

public class ConnectingToPMAStart extends HttpServlet {

   private static final long serialVersionUID = 1L;

   @Override
   protected void doGet(HttpServletRequest request, HttpServletResponse response)
         throws ServletException, IOException {

      ServletOutputStream out = response.getOutputStream();
      String sessionID = Core.connect();
      out.println("<html>");
      if (sessionID == null) {
         out.println("Unable to connect to PMA.start");
      } else {
         out.println("Successfully connected to PMA.start; sessionID = " + sessionID);
         // not always needed; depends on whether the client (e.g. browser) still needs to SessionID as well
         Core.disconnect();
      }
      out.println("</html>");
   }

   @Override
   protected void doPost(HttpServletRequest request, HttpServletResponse response)
         throws ServletException, IOException {
      this.doGet(request, response);
   }
}
If the connection succeeds, the sessionID is then displayed on the web browser
Finding your hard disks
For the fourth sample, a connection is established to PMA.Start, then the local HDD is parsed to retrieve root directories (Drive letters) :
package samples_40;

import java.io.IOException;

import javax.servlet.ServletException;
import javax.servlet.ServletOutputStream;
import javax.servlet.http.HttpServlet;
import javax.servlet.http.HttpServletRequest;
import javax.servlet.http.HttpServletResponse;

import com.pathomation.Core;

public class GettingDriveLettersFromPMAStart extends HttpServlet {

   private static final long serialVersionUID = 1L;

   @Override
   protected void doGet(HttpServletRequest request, HttpServletResponse response)
         throws ServletException, IOException {

      ServletOutputStream out = response.getOutputStream();
      out.println("<html>");
      // establish a default connection to PMA.start
      if (Core.connect() != null) {
         out.println("The following drives were found on your system:" + "<br/>");
         for (String rootDirectory : Core.getRootDirectories()) {
            out.println(rootDirectory + "<br/>");
         }
         out.println("Can't find all the drives you're expecting? For network-connectivity (e.g. mapped drive access) you need PMA.core instead of PMA.start");
      } else {
         out.println("Unable to find PMA.start");
      }
      out.println("</html>");
   }

   @Override
   protected void doPost(HttpServletRequest request, HttpServletResponse response)
         throws ServletException, IOException {
      this.doGet(request, response);
   }
}
If the connection succeeds, a list of drive letters is displayed one by one on the web browser
Navigating directories
The fifth sample is very similar to previous one, it selects the first root directory (drive letter), its content is then displayed one by one
package samples_60;

import java.io.IOException;
import java.util.List;

import javax.servlet.ServletException;
import javax.servlet.ServletOutputStream;
import javax.servlet.http.HttpServlet;
import javax.servlet.http.HttpServletRequest;
import javax.servlet.http.HttpServletResponse;

import com.pathomation.Core;

public class GettingDirectoriesPMAStart extends HttpServlet {

   private static final long serialVersionUID = 1L;

   @Override
   protected void doGet(HttpServletRequest request, HttpServletResponse response)
         throws ServletException, IOException {

      ServletOutputStream out = response.getOutputStream();
      out.println("<html>");
      String sessionID = Core.connect();
      if (sessionID == null) {
         out.println("Unable to connect to PMA.start");
      } else {
         out.println("Successfully connected to PMA.start" + "<br/>");
         List<String> rootDirs = Core.getRootDirectories();
         out.println("Directories found in " + rootDirs.get(0) + ":" + "<br/>");
         List<String> dirs = Core.getDirectories(rootDirs.get(0), sessionID);
         for (String d : dirs) {
            out.println(d + "<br/>");
         }
         // not always needed; depends on whether the client (e.g. browser) still needs to SessionID as well
         Core.disconnect(sessionID);
      }
      out.println("</html>");
   }

   @Override
   protected void doPost(HttpServletRequest request, HttpServletResponse response)
         throws ServletException, IOException {
      this.doGet(request, response);
   }
}
Successful connection results in a list of drive letters with their respective folders shown one by one
Looking for slides
For the next sample, a connection is established to PMA.Start, then we look for the first non empty directory inside the local HDD to browse its content
package samples_80;

import java.io.IOException;
import java.util.List;

import javax.servlet.ServletException;
import javax.servlet.ServletOutputStream;
import javax.servlet.http.HttpServlet;
import javax.servlet.http.HttpServletRequest;
import javax.servlet.http.HttpServletResponse;

import com.pathomation.Core;

public class GettingSlidesPMAStart extends HttpServlet {

   private static final long serialVersionUID = 1L;

   @Override
   protected void doGet(HttpServletRequest request, HttpServletResponse response)
         throws ServletException, IOException {

      ServletOutputStream out = response.getOutputStream();
      out.println("<html>");
      String sessionID = Core.connect();
      if (sessionID == null) {
         out.println("Unable to connect to PMA.start");
      } else {
         out.println("Successfully connected to PMA.start" + "<br/>");
         // for this demo, we don't know where we can expect to find actual slides
         // the getFirstNonEmptyDirectory() method wraps around recursive calls to getDirectories() and is useful to "just" find a bunch of slides in "just" any folder
         String dir = Core.getFirstNonEmptyDirectory("/", sessionID);
         out.println("Looking for slides in " + dir + ":" + "<br/>");
         List<String> slides = Core.getSlides(dir, sessionID);
         for (String slide : slides) {
            out.println(slide + "<br/>");
         }
         // not always needed; depends on whether the client (e.g. browser) still needs to SessionID as well
         Core.disconnect(sessionID);
      }
      out.println("</html>");

   }

   @Override
   protected void doPost(HttpServletRequest request, HttpServletResponse response)
         throws ServletException, IOException {
      this.doGet(request, response);
   }
}
A quite similar result can be obtained if connection succeeds
Listing slides
Last sample for PMA.Start is a continuation for previous one, once the first non empty directory is found, the list of slides within is displayed successively (besides each slide name, its UID is added)
package samples_90;

import java.io.IOException;

import javax.servlet.ServletException;
import javax.servlet.ServletOutputStream;
import javax.servlet.http.HttpServlet;
import javax.servlet.http.HttpServletRequest;
import javax.servlet.http.HttpServletResponse;

import com.pathomation.Core;

public class GetUIDSlidePMAStart extends HttpServlet {

   private static final long serialVersionUID = 1L;

   @Override
   protected void doGet(HttpServletRequest request, HttpServletResponse response)
         throws ServletException, IOException {

      ServletOutputStream out = response.getOutputStream();
      out.println("<html>");
      String sessionID = Core.connect();
      if (sessionID == null) {
         out.println("Unable to connect to PMA.start");
      } else {
         out.println("Successfully connected to PMA.start" + "<br/>");
         String dir = Core.getFirstNonEmptyDirectory("/", sessionID);
         out.println("Looking for slides in " + dir + "<br/>");
         for (String slide : Core.getSlides(dir, sessionID)) {
            out.println(slide + " - " + Core.getUid(slide, sessionID) + "<br/>");
         }
         // not always needed; depends on whether the client (e.g. browser) still needs to SessionID as well
         Core.disconnect(sessionID);
      }
      out.println("</html>");
   }

   @Override
   protected void doPost(HttpServletRequest request, HttpServletResponse response)
         throws ServletException, IOException {
      this.doGet(request, response);
   }
}
Here is what you can get for a successful connection
PMA.core
One main difference between PMA.Start and PMA.core is the former is run on a server which implies end users connect to through authentication (server URL, username, password).
For better code organisation & readability, we added Config class which intends to provide a single file to define the connection values to interact with PMA.core.
As You can notice later on the samples for PMA.core, HTTPServlet Classes for each sample retrieve connection values from Config class.
End users are invited to substitute the server’s url & credentials with their own respective values!
package configuration;

public class Config {

   // modify the following three lines for your specific circumstances:
   public static String pmaCoreServer = "http://my_server/pma.core";
   public static String pmaCoreUser = "user";
   public static String pmaCorePass = "secret";
}
First sample on the list checks if the url provided refers to a PMA.Start instance
package samples_10;

import java.io.IOException;

import javax.servlet.ServletException;
import javax.servlet.ServletOutputStream;
import javax.servlet.http.HttpServlet;
import javax.servlet.http.HttpServletRequest;
import javax.servlet.http.HttpServletResponse;

import com.pathomation.*;
import Configuration.Config;

public class IdentifyingPMACore extends HttpServlet {

   private static final long serialVersionUID = 1L;

   @Override
   protected void doGet(HttpServletRequest request, HttpServletResponse response)
         throws ServletException, IOException {

      String pmaCoreServer = Config.pmaCoreServer;

      ServletOutputStream out = response.getOutputStream();
      out.println("<html>");
      // testing actual "full" PMA.core instance that may or may not be out there
      out.println("Are you running PMA.start(PMA.core.lite) at " + pmaCoreServer + " ? " + ((Core.isLite(pmaCoreServer) != null &&
            (Core.isLite(pmaCoreServer) == true))  ? "Yes!" : "no :-(") + "<br />");
      out.println(
            "Are you running PMA.start(PMA.core.lite) at http://nowhere ? "
                  + ((Core.isLite("http://nowhere") != null && (Core.isLite("http://nowhere") == true)) ? "Yes!" : "no :-("));
      out.println("</html>");

   }

   @Override
   protected void doPost(HttpServletRequest request, HttpServletResponse response)
         throws ServletException, IOException {
      this.doGet(request, response);
   }
}
The second sample retrieves the version info for the provided PMA.core instance, it also shows what you would get trying a “bogus” URL
package samples_20;

import java.io.IOException;

import javax.servlet.ServletException;
import javax.servlet.ServletOutputStream;
import javax.servlet.http.HttpServlet;
import javax.servlet.http.HttpServletRequest;
import javax.servlet.http.HttpServletResponse;

import com.pathomation.Core;
import Configuration.Config;

public class GettingVersionInformationPMACore extends HttpServlet {

   private static final long serialVersionUID = 1L;

   @Override
   protected void doGet(HttpServletRequest request, HttpServletResponse response)
         throws ServletException, IOException {

      String pmaCoreServer = Config.pmaCoreServer;

      ServletOutputStream out = response.getOutputStream();
      out.println("<html>");
      out.println("You are running PMA.core version " + Core.getVersionInfo(pmaCoreServer) + " at " + pmaCoreServer + "<br/>");

      // what happens when we run it against a bogus URL?
      String version = Core.getVersionInfo("http://nowhere/");

      if (version == null) {
         out.println("Unable to detect PMA.core at specified location (http://nowhere/)");
      } else {
         out.println("You are running PMA.core version " + version);
      }
      out.println("</html>");
   }

   @Override
   protected void doPost(HttpServletRequest request, HttpServletResponse response)
         throws ServletException, IOException {
      this.doGet(request, response);
   }
}
For the third sample a connection is established to the PMA.Core instance, then the sessionID generated is displayed on web browser
package samples_30;

import java.io.IOException;

import javax.servlet.ServletException;
import javax.servlet.ServletOutputStream;
import javax.servlet.http.HttpServlet;
import javax.servlet.http.HttpServletRequest;
import javax.servlet.http.HttpServletResponse;

import com.pathomation.Core;
import Configuration.Config;

public class ConnectingToPMACore extends HttpServlet {

   private static final long serialVersionUID = 1L;

   @Override
   protected void doGet(HttpServletRequest request, HttpServletResponse response)
         throws ServletException, IOException {

      String pmaCoreServer = Config.pmaCoreServer;
      String pmaCoreUser = Config.pmaCoreUser;
      String pmaCorePass = Config.pmaCorePass;

      ServletOutputStream out = response.getOutputStream();
      String sessionID = Core.connect(pmaCoreServer, pmaCoreUser, pmaCorePass);
      out.println("<html>");
      if (sessionID == null) {
         out.println("Unable to connect to PMA.core at specified location (" + pmaCoreServer + ")");
      } else {
         out.println("Successfully connected to PMA.core; sessionID = " + sessionID);
         // not always needed; depends on whether the client (e.g. browser) still needs to SessionID as well
         Core.disconnect();
      }
      out.println("</html>");
   }

   @Override
   protected void doPost(HttpServletRequest request, HttpServletResponse response)
         throws ServletException, IOException {
      this.doGet(request, response);
   }
}
In analogy to previous PMA.Start samples, The next sample searches for root directories of the provided PMA.core instance and displays them one by one
package samples_40;

import java.io.IOException;

import javax.servlet.ServletException;
import javax.servlet.ServletOutputStream;
import javax.servlet.http.HttpServlet;
import javax.servlet.http.HttpServletRequest;
import javax.servlet.http.HttpServletResponse;

import com.pathomation.Core;
import Configuration.Config;

public class GettingRootDirectoriesFromPMACore extends HttpServlet {

   private static final long serialVersionUID = 1L;

   @Override
   protected void doGet(HttpServletRequest request, HttpServletResponse response)
         throws ServletException, IOException {

      String pmaCoreServer = Config.pmaCoreServer;
      String pmaCoreUser = Config.pmaCoreUser;
      String pmaCorePass = Config.pmaCorePass;

      ServletOutputStream out = response.getOutputStream();
      String sessionID = Core.connect(pmaCoreServer, pmaCoreUser, pmaCorePass);
      out.println("<html>");
      if (sessionID == null) {
         out.println("Unable to connect to PMA.core at specified location (" + pmaCoreServer + ")");
      } else {
         out.println("Successfully connected to " + pmaCoreServer + "<br/>");
         out.println("You have the following root-directories at your disposal:" + "<br/>");
         for (String rd : Core.getRootDirectories(sessionID)) {
            out.println(rd + "<br/>");
         }
         Core.disconnect(sessionID);
      }
      out.println("</html>");
   }

   @Override
   protected void doPost(HttpServletRequest request, HttpServletResponse response)
         throws ServletException, IOException {
      this.doGet(request, response);
   }
}
The fifth sample on the list is very similar to previous one, except that instead of displaying a complete list of root directories it only displays the first one and browses its content
package samples_60;

import java.io.IOException;
import java.util.List;

import javax.servlet.ServletException;
import javax.servlet.ServletOutputStream;
import javax.servlet.http.HttpServlet;
import javax.servlet.http.HttpServletRequest;
import javax.servlet.http.HttpServletResponse;

import com.pathomation.Core;
import Configuration.Config;

public class GettingDirectoriesPMACore extends HttpServlet {

   private static final long serialVersionUID = 1L;

   @Override
   protected void doGet(HttpServletRequest request, HttpServletResponse response)
         throws ServletException, IOException {

      String pmaCoreServer = Config.pmaCoreServer;
      String pmaCoreUser = Config.pmaCoreUser;
      String pmaCorePass = Config.pmaCorePass;

      ServletOutputStream out = response.getOutputStream();
      String sessionID = Core.connect(pmaCoreServer, pmaCoreUser, pmaCorePass);
      out.println("<html>");
      if (sessionID == null) {
         out.println("Unable to connect to PMA.core at specified location (" + pmaCoreServer + ")" + "<br/>");
      } else {
         out.println("Successfully connected to PMA.core; sessionID = " + sessionID + "<br/>");
         List<String> rootDirs = Core.getRootDirectories();
         out.println("Directories found in " + rootDirs.get(0) + ":" + "<br/>");
         List<String> dirs = Core.getDirectories(rootDirs.get(0), sessionID);
         for (String d : dirs) {
            out.println(d + "<br/>");
         }
         // not always needed; depends on whether the client (e.g. browser) still needs to SessionID as well
         Core.disconnect(sessionID);
      }
      out.println("</html>");
   }

   @Override
   protected void doPost(HttpServletRequest request, HttpServletResponse response)
         throws ServletException, IOException {
      this.doGet(request, response);
   }
}
For the next sample, a connection is established to the provided PMA.core instance.
If Successful, we look for the first non empty directory to display the list of slides within successively
package samples_80;

import java.io.IOException;
import java.util.List;

import javax.servlet.ServletException;
import javax.servlet.ServletOutputStream;
import javax.servlet.http.HttpServlet;
import javax.servlet.http.HttpServletRequest;
import javax.servlet.http.HttpServletResponse;

import com.pathomation.Core;
import Configuration.Config;

public class GettingSlidesPMACore extends HttpServlet {

   private static final long serialVersionUID = 1L;

   @Override
   protected void doGet(HttpServletRequest request, HttpServletResponse response)
         throws ServletException, IOException {

      String pmaCoreServer = Config.pmaCoreServer;
      String pmaCoreUser = Config.pmaCoreUser;
      String pmaCorePass = Config.pmaCorePass;

      ServletOutputStream out = response.getOutputStream();
      String sessionID = Core.connect(pmaCoreServer, pmaCoreUser, pmaCorePass);
      out.println("<html>");
      if (sessionID == null) {
         out.println("Unable to connect to PMA.core at specified location (" + pmaCoreServer + ")" + "<br/>");
      } else {
         out.println("Successfully connected to PMA.core; sessionID = " + sessionID + "<br/>");
         // for this demo, we don't know where we can expect to find actual slides
         // the getFirstNonEmptyDirectory() method wraps around recursive calls to getDirectories() and is useful to "just" find a bunch of slides in "just" any folder
         String dir = Core.getFirstNonEmptyDirectory("/", sessionID);
         out.println("Looking for slides in " + dir + ":" + "<br/>");
         List slides = Core.getSlides(dir, sessionID);
         for (String slide : slides) {
            out.println(slide + "<br/>");
         }
         // not always needed; depends on whether the client (e.g. browser) still needs to SessionID as well
         Core.disconnect(sessionID);
      }
      out.println("</html>");
   }

   @Override
   protected void doPost(HttpServletRequest request, HttpServletResponse response)
         throws ServletException, IOException {
      this.doGet(request, response);
   }
}
What we did on previous sample is extended on the last sample on this list, so in addition to displaying slides’ name we add also the UID for each slide
package samples_90;

import java.io.IOException;

import javax.servlet.ServletException;
import javax.servlet.ServletOutputStream;
import javax.servlet.http.HttpServlet;
import javax.servlet.http.HttpServletRequest;
import javax.servlet.http.HttpServletResponse;

import com.pathomation.Core;
import Configuration.Config;

public class GetUIDSlidePMACore extends HttpServlet {

   private static final long serialVersionUID = 1L;

   @Override
   protected void doGet(HttpServletRequest request, HttpServletResponse response)
         throws ServletException, IOException {

      String pmaCoreServer = Config.pmaCoreServer;
      String pmaCoreUser = Config.pmaCoreUser;
      String pmaCorePass = Config.pmaCorePass;

      ServletOutputStream out = response.getOutputStream();
      String sessionID = Core.connect(pmaCoreServer, pmaCoreUser, pmaCorePass);
      out.println("<html>");
      if (sessionID == null) {
         out.println("Unable to connect to PMA.core at specified location (" + pmaCoreServer + ")" + "<br/>");
      } else {
         out.println("Successfully connected to PMA.core; sessionID = " + sessionID + "<br/>");
         String dir = Core.getFirstNonEmptyDirectory("/", sessionID);
         out.println("Looking for slides in " + dir + "<br/>");
         for (String slide : Core.getSlides(dir, sessionID)) {
            out.println(slide + " - " + Core.getUid(slide, sessionID) + "<br/>");
         }
         // not always needed; depends on whether the client (e.g. browser) still needs to SessionID as well
         Core.disconnect(sessionID);
      }
      out.println("</html>");
   }

   @Override
   protected void doPost(HttpServletRequest request, HttpServletResponse response)
         throws ServletException, IOException {
      this.doGet(request, response);
   }
}
What’s next?
In this blog post we toured you around our PMA.java SDK. We focused on basic back-end interactions like connecting and finding out which slides are available. We showed you how to navigate around our sample files that we now deposit as part our respective github repositories.
We intend to keep building on top of these initial samples. At the time you read this, there may already be more samples available in addition to the ones described here, so make sure to check.
In a next blog post, we intend to provide you with sample code to start building graphical user interfaces for digital pathology using the pathomation.UI namespace (if you just can’t wait; feel free to already read how this is done in PHP).
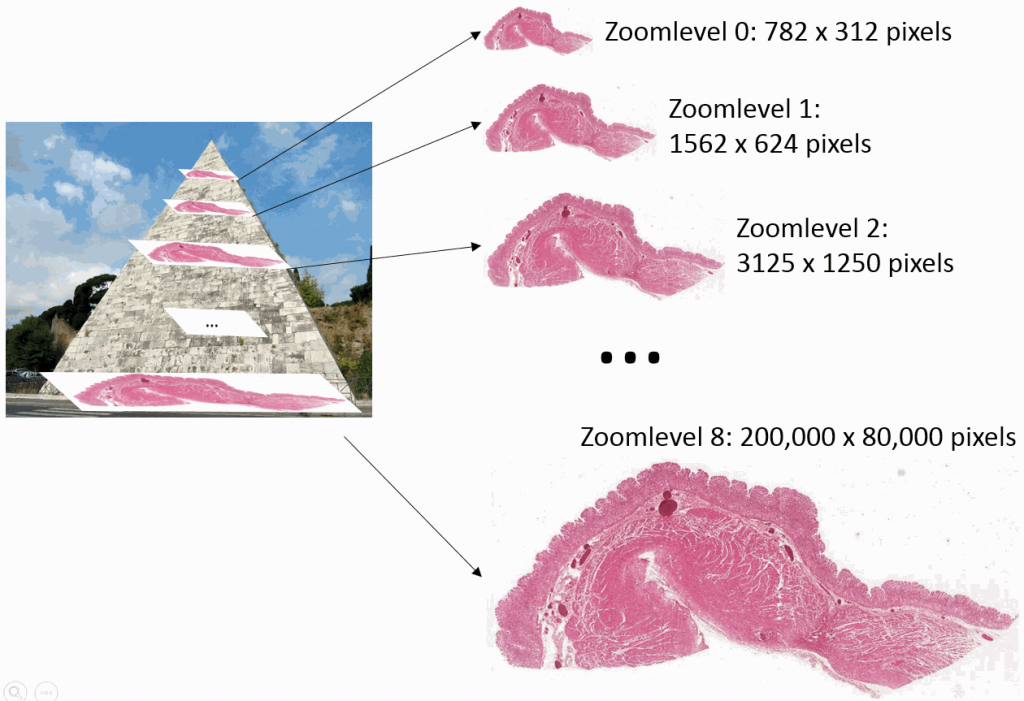
This impacts how the two categories of software can (afford to) manipulate tiles behind the scenes. Data duplication of Planet Earth’s satellite imagery is acceptable if it speeds up the graphics rendering process. In contrast, this is not the case for whole slide images. Because of the amount of data generated in a short timeframe, storage and time needed to extract all tiles beforehand registered somewhere on a scale from unnecessary, over impractical, up to just downright impossible.
That being said, a tile is valuable. It took time to extract and to render, and it will be gone once you release it, so you better do something useful with it once you have it!
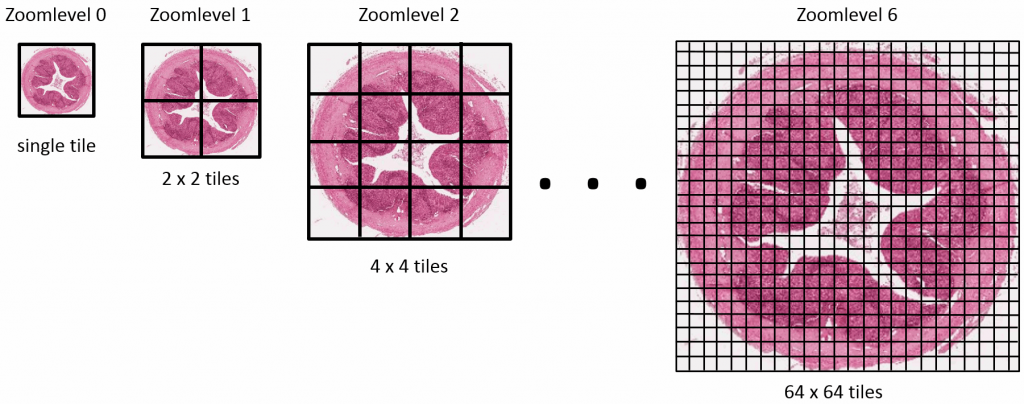
What’s in a tile?
A tile in Pathomation is typically 500 by 500 pixels. That’s actually a LOT of pixels (250,000). Add to that the fact that we’re usually talking about 24-bit data stored in the RGB color space, and you end up with 750,000 bytes needed to store a single tile in-memory. It also means that when we compute an individual tile’s histogram, we need no fewer than 750,000 computations to take place. If you have a grid of 1000 x 2000 tiles… you do the math.
But of course, today’s GPUs solve all this for you, right? We can do billions of computations per second. We have gigabytes of RAM memory available, and it’s all cheap. Why even bother button up the original slide in tiles at all?
Because algorithms and optimization still matter. At our recent CPW2018 workshop, one very clear message was that we cannot solve problems in pathology by brute force. Knowing what happens behind the scenes is still relevant.
In an AI-centric world, deep learning (DL) is at the center of that center. Can we really solve all problems in the world by just adding more layers to our networks?
With real problems, can we even afford to waste C/GPU cycles using brute force “throw enough at the wall; something will stick” approaches? Or did XKCD essentially get it right when they illustrated the goal of technology?
So, this is just a long rant to illustrate our point that we think it’s still worthwhile to think about proper algorithmic design and parallelization. The tile as a basic unit is key to that, and our software can help you get bite-size tiles for your processing pleasure.
Loading images and tiles
If you’ve made it this far, it means you at least partially agree with out tile-centric vision. Cool! Perhaps you’ve even tried a couple of our code snippets in our earlier tutorials already. Even cooler! Perhaps you’ve already experienced how SLOW some of our proposed solutions to problems are. In the latter: stick with us; we totally plan on addressing all of these issues in the coming months through posts examining various aspects of these problems.
Before we get into this however, let’s just explore some of the basic techniques there are in Python to work with partial image content. Here’s how we can load an image from disk:
import matplotlib.pyplot as plt
img_grid = plt.imread("ref_grid.png")
plt.imshow(img_grid)
And here’s how we can load a tile through Pathomation:
from pma_python import core
core.connect()    # connect to PMA.start
img_tile = core.get_tile("C:/my_slides/CMU-1.svs")   # make sure this file exists on your HDD
plt.imshow(img_tile)
The internal Python representations are slightly different:
print(type(img_grid))
print(type(img_tile))
But we can convert PIL image-objects to Numpy arrays just as easily. We can convert an image to a numpy array, and subsequently visualize that one:
import numpy as np
arr_tile = np.array(img_tile)
print(type(arr_tile))
plt.imshow(arr_tile)
Converting a numpy ndarray back to a PIL Image goes like this:
import numpy as np
type(arr_grid)
pil_grid = Image.fromarray(np.uint8(arr_grid))
type(pil_grid)
Take a note of this! There’s a tremendous amount of operations possible in Python, but some of it is in numpy, other things occur in matplotlib, there’s PIL etc. Chances are that you’ll be converting back and forth between different types quite often.
Subplots
Matplotlib offers a convenient way to combine multiple images into a grid-like organization:
def plot_slide_as_tiles(slide_ref, zoomlevel):
    dims = core.get_zoomlevels_dict(slide_ref)[zoomlevel]
    max_x = dims[0]
    max_y = dims[1]
    plt.subplots(max_y, max_x, figsize=(15,15))
    for x in range(0,max_x):
        for y in range(0,max_y):
            plt.subplot(max_y, max_x, (x+1) + y * max_x)
            plt.imshow(core.get_tile(slide_ref, zoomlevel = zoomlevel, x = x, y = y))
    plt.plot(figsize=(200,100))
plt.show()
Basic operations
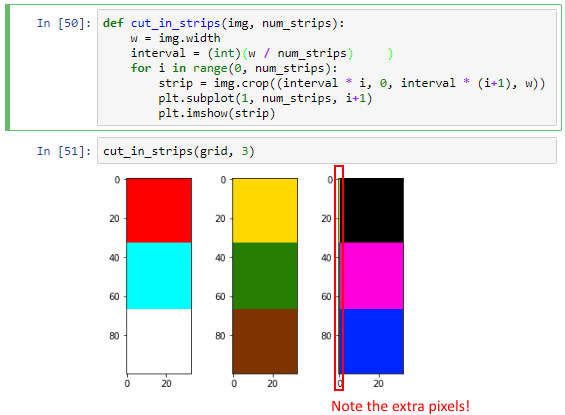
Let’s go back to the original image shown with this post: it’s a 100 x 100 pixel image, purposefully and deliberately divided in a 3 x 3 grid. Why? Because 100 isn’t divided by 3. So:
in the corners, we have 33 x 33 pixels squares,
in the center we have a 34 x 34 pixels square,
in the top and bottom center section we have two rectangles of 34 pixels wide and 33 pixels tall,
In the left and right section of the middle band of the image we have two rectangles of 33 pixels wide and 34 pixels tall.
What’s the importance of this image? It allows us to experiment in a convenient way with cropping. See, when dealing with array data it’s very easy to be just one-element off. You forget to process the last or first element, your offset is just one-off, or another couple of hundred variations on this basic scenario.
def cut_in_strips(img, num_strips):
    w = img.width
    interval = w / num_strips
    for i in range(0, num_strips):
        strip = img.crop((interval * i, 0, interval * (i+1), w))
        plt.subplot(1, num_strips, i+1)
        plt.imshow(strip)

cut_in_strips(grid, 3)
It works, but we actually sort of got lucky here. The key is that the width of our image is 100 pixels, and 100 doesn’t divide exactly by 3. It turns out that when we calculate interval, the variable automatically assuming the floating point data type. This may not always be the case (and certainly not in all languages). We can actually simulate what could go wrong by forcing interval into an integer datatype:
interval = (int)(w / num_strips)
You can see now that the third strip shows an extra pixel-edge that is clearly overflow from the third one.
“What’s the big deal?”, you might ask. After all, Python got it right the first time. Why bother?
Because Python might not get it right all the time. Our explicit conversion to int raises a typical off-by-one error. Furthermore: as images are typically converted to 2-dimensional arrays, and as we can have hundreds of tiles next to each other, this kind of one-off errors can easily snowball into big problems.
And in defense of sell-documenting code, the correct syntax to calculate the interval statement should be something more along the lines of:
interval = (float)(w * 1.0 / num_strips)
Remember, the ultimate goal is to break apart a “native” 500 x 500 Pathomation time into smaller pieces (say 25 100 x 100 tiles) and be able to parallelize tasks on these smaller tasks (as well as operate at a coarser zoomlevel).
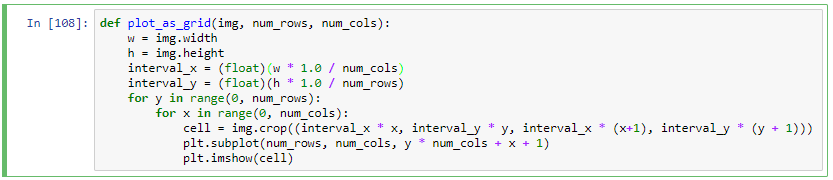
So with this in mind, we can now plot any image into an arbitrary grid of images:
def plot_as_grid(img, num_rows, num_cols):
    w = img.width
    h = img.height
    interval_x = (float)(w * 1.0 / num_cols)
    interval_y = (float)(h * 1.0 / num_rows)
    for y in range(0, num_rows):
        for x in range(0, num_cols):
            cell = img.crop((interval_x * x, interval_y * y, interval_x * (x+1), interval_y * (y + 1)))
            plt.subplot(num_rows, num_cols, y * num_cols + x + 1)
            plt.imshow(cell)

plot_as_grid(grid, 3, 3)
plot_as_grid(grid, 2, 2)
plot_as_grid(grid, 9, 9)
It is worth pointing out that not all functionality from the Python API was taken over in the PHP API.
In turn, the PHP API introduces some interesting options weren’t available in the original Python interface, either (and that are probably worth bringing over to our Java API as a result).
Some functionality is (or will be, based on our most recently gained insights) available in all platform. We leave it up to you to determine which one makes the most sense given your habitat.
Here’s an interesting example. In our Python tutorial series, one of the things we do is load a slide’s thumbnail and send it to MatPlotLib’s pyplot.
Translating our Python functionality to PHP, we get:
<?php
include_once "lib_pathomation.php";

Use  Pathomation\PmaPhp\Core;

// connect to PMA.start
$session = Core::connect();

// pick up the first slide available in the C:\my_slides directory
$slides = Core::getSlides("C:/my_slides/", $session);
$my_slide = $slides[0];

// retrieve the slide's thumbnail as a GD image object
$thumb = Core::getThumbnailImage($my_slide);

// output JPEG content to webbrowser
header("Content-Type: image/png");
imagejpeg($thumb);
imagedestroy($thumb);
?>
However, this is a rather futile exercise: we’re sending image content back to the browser. A much easier way is to send back a URL to the browser of where the thumbnail is located. Let the browser figure it out from there; that’s why it exists in the first place.
A more PHP-ish way to render a slide’s thumbnail is:
<?php
 include_once "lib_pathomation.php";

Use  Pathomation\PmaPhp\Core;

// connect to PMA.start
 $session = Core::connect();

// pick up the first slide available in the C:\my_slides directory
 $slides = Core::getSlides("C:/my_slides/", $session);
 $my_slide = $slides[0];

header("location: ".Core::getThumbnailUrl($my_slide));
 ?>
Remember Larry Wall: why bother parsing the content of the thumbnail first ourselves, if we can completely delegate this to the webbrowser?
We still take care to provide data in a host environment’s most “naturally” feeling format.
Case in point: in Python we give you image data in PIL(low) format, in PHP we use GD.
The question that you have to ask yourself: does it make sense to work with GD image data yourself, or is it easier and more convenient to refer to a resource by its URL directly?
PHP introduction
Let’s look at some simple PHP-Pathomation interaction code. The following code is pretty much standard for each script you’ll write:
// include the interaction library
include_once "lib_pathomation.php";

// indicate what functionality you want from the library
Use  Pathomation\PmaPhp\Core;

// connect to PMA.start
$session = Core::connect();
Note that when you connect to a commercial version of PMA.core, only the last line of your code needs to change:
More so then in Python, in PHP you have to frequently ask yourself whether an action is taking place on the webserver back-end side or in the webbrowser client.
A good example of this is the isLite() method. Similar to its Python (and Java) counterpart, it checks and verifies PMA.start is found running. This function only is useful when you’re either using the PHP Command-line interface (CLI):
<?php
// load library
require "lib_pathomation.php";
use  Pathomation\PmaPhp\Core;

// test for PMA.core.lite (PMA.start)
echo "Are you running PMA.core.lite? ".(Core::isLite() ? "Yes!": "no :-(");
Alternatively, the method can be used when you’re developing for PMA.start and you’re guaranteed to have server and client operate at the level of the same localhost setup.
Working with slides
The PHP Core class comes with a number of methods to navigate WSI slides on your local hard disk. Most often you’ll be alternating between getDirectories and getSlides.
Here’s a script that will allow you to navigate your hard disk in a tree-like fashion (place this in c:\inetpub\wwwroot of your (localhost) IIS setup):
<?php
require_once "lib_pathomation.php";

use  Pathomation\PmaPhp\Core;

if (!Core::isLite()) {
 die("PMA.start not found");
}

Core::connect();

echo "<ul>";
if (!isset($_GET["p"])) {
 foreach (Core::getRootDirectories() as $rd) {
  echo "<li><a href='?p=".urlencode($rd)."'>$rd</li>";
 }
} else {
 $parts = explode("/", $_GET["p"]);
 foreach (Core::getRootDirectories() as $rd) {
  if ($parts[0] == $rd) {
   echo "<li><b>$rd</b>";
   foreach (Core::getDirectories($rd) as $subdir) {
    echo "<ul>";
    $subdirParts = explode("/", $subdir);
    if (stripos($_GET["p"], $subdir) === 0) {
     echo "<li><b>".end($subdirParts)."</b>";
     // keep drilling down, or see if you can retrieve slides as well
     echo "</li>";
    } else {
     echo "<li><a href='?p=".urlencode($subdir)."'>".end($subdirParts)."</a></li>";
    }
    echo "</ul>";
   }
   echo "</li>";
  } else {
   echo "<li><a href='?p=".urlencode($rd)."'>$rd</a></li>";
  }
 }
}
echo "</ul>";
?>
Yes, this should all be in a recursive function so you can dig down to just about any level in your tree structure. However, this post is not about recursive programming; we’re mostly interested in showing you what our API/SDK can do.
For instance, you can retrieve the slides in a selected folder and generate a link to them for visualization:
 // now handle the slides in the subfolder
 echo "<ul>";
 foreach (Core::getSlides($subdir) as $slide) {
  $slideParts = explode("/", $slide);
  echo "<li>".end($slideParts)."</li>";
 }
 echo "</ul>";
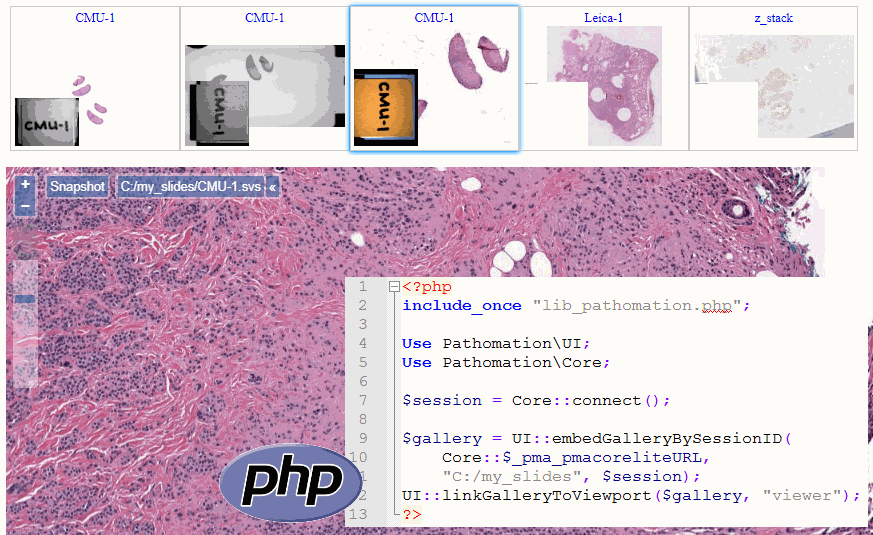
Introducing the UI class
We can do better than our last example. Providing a link to PMA.start is easy enough, but once you get to that level you’ve lost control over the rest of your layout. What if you make a website where you want to place slides in certain predefined locations and placeholders?
That’s where the UI class comes in. Currently, you can use it to either embed slide viewports, or thumbnail galleries in your own website.
Here’s how you can include an arbitrary slide:
<?php
// load library
include_once "lib_pathomation.php";

Use  Pathomation\PmaPhp\UI;
Use  Pathomation\PmaPhp\Core;

// setup parameters
UI::$_pma_ui_javascript_path = UI::$_pma_start_ui_javascript_path;
$session = Core::connect();

// pick a slide to embed in your page
$slides = Core::getSlides("C:/my_slides/");
$slide = $slides[0];

// actually embed slide
UI::embedSlideBySessionID(Core::$_pma_pmacoreliteURL, $slide, $session);
?>
The embedSlideBySessionID() method return a string that serves as an identifier for the generated viewport. Use this identifier to subsequently define a style for your viewport:
The result is now a 500 x 500 fixed square (with a dashed border) that doesn’t change as your modify the browser window:
You can have as many viewports on a single page as you want; each is automatically assigned a new ID, and so you can set separate layout for each one.
Working with galleries
What if you have a collection of slides and you want to present an overview of these (browsing through slide filenames is tiring and confusing). You could already combine the code we have in this post so far and request thumbnails for a list of a slides found in a directory, subsequently rendering selected slides in a viewport.
But what if you have 50 slides in the folder? Do you really want to handle the scrolling, just-in-time rendering of initially hidden thumbnails etc.?
Pretty early on in our Pathomation career we found ourselves facing the same problems. We re-invented our own wheel a couple of times, after which we figured it was round enough to encapsulate in a piece of re-usable code.
You guessed it: the UI class provides a way to generate galleries, too. At its simplest implementation, only one line of code is needed (setup not included):
<?php
include_once "lib_pathomation.php";

Use  Pathomation\PmaPhp\UI;
Use  Pathomation\PmaPhp\Core;

$session = Core::connect();
echo "<p>".$session."</p>\n";

UI::$_pma_ui_javascript_path = UI::$_pma_start_ui_javascript_path;

UI::embedGalleryBySessionID(Core::$_pma_pmacoreliteURL, "C:/my_slides", $session);
?>
You’ll notice that you can select slides in the gallery, but they’re not particularly reactive. For that, you’ll need to instruct PMA.UI to provide a viewport as well. When a slide is clicked in the gallery, the slide is then shown in the viewport:
UI::linkGalleryToViewport($gallery, "viewer");
The default orientation of a gallery is “horizontal”, but you can set it to a vertical layout, too:
In which you can build something that looks like this:
Try it!
You can build pretty complicated interfaces already this way. One possibly scheme e.g. is where you offer end-users the possibility to compare slides. You need two galleries and two viewports, and that goes like this:
Everything PHP spits out is HTML, JavaScript, or CSS. Essentially, the only means of communication PHP has is to provide instructions to the webrowser.
The PHP SDK demonstrated in this post do the same thing: simple single-line instructions in PHP are translated in whole parts of JavaScript code. The UI class takes care of loading all the required libraries, and makes sure housekeeping is taken care of in case of multiple viewports, galleries, etc.
You can see this for yourself by looking at the source-code of your PHP page, after it loads in the webbrowser.
The JavaScript framework that we wrote ourselves for browser-based WSI visualization is called PMA.UI. It comes with its own set of tutorials, and there is much more you can do with PMA.UI than through the PHP SDK alone.
However, we found in practice that there is much demand for cursive embedding of WSI content in any number of places on a website or corporate intranet. In my cases, a gallery browser and a “live” slide viewport are sufficient. In those scenarios, the PHP SDK can definitely come in handy and offer a reduced learning curve.
The SDK should help you get started . By studying the interaction between the PHP-code and the generated JavaScript, you can eventually master the PMA.UI library as well and interact with it directly.
By all means, do send us screenshots of your concoctions (let us know when you need help from your friendly neighborhood pathologists, too)! Perhaps we can have a veritable “wall of WSI fame” up one day.
Digital pathology is on the rise, much in part of a 2017 FDA approval. With expanding activities comes the need to hire the right people for the right job.
Both manufacturers and customers have been putting out job ads at an increasing rate to keep up with the rapid move to digitization. But as I go over these postings, I often find unrealistic expectations on the customer side.
The digital pathology customer
What does a digital pathology customer look like? As it minimum, we’re talking about organizations that have decided to adopt whole slide imaging in at least some of their workflow.
Read that last sentence again. We don’t think you’re a digital pathology adapter if you bought a scanner. Then you bought a scanner. But there’s more to it than that: the organization that purchases the scanner must make the conscious decision of wanting to bring it into their regular workflow, and possibly modify their procedures where needed.
On that note, we think there are quite possibly people out there that are already doing digital pathology without realizing it, or at least without actually having the hardware to do whole slide imaging.
Many conventional microscopes can and have been outfitted with digital recording devices. If you have a workflow at your lab that is inherent to and optimized for these digital material produced by these, you are doing digital pathology. PMA.start probably supports your file types already.
Who to hire?
In many places around the world, the realization now sets in that digital pathology in indeed more than just getting the slide scanner. You need somebody to run the operation (and not just the scanner). You need somebody who can do internal PR and evangelization.
The person should have great communication skills, as they’ll need to interact with IT, as well as various types of end-users. Reporting to management or even the C-suite may bed required. You’ll need to communicate with various layers in the hierarchy, too. Say that you’re at a university: chances are that a PI doesn’t know or care about whole slide imaging, but that a number of students in the lab would indeed benefit from the technology. This requires certain diplomatic skills at time.
Let’s call the person that can do the above job the “digital pathology manager”.
There’s no well established job profile for a digital pathology manager yet. Yet I held this position myself for three years at the Vrije Universiteit Brussel. To be perfectly honest: this wasn’t a job title given to me. I picked it myself as it seemed fitting.
In retrospect, I think it was. The university had bought a scanner, and was looking for use cases and scenarios to fit it into. They were ready to embark on the digital pathology journey!
Responsibilities of the digital pathology manager
So here’s a list of tasks and responsibilities that I think fall under the responsibility of a digital pathology manager, and that may be included in a job ad:
Support digital pathology users
Teach techniques
Think about “best pracices”
Reporting
user trends
rate of adaptation
Maintain internal portal websites
Be vigilant about mobile digital pathology
It’s not because you CAN that you SHOULD
Support educational activities
Histology / pathology / microscopy
Digital pathology as a training and certification tool
Establish collaborations with external and international partners
Present the home institute or organization as a center of competence in digital pathology
representation at digital pathology conferences
lecture at conferences and other institutes (invited talks)
be an ambassador for digital pathology at events that are not necessarily DP-focused
like bioinformatics, image processing, or pathology)
supervise the publication of non-scientific content about digital pathology
e.g. through a blog or industry publication
keep an eye out for the possibility to (co)author scientific publications
organize workshops about digital pathology
I should point out that my function was at a public university. Depending on whether you work at a research institute, a company, or a hospital, accents on different aspect of the job can be expected to vary.
Finding your own
Why did I actually feel the need to post this?
I think that many job ads out there today don’t reflect what an organization actually needs to establish a successful digital pathology program. Many job ads ask for combined MD/PhD degrees, with experience in research as well as the clinic, and possibly have experience with digital pathology already.
Sure, you’ll need some background, and probably a substantial one. But do you really need two doctorate-level degrees? Why not throw in an MBA as well?
I find many of these ads go look for the proverbial five-legged sheep, and are therefore unlikely to find these.
Instead, focus on what you actually want to accomplish. Do you have a concrete scenario in mind already? Or are you still at an exploration phase? Do you have your (internal) customers lining up? Or are most people unaware that you have this technology now (or do they just not care)?
Digital pathology is still new and you will not find people that come from targeted degree programs. I think the hiring challenge for digital pathology customers should start from making a list of responsibilities. Search and you will find.
The reason why we decided to add PHP to the mix is that much web-based software is written in PHP, and PHP is just much quicker to get something started in than Java (or Python). PHP is also the first library where we introduce a UI class, which wraps around PMA.UI, our JavaScript framework.
Our SDK therefore now support three environments, each for their own purposes:
This is not to say that you can’t use Python for web development, or Java for scripting. There’s some overlap, too. If you’re a seasoned PHP developer and you want to generate overnight reports of newly scanned slides, you may not find it worth the hassle to learn Python, just for this one-time task.
The important thing here is that we support all three languages, no matter what your preference is.
We’ve also dabbled a bit in Ruby (thank you Alexandr Kulinich!), but don’t see any concrete need (yet) to come out (and maintain) a formal SDK library for it, Contact us if you think we are wrong about this.
Seamless transitioning
Pathomation’s SDK interacts with both PMA.start as well as our commercial PMA.core offering. This was done to allow for painless transitioning from one environment to the next. If you decide to switch from PMA.startto its bigger brother PMA.core, you don’t have to re-learn anything. Just add authentication credentials when you establish your first PMA.core connection, and you’re good to go.
Tissue presented on a glass slide can be obtained in three fashions: tissue slides by a microtome from a FFPE tissue block is typically completely flat. This means a scanner can usually obtain an optimal focus point and scan a large area of tissue in a single pass.
The two other types of samples however are typically not flat: both cytological samples and needle aspirations contain clumps of cell (a pap smear test is a good example); if samples from FFPE tissue blocks are mirror-like surfaces (at least with respect to smoothness), then cytological samples are more like the gravel surface on a tennis court.
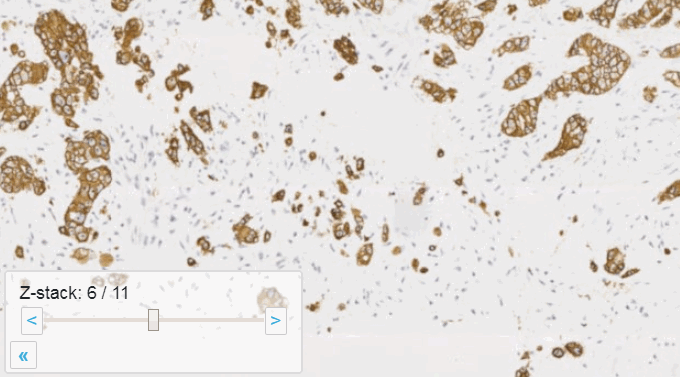
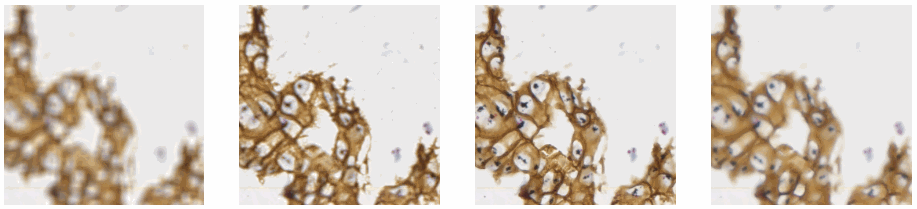
Allowing an end-user to navigate through a z-stack is nice, but can be very tedious and time consuming. Imagine that we have a z-stack with 4 images, then each individual layer can look like this:
A skilled pathologist or researcher can scan through a complete slide in under 10 minutes, but it takes time to acquire this skill, and even so: much of that time is still spent zooming in and out, looking for the optimal sharpness in many regions of the slide.
Can we then use an algorithm to at least select out the most out-of-focus and in-focus tiles in a tiled z-stack? Of course the answer is yes (or we wouldn’t be writing about it)!
To follow along with the rest of this blog, you’ll need a Jupyter environment (we use Anaconda), a Python programming environment, as well as the PMA_python, Matplotlib, Numpy, and OpenCV packages. You can learn here about setting up PMA_python in Anaconda; take care that you install OpenCV with the correct package name, too (it’s PyPI package name is actually opencv-python, even though you import it into your code as “cv2”):
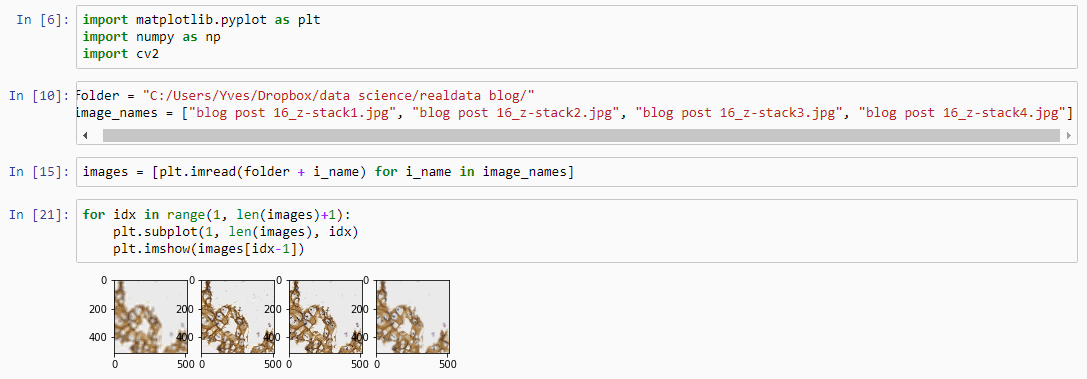
Let’s first see about reading in all images in an array (and visualize them as a sanity check):
import matplotlib.pyplot as plt
import numpy as np
import cv2

folder = "C:/Users/Yves/blog/"
image_names = ["z-stack1.jpg", "z-stack2.jpg", "z-stack3.jpg", "z-stack4.jpg"]

images = [plt.imread(folder + i_name) for i_name in image_names]

for idx in range(1, len(images)+1):
    plt.subplot(1, len(images), idx)
    plt.imshow(images[idx-1])
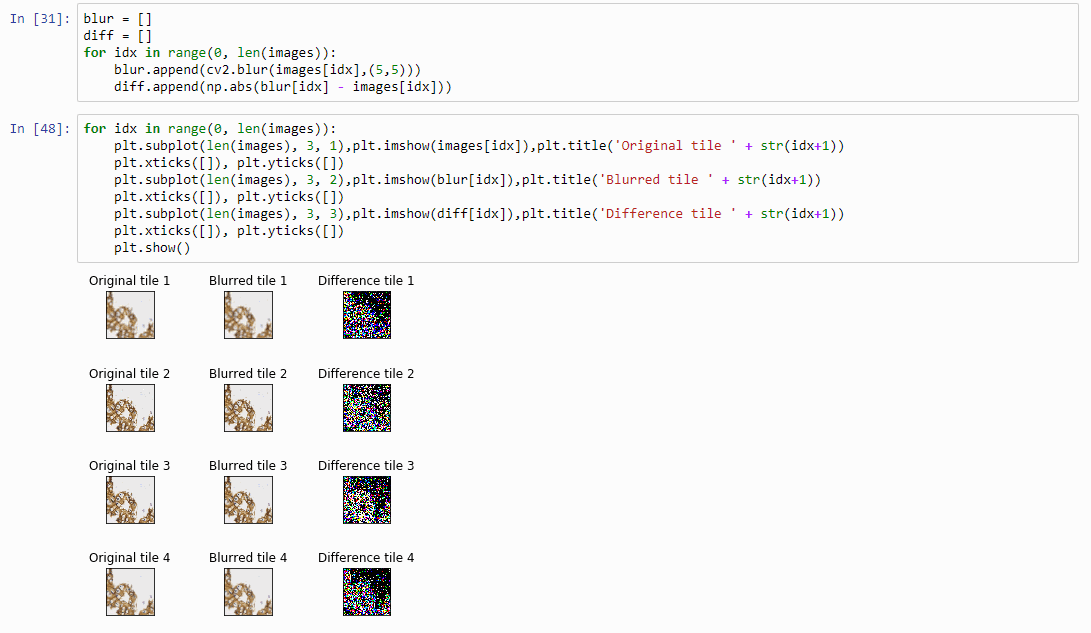
Next, let’s apply an OpenCV blurring filter on each image and compute the difference between the pixel-values in the original image and the blurred image.
blur = []
diff = []

for idx in range(0, len(images)):
    blur.append(cv2.blur(images[idx],(5,5)))
    diff.append(np.abs(blur[idx] - images[idx]))
And plot the result (although admittedly visualization of the diff-arrays doesn’t necessarily reveal much information):
The idea behind our exercise is the following: a blurred image that is blurred, will show less difference in pixel-values, compared to a sharp images that is blurred with the same filter properties.
Therefore, we can now compute the sum of all the values in the diff-array and identify the indices of the lowest and highest values. For our z-stack, the index that contains the smallest summed differences will point to the blurriest (or “most blurred”?) image; the index that contains the largest summed difference will point to the sharpest image. Let’s see if this works:
For any z-stacked slide, we can now write a loop that goes over all tiles in the slide. At each location, we retrieve all the z-stacked tiles:
def get_z_stack(path, x, y):
    z_stack = []
    for i in range(0, num_z_stacks):
        # print("getting tile from", path, " at ", x, y, " (zoomlevel", sel_zl, ") / z-stack level ", i)
        z_stack.append(core.get_tile(path, x, y, zoomlevel=sel_zl, zstack=i))
    return z_stack
Now we can calculate at each location independently the sharpest tile.
def determine_sharpest_tile_idx(tiles):
    blur = []
    diff = []

    for idx in range(0, len(tiles)):
        blur.append(cv2.blur(np.array(tiles[idx]),(5,5)))
        diff.append(np.abs(blur[idx] - tiles[idx]))
        diff_sums = [np.sum(arr) for arr in diff]

    return diff_sums.index(np.max(diff_sums))
And we can invoke these method repeatedly for each location in the slide:
zoomlevels = core.get_zoomlevels_dict(slide)
sel_zl = int(round(len(zoomlevels) / 2)) + 2     # arbitrary selection
max_x, max_y = zoomlevels[sel_zl][0], zoomlevels[sel_zl][1]

sharpness_map = []
for x in range(0, max_x):
    print (".", end="")
    for y in range(0, max_y):
        sharpness_map.append(determine_sharpest_tile_idx(get_z_stack(slide, x, y)))
Say that the thumbnail of our image look as follows:
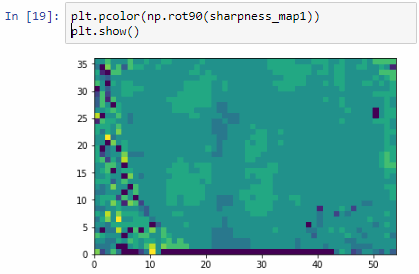
We can then print the selected optimal layers at each position as a heatmap with matplotlib.
The resulting image illustrates the fact that indeed throughout the slide, different clusters of cells are sharper in one plane or another.
The output for one of our slides looks like this:
Constructing a new single-plane image
Instead of returning the index of the sharpest tile in a stack of tiles, we can return the sharpest tiles itself. For this, we only need to make a small modification in our earlier determine_sharpest_tile_idx function.
def determine_sharpest_tile(tiles):
    blur = []
    diff = []

    for idx in range(0, len(tiles)):
        blur.append(cv2.blur(np.array(tiles[idx]),(5,5)))
        diff.append(np.abs(blur[idx] - tiles[idx]))
        diff_sums = [np.sum(arr) for arr in diff]

    return tiles[diff_sums.index(np.max(diff_sums))]
We can subsequently paste all of the sharpest tiles into a new PIL image object that is made up of the dimensions of the selected zoomlevel from which the tiles are selected:
def get_focused_slide(slide, zoomlevel):
    x_count, y_count, n = core.get_number_of_tiles(slide, zoomlevel)
    x_tile_size, y_tile_size = core.get_tile_size()
    focused_tiles = []

    image = Image.new('RGB', (x_count * x_tile_size, y_count * y_tile_size))

    coords = list(map(lambda x: (x[0], x[1], zoomlevel), itertools.product(range(y_count), range(x_count))))

    for x in range(0, max_x):
        print (".", end="")
        for y in range(0, max_y):
            focused_tiles.append(determine_sharpest_tile_idx(get_z_stack(slide, x, y)))

    i=0
    for y in range(y_count):
        for x in range(x_count):
            tile = focused_tiles[i]
            i+=1
            image.paste(tile, (x*x_tile_size, y*y_tile_size))

    return image
If you’ve run the code so far, you’ve already found out (the hard way) that it can actually take quite some time to loop over all tiles in the slide this way.
Therefore, let’s introduce some parallellization logic here as well:
def get_focused_tile(c):
    return determine_sharpest_tile(get_z_stack(slide, c[1], c[0], c[2]))

def get_focused_slide(slide, zoomlevel):
    x_count, y_count, n = core.get_number_of_tiles(slide, zoomlevel)
    x_tile_size, y_tile_size = core.get_tile_size()
    focused_tiles = []

    image = Image.new('RGB', (x_count * x_tile_size, y_count * y_tile_size))

    coords = list(map(lambda x: (x[0], x[1], zoomlevel), itertools.product(range(y_count), range(x_count))))

    tiles = Parallel(n_jobs=-1, verbose=2, backend="threading")(
        map(delayed(get_focused_tile), tqdm(coords)))

    i=0
    for y in range(y_count):
        for x in range(x_count):
            tile = tiles[i]
            i+=1
            image.paste(tile, (x*x_tile_size, y*y_tile_size))

    return image
Once you have the new image, saving the image to TIFF output is trivial:
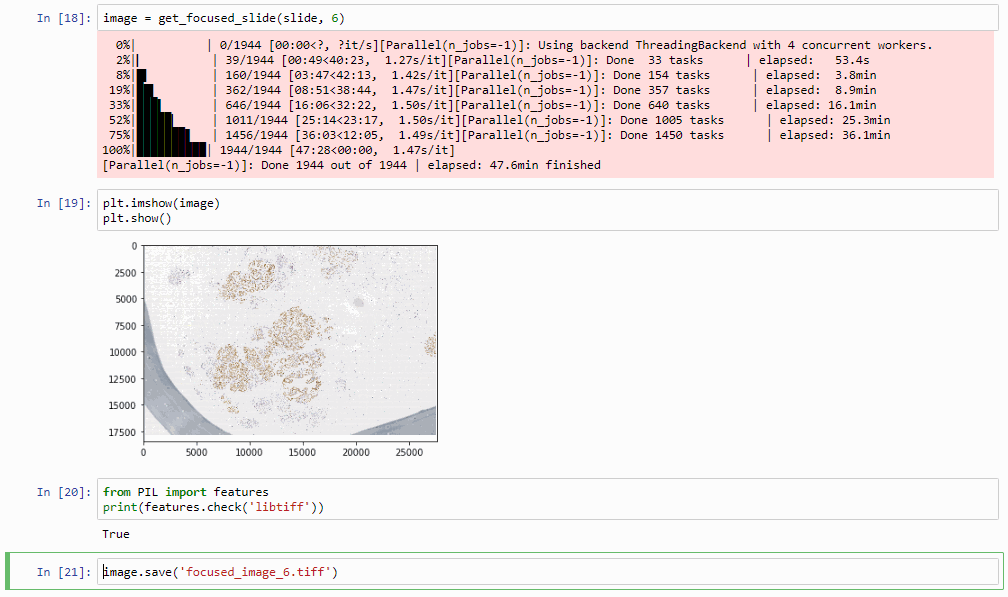
image = get_focused_slide(slide, 6)    # do this at zoomlevel 6, can take a while...
image.save('focused_image.tiff')
Which in practice can end up looking like this (including parallellization progression bars):
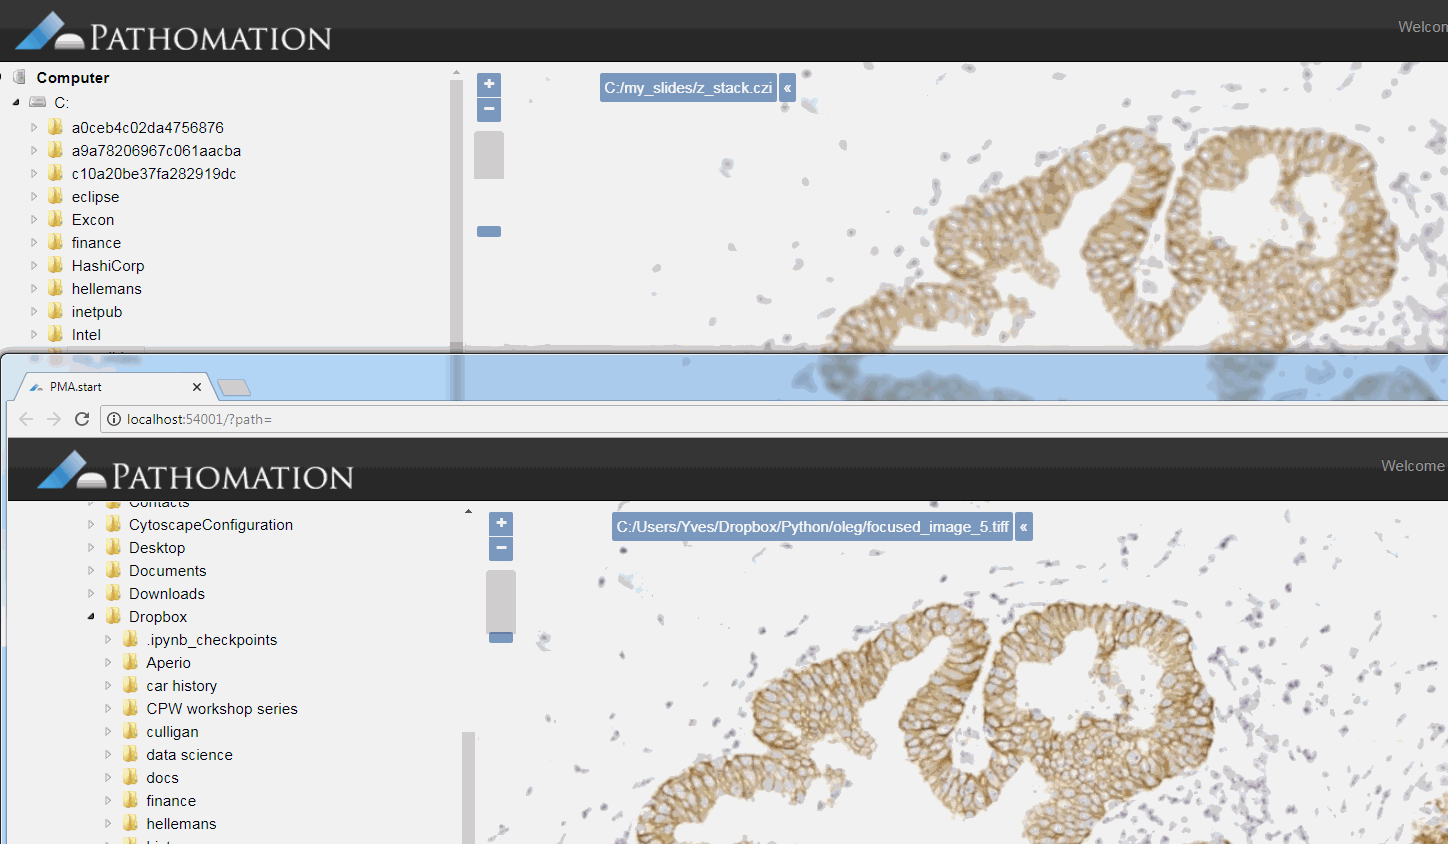
The resulting image can now be opened in turn (in PMA.start, of course) to navigate without the need to continuously having to scan for the sharpest plane.
Here’s comparison of a random zoomlevel in the original image with the same region of interest in the new optimized image:
The sourcecode for this procedure so far can be downloaded as another Jupyter notebook (thanks Oleg Kulaev for helping with the finer details of parallellization and image orientation handling in matplotlib).
Cool huh? Well, sort of, kinda… read on.
Libvips to save our TIFFs
There’s an implicit problem with the TIFFs that we generate: they’re big! Most importantly… they’re flat.
There’s some irony to this. We spent all this effort flattening the z-stacked CZI file for a flat TIFF, which is infinitely slower to navigate than the original CZI!
So saving as a pyramidal TIFF instead of a flat tiff would definitely help our case here.
The quickest way to do this is through libvips, with pyvips bindings installed (make sure that you install libvips before getting pyvips with pip; also, if you’re on Windows, make sure that the libvips’ \bin folder is included in your SYSTEM path variable).
This final procedure is available as yet another separate Jupyter notebook. Once again much gratitude goes to Oleg Kulaev for figuring out the libvips interactions.
The procedure as described can still take quite a while to process. The time needed is highly dependent on the selected zoomlevel. Deeper zoomlevels give you better accuracy, but at the expense of having to process more pixels.
We wrote this post mostly to explain the principle of how blur detection and z-stack optimization can work. By no means do we claim that is production-ready code. If you need professional, scalable blur-detection methods, check out e.g. David Ameisen‘s start-up company ImginIT (just don’t expect his process to be as clearly explained as we just did).
Here are a couple of ideas for optimization:
Do we really need to consider all pixels in a tile? Can we get by with selecting perhaps every other 2nd, 4th, 8th… pixel perhaps?
Do we need to run the blur detection on tiles from zoomlevel x in order to determine the right layer to select from? Perhaps we can get by with zoomlevel x – 1, x – 2…
Do we need to process tiles in their entirety? Perhaps we can select tiles from a coarser zoomlevel, artificially break up an individual tiles in smaller tiles, and use those as a reference.
Last but not least, do we even need all contingent tiles? This is easiest to illustrate in a 1-dimensional world: if the optimal layer to select from for tile 1 and tile 3 are the same, is there still any point to examine tile 2 as well? It’s easy now to conceive a recursive algorithm that starts with a (possibly even random) selection of tiles that only analyzes intermediate tiles as the need arises.
In a next post we’ll be discussing how you can use PMA.start to generate DICOM-compliant image objects.
The following is a cartoon from XKCD dating from a few years back. If you’ve ever been involved in the transfer of whole slide images, this will be very recognizable.
With whole slide imaging data, the above actually is more complicated. The step that is being skipped in the cartoon is the file integrity check. And with whole slide images, as a single virtual slide can consist of multiple files, it can become really complex really fast.
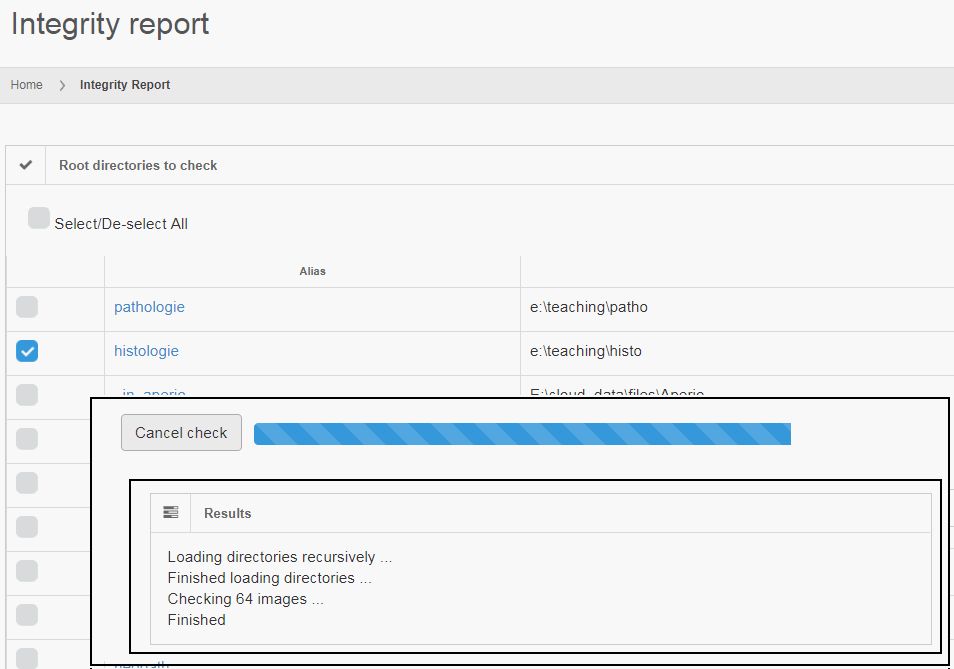
If you’re a professional user of PMA.core, you no doubt have already appreciated the convenience of the “integrity check” tool: it allows you to select a set of slides, and check if they actually really whole slide imaging data.
Can your image management solution do this? 🙂
But we admit, buying PMA.core just to verify virtual slide integrity is probably overkill.
DIY slide integrity
It turns out, PMA.start is just a well capable to verify virtual slide integrity. But first some background about why you would even want to do this.
The fundamental reason why you want to route all of your slide manipulation operations through PMA.start or its bigger brother PMA.core is that the software knows and understands what a slide is. When you copy a number a multi-file slides from one device to another and you refer to our software components in your code for verification purposes, you cannot make any mistakes in terms of accidentally copying only parts of files the slides. If a mistake does crop up in your report, you can simultaneously check whether something was perhaps wrong with the original slides and files. Digital pathology is hard enough as it is; at least do it on a unit of data (the “slide” rather than the “file”) that makes sense!
As much of slide transfers occur “ad hoc” (on a “need to transfer” basis sort of speak), we wrote an integrity check procedure ourselves as an AnacondaJupyter notebook.
In order to get PMA.python to work with Anaconda, you’ll first have to get it through PyPI. Start an anadonda prompt and type in “pip install pma_python”.
Great, now you’re ready to import our nifty library in your Jupyter notebooks.
Here’s a good way to start all of your notebooks:
The first block confirms the availability of the library; the second block confirms that PMA.start is running on your system.
This is where Jupyter really shines: you can subdivide your Python (or R) code in separate discrete parts and execute them in an order you want. It becomes really convenient to tweak your scripts and even faster to debug them.
Our strategy for doing an integrity check on a folder an its subfolders is straightforward: loop over all the slides in the folder and see whether we can request the slide information from each one:
def loop_over_directories(dir):
    slides = {}
    for subdir in core.get_directories(dir):
        slides.update(loop_over_directories(subdir))
        for slide in core.get_slides(dir):
            slides[slide] = core.get_slide_info(slide)
    return slides
The result of this function is a dictionary that as keys has paths to all the slides, and as values has information objects (or None in case the slide turned out to be corrupt).
We can now invoke the function on an external hard disk’s folder after copying to see if it goes ok. By means of a sanity check, we’ll also output some parameters on the first slide encountered, as well as the number of items in the dictionary:
Our next step is to convert part of the dictionary data to a pandas DataFrame, which in turn it written out as an Excel file. The Excel file is subsequently stored on the external hard disk to provide a check-list for the client and confirm data integrity on their end upon receipt.
df = pd.DataFrame(columns=["SlideName", "PixelWidth", "PixelHeight", "ppmX", "ppmY", "SizeOnDisk"])
df.set_index(["SlideName"])
for slide in slides:
    info = slides[slide]
    if info == None:
        print("Unable to get slide information for", slide)
    else:
        df = df.append({"SlideName": slide,
            "PixelWidth": info["Width"],
            "PixelHeight": info["Height"],
            "ppmX": info["MicrometresPerPixelX"],
            "ppmY": info["MicrometresPerPixelY"],
            "SizeOnDisk": info["PhysicalSize"]}, ignore_index=True)
print (df.shape[0], " out of ", len(slides), " check out OK")
Great, but what if things don’t work out they’re supposed to?
As it turns out, we had been copying a collection of slides (about 60GB in total) overnight from an FTP site. Chances are that in the time that takes, something will go wrong. This turned out have happened in our case, as well, and the output flagged correctly that there was a mistake.
The flagged item was minor actually; one of the files had indeed failed to copy and had resulted in a file size with 0 bytes. We downloaded the file anew, and now everything checked out.
Did we need PMA.start to find out that a file was the wrong size? No, we could have used a range of other tools. But the point is that many things can go wrong with whole slide image transfer. The final goal is to check slide integrity, and once a problem is detected, other tools can be used to dig further and resolve them.
There are other potential problems, too: you may be sending someone slides who’s unable to read them. By including a test report from your end with the data, you’re telling them that the files are indeed all right, and that other problems may be at play (perhaps they’re not using the right viewer or import module for the file format that you sent them).
Troubleshooting and debugging is all about eliminating possibilities. We like to think PMA.start (and it’s bigger brother PMA.core) can help you get there faster than anything else on the market today.
You can download the Jupyter notebook discussed in this post. Just modify the folder_to_check variable in the third codeblock to point to the location that you want to validate.
Following the release of our SDK for python, our next step is to implement the same set of functionalities for Java.
Similarly to what we already did for Python, this Java package comes with a set of methods to do basic tasks such as obtaining lists of slides, navigating a hierarchical folder structure, and, of course, extracting tiles. The code was deposited in GitHub.
Getting an interface to Pathomation software in Java is now as easy as including this dependency tag into your pom.xml (version tag set to always retrieve latest version) :
What can you do with our Java SDK today? If you have PMA.start installed on your system, you can go right ahead and try out the following code:
import com.pathomation.*;

public class Test {

    public static void main(String[] args) throws Exception {
        if (Core.pmaIsLite()) {
            System.out.print("Congratulations; PMA.start is running on your system");
            System.out.print("You’re running PMA.core.lite version " + core.getVersionInfo());
        } else {
            System.out.print("PMA.start not found. Either you don’t have it installed, or you don’t have the server-component running currently");
            throw new Exception("PMA.start not detected");
        }
    }
}
You can use the same isLite() method by the way to ask your end-user to make sure PMA.start IS running before continuing the script:
import com.pathomation.*;

public class Test {

    public static void main(String[] args) {
        if (Core.pmaIsLite()) {
            System.out.print("PMA.core.lite is NOT running.");
            System.out.print("Make sure PMA.core.lite is running and press <enter> to continue");
            System.in.read();
        }
        if (Core.pmaIsLite()) {
            System.out.print("PMA.core.lite is NOT running.");
            System.exit(1);
        }
    }
}
Slides
Now that you know how to establish the availability of PMA.start as a back-end for whole slide imaging (WSI) data, you can start looking for slides:
import com.pathomation.*;

public class Test {

    public static void main(String[] args) throws Exception {
        if (!Core.pmaIsLite()) {
            throw new Exception("PMA.start not detected");
        }
        // assume that you have slides in C:\my_slides (note the capital C)
        for (String slide : Core.getSlides("C:/my_slides")) {
            System.out.print(slide);
        }
    }
}
But you knew already that you had slides in that folder, of course. By, the way, if NO data shows up, check the specified path. It’s case sensitive, and drive letters have to be capitalized. Also make sure to use a forward slash instead of the more traditional (on Windows at least) backslash.
Now what you probably didn’t know yet is the dimensions of the slide, both in pixels as well as micrometers.
System.out.print("Pixel dimensions of slide:");
Integer xDimPix = Core.getPixelDimensions(slide).get(0),
        yDimPix = Core.getPixelDimensions(slide).get(1);
System.out.print(xDimPix.toString() + " x " + yDimPix.toString());

System.out.print("Slide surface area represented by image:");
Float xDimPhys = Core.getPhysicalDimensions(slide).get(0),
      yDimPhys = Core.getPhysicalDimensions(slide).get(1);
System.out.print(xDimPhys.toString() + "µm x " + yDimPhys.toString() + "µm = ");
System.out.print((xDimPhys * yDimPhys / 1E6) + " mm2");
Below is the output on our computer, having 3 3DHistech MRXS slides in the c:\my_slides folder. You can use this type of output as a sanity check, too.
While the numbers in µm seems huge, they start to make more sense once translated to the surface area captured. As a reminder: 1 mm2 = 1,000,000 µm2, which explains why we divide by 1E6 to get the area in mm2. 1020 mm2 still not saying much? Then keep in mind that 100 mm2 equals 1 cm2, and that 10 cm2 can very will constitute a 2 cm x 5 cm piece of tissue. A physical slide’s dimensions are typically 10 cm x 4 cm. Phew, glad the data matches reality!
Determining a slide’s magnification
We can also determine the magnification at which an image was registered. The getMagnification function has a Boolean exact= parameter that works as follows: when set to True, getMagnification will round to the nearest “whole number” magnification that’s typically mentioned on a microscope’s objective lens. This could be 5X, 20X, 40X… But bear in mind that when a microscopist looks through his device, he can fine-focus on a sample, thereby slightly modifying the actual magnification used, perhaps from 40X to 38X (even though the label on the lens still says 40X of course). Scanners work in the same manner; because of auto-focusing, the end-result of a scan may be in 38X instead of 40X, or 21X instead of 20X. And this is the number that is returned when the exact= parameter is set to True.
Of course, when building a Dataframe (using library TableSaw), you might as well include columns for both measurements (perhaps using the rounded measurement later for a classification task):
import java.util.ArrayList;
import java.util.HashMap;
import java.util.Map;

import com.pathomation.*;
import tech.tablesaw;

public class Test {

    public static void main(String[] args) throws Exception {

        if (!Core.pmaIsLite()) {
            throw new Exception("PMA.start not detected");
        }
        // create blank list (to be converted into a pandas DataFrame later)
        List<Map<String, Object>> slideInfos = new ArrayList<Map<String, Object>>();

        //Initialize the components for TableSaw
        StringColumn colSlide = StringColumn.create("slide");
        DoubleColumn colApproxMag = DoubleColumn.create("approxMag");
        DoubleColumn colExactMag = DoubleColumn.create("exactMag");
        BooleanColumn colIsFluo = BooleanColumn.create("isFluo");
        BooleanColumn colIsZStack = BooleanColumn.create("isZStack");
        // assume that you have slides in C:\my_slides (note the capital C)
        for (String slide : Core.getSlides("C:/my_slides")) {
            colSlide.append(Core.getSlideFileName(slide));
            colApproxMag.append(Core.getMagnification(slide, false));
            colExactMag.append(Core.getMagnification(slide, true));
            colIsFluo.append(Core.isFluorescent(slide));
            colIsZStack.append(Core.isZStack(slide));
        }
        Table results = Table.create("Results", colSlide, colApproxMag, colExactMag, colIsFluo, colIsZStack);
        results.print();
    }
}
The output of this script on our computer is as follows:
Note that for one slide, both the exact and the approximate magnification is 0. This is because that particular slide is a .jpg-file, which doesn’t contain any useful (pixels per micron) metadata to use to determine the magnification.
The images PMA.start typically deals with are called whole slide images, so how about we show some pixels? As it turns out, this is really easy. Just invoke the showSlide() call. Assuming you have a slide at c:\my_slides\alk_stain.mrxs, we get:
import Core.java;

public class Test {

    public static void main(String[] args)  {

        String slide = "C:/my_slides/alk_stain.mrxs";
        Core.showSlide(slide);
    }
}
The result depends on whether you’re using PMA.start or a full version of PMA.core. If you’re using PMA.start, you’re taken to the desktop viewer:
If you’re using PMA.core, you’re presented with an interface with less frills: the webbrowser is still involved, but nothing more than scaffolding code around a PMA.UI.View.Viewport is offered (which actually allows for more powerful applications):
Associated images
But there’s more to these images; if you only wanted to view a slide, you wouldn’t bother with Java in the first place. So let’s see what else we can get out of these?
Assuming you have a slide at c:\my_slides\alk_stain.mrxs, you can execute the following code to obtain a thumbnail image representing the whole slide:
import java.awt.BorderLayout;
import java.awt.Image;
import javax.swing.ImageIcon;
import javax.swing.JFrame;
import javax.swing.JLabel;
import javax.swing.JPanel;

import com.pathomation.*;

public class Test {

    public static void main(String[] args) {

        String slide = "C:/my_slides/alk_stain.mrxs";
        Image thumb = Core.getThumbnailImage(slide);
        displayImage(thumb);
    }

    public static void displayImage(Image image) {
        JFrame frame = new JFrame();
        JLabel lblImage = new JLabel(new ImageIcon(image));
        JPanel mainPanel = new JPanel(new BorderLayout());
        mainPanel.add(lblImage);
        frame.add(mainPanel);
        frame.setVisible(true);
    }
}
But this thumbnail presentation alone doesn’t give you the whole picture. You should know that a physical glass slide usually consists of two parts: the biggest part of the slide contains the specimen of interest and is represented by the thumbnail image. However, near the end, a label is usually pasted on with information about the slide: the stain used, the tissue type, perhaps even the name of the physician. More recently, oftentimes the label has a barcode printed on it, for easy and automated identification of a slide. The label is therefore sometimes also referred to as “barcode”. Because the two terms are used so interchangeably, we decided to support them in both forms, too. This makes it easier to write code that not only syntactically makes sense, but also applies semantically in your work-environment.
A systematic representation of a physical glass slide can then be given as follows:
The Core java library then has three methods to obtain slide representations, two of which are aliases of one another:
core.getThumbnailImage() returns the thumbnail image
core.getLabelImage() returns the label image
core.getBarcodeImage() is an alias for getLabelImage
All of the above methods return PIL Image-objects. It actually took some discussion to figure out how to package the data. Since the SDK wraps around an HTTP-based API, we settled on representing pixels through Pillows. Pillows is the successor to the Python Image Library (PIL). The package should be installed for you automatically when you obtained Core java.
The following code shows all three representations of a slide side by side:
import java.awt.BorderLayout;
import java.awt.Image;
import javax.swing.ImageIcon;
import javax.swing.JFrame;
import javax.swing.JLabel;
import javax.swing.JPanel;

import com.pathomation.*;

public class Test {

    public static void main(String[] args) {

        String slide = "C:/my_slides/alk_stain.mrxs";
        // displaying thumbnail image
        Image thumb = Core.getThumbnailImage(slide);
        displayImage(thumb);
        // displaying label image
        Image label = Core.getLabelImage(slide);
        displayImage(label);
        // displaying barcode image
        Image barcode = Core.getBarcodeImage(slide);
        displayImage(barcode);
    }

    public static void displayImage(Image image) {
        JFrame frame = new JFrame();
        JLabel lblImage = new JLabel(new ImageIcon(image));
        JPanel mainPanel = new JPanel(new BorderLayout());
        mainPanel.add(lblImage);
        frame.add(mainPanel);
        frame.setVisible(true);
    }
}
The output is as follows:
Note that not all WSI files have label / barcode information in them. In order to determine what kind of associated images there are, you can inspect a SlideInfo dictionary first to see what’s available:
Map<String, Object> info = Core.getSlideInfo(slide);
System.out.print(Collections.singletonList((HashMap<String, Object>) info.get("AssociatedImageTypes")));
AssociatedImageTypes may refer to more than thumbnail or barcode images, depending on the underlying file format. The most common use of this function is to determine whether a barcode is included or not.
You could write your own function to determine whether your slide has a barcode image:
If you already know about pyramidical image files, feel free to skip this paragraph. If you don’t, sticks around; it’s important to understand how microscopy data coming out of slide scanners is structured to be able to manipulate it.
It all starts with a physical slide: a physical slide is a thin piece of glass, with the dimensions
When a physical slide is registered in a digital fashion, it is translated into a 2-dimensional pixel matrix. At a 40X magnification, it takes a grid of4 x 4 pixels to represent 1 square micrometer. We can also say that the image has a resolution of 0.25 microns per pixel. This is also expressed as 4 pixels per micron (PPM).
All of this means that in order to present our 5 cm x 2 cm physical specimen from the first part of this tutorial series in a 40X resolution we need (5 * 10 * 1000 * 4) * (2 * 10 * 1000 * 4) = 200k x 80k = 16B pixels
Now clearly that image is way too big to load in memory all at once, and even with advanced compression techniques, the physical sizes of these is roughly around one gigabyte per slide. So what people have thought of is to package the image data as a pyramidal stack.
Pyramid of Cestius as a metaphore for pyramidal stack images. By Francesco Gasparetti from Senigallia, Italy – Piramide Cestia, CC BY 2.0, https://commons.wikimedia.org/w/index.php?curid=2614848
Ok, perhaps not that kind of pyramid…
But you can imagine a very large image being downsampled a number of times until it receives a manageable size. You just keep dividing the number of pixels by two, and eventually you get a single image that still represents the whole slide, but is only maybe 782 x 312 pixels in size. This then becomes the top of your pyramid and we label it as zoomlevel 0.
At zoomlevel 1, we get a 1562 x 624 pixel image etc. It turns out that our original image of 200k x 80k pixels is found at zoomlevel 8. Projected onto our pyramid, we get something like this:
Worked out example (showing the different zoomlevels) of a pyramidal stack for a concrete whole slide image.
So the physical file representing the slide doesn’t just store the high-resolution image, it stored a pyramidal stack with as many zoomlevels as needed to reach the deepest level (or highest resolution). The idea is that depending on the magnification that you want to represent on the screen, you read data from a different zoomlevel.
Tiles
The pyramid stack works great up to certain resolution. But pretty quick we get into trouble and the images become too big once again to be shown in one pass. And of course, that is eventually what we want to do: Look at the images in their highest possible detail.
In order to work around this problem, the concept of tiles is introduced. The idea is that at each zoomlevel, a grid overlays the image data, arbitrarily breaking the image up in tiles. This leads to a representation like this:
Now, for any area of the slide that we want to display at any given time to the end-user, we can determine the optimal zoomlevel to select from, as well a select number of tiles that are sufficient to show the desired “field of view”, rather than asking the user to wait to download the entire (potentially huge!) image. This goes as follows:
Or, put the other way around (from the browser’s point of view):
So there you have it: whole slide images are nothing but tiled pyramid-shaped stacks of image data.
Tiles in PMA.start
We can access individual tiles within the tiled stack using PMA.start, but before we do that we should first look some more at a slide’s metadata.
We can start by making a table of all zoomlevels the tiles per zoomlevel, along with the magnification represented at each zoomlevel (using library TableSaw) :
The result for our alk_stain.mrxs slide looks as follows:
Now that we have an idea of the number of zoomlevels to expect and how many tiles there are at each zoomlevel, we can request an individual tile easily. Let’s say that we wanted to request the middle tile at the middle zoomlevel:
import java.awt.BorderLayout;
import java.awt.Image;
import java.util.ArrayList;
import javax.swing.ImageIcon;
import javax.swing.JFrame;
import javax.swing.JLabel;
import javax.swing.JPanel;

import com.pathomation.*;

public class Test {

    public static void main(String[] args) {

        String slide = "C:/my_slides/alk_stain.mrxs";
        List<Integer> levels = Core.getZoomLevelsList(slide);
        int lvl = levels.get((int) (levels.size() / 2));
        List<Integer> tilesXyz = Core.getNumberOfTiles(slide, lvl);
        int x = (int) (tilesXyz.get(0) / 2);
        int y = (int) (tilesXyz.get(1) / 2);
        Image tile = Core.getTile(slide, x, y, lvl);
        displayImage(tile);
    }

    public static void displayImage(Image image) {
        JFrame frame = new JFrame();
        JLabel lblImage = new JLabel(new ImageIcon(image));
        JPanel mainPanel = new JPanel(new BorderLayout());
        mainPanel.add(lblImage);
        frame.add(mainPanel);
        frame.setVisible(true);
    }
}
This should pop up a single tile:
.Ok, perhaps not that impressive.
In practice, you’ll typically want to loop over all tiles in a particular zoomlevel. The following code will show all tiles at zoomlevel 1 (increase to max_zoomlevel at your own peril):
The advantage of this approach is that you have control over the direction in which tiles are processed. You can also process row by row and perhaps print a status update after each row is processed.
However, if all you care about is to process all rows left to right, top to bottom, you can opt for a more condensed approach:
for (Image tile : Core.getTiles(slide, tileSz.get(0), tileSz.get(1), 4) {
    //converting the image into N-Dimensional Array
}
The body of the for-loop now processes all tiles at zoomlevel 4 one by one and converts them into an array structure, ready for image processing to occur, e.g. through opencv.
This website uses cookies to improve your experience. We'll assume you're ok with this, but you can opt-out if you wish. Cookie settingsACCEPT
Privacy & Cookies Policy
Privacy Overview
This website uses cookies to improve your experience while you navigate through the website. Out of these cookies, the cookies that are categorized as necessary are stored on your browser as they are essential for the working of basic functionalities of the website. We also use third-party cookies that help us analyze and understand how you use this website. These cookies will be stored in your browser only with your consent. You also have the option to opt-out of these cookies. But opting out of some of these cookies may have an effect on your browsing experience.
Necessary cookies are absolutely essential for the website to function properly. This category only includes cookies that ensures basic functionalities and security features of the website. These cookies do not store any personal information.
Any cookies that may not be particularly necessary for the website to function and is used specifically to collect user personal data via analytics, ads, other embedded contents are termed as non-necessary cookies. It is mandatory to procure user consent prior to running these cookies on your website.

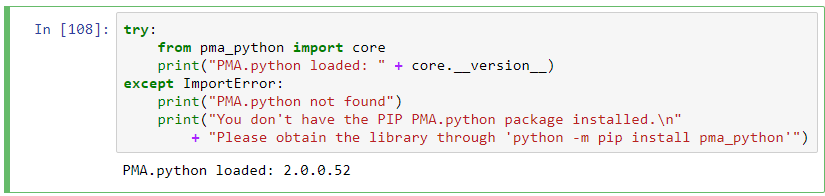
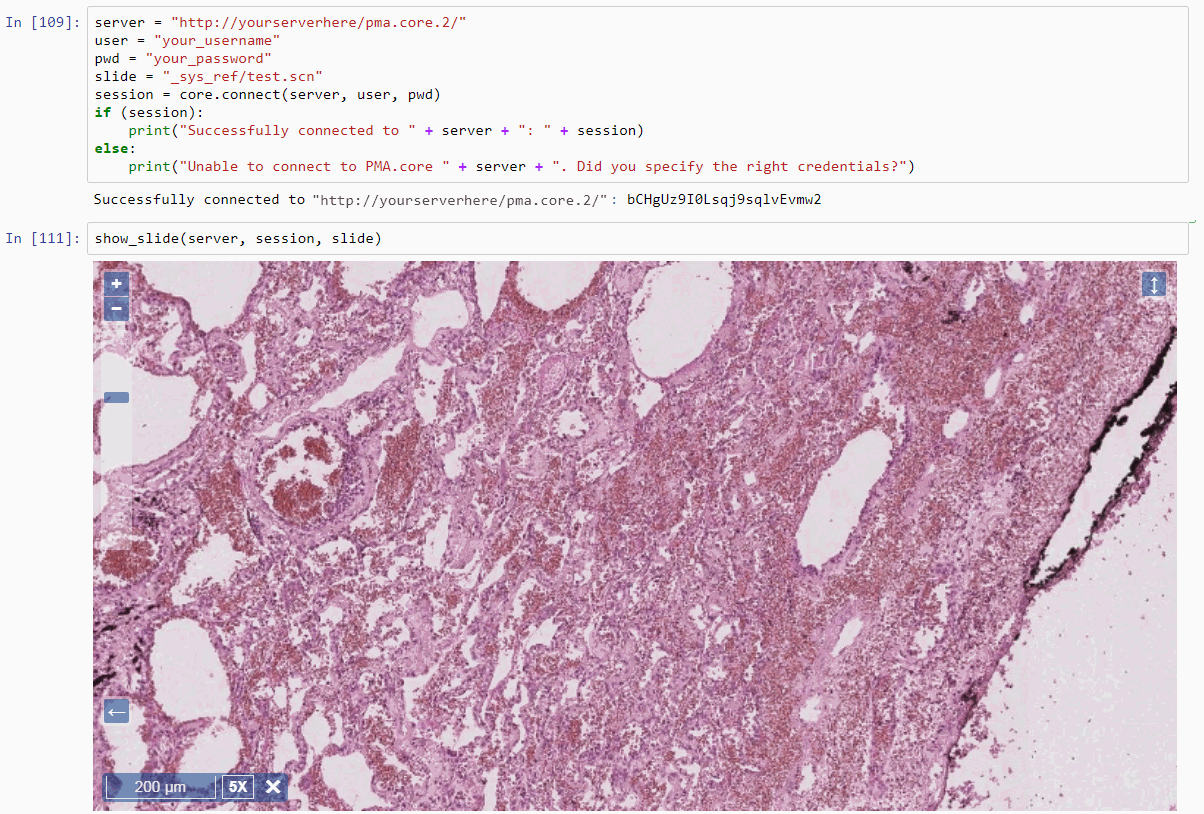
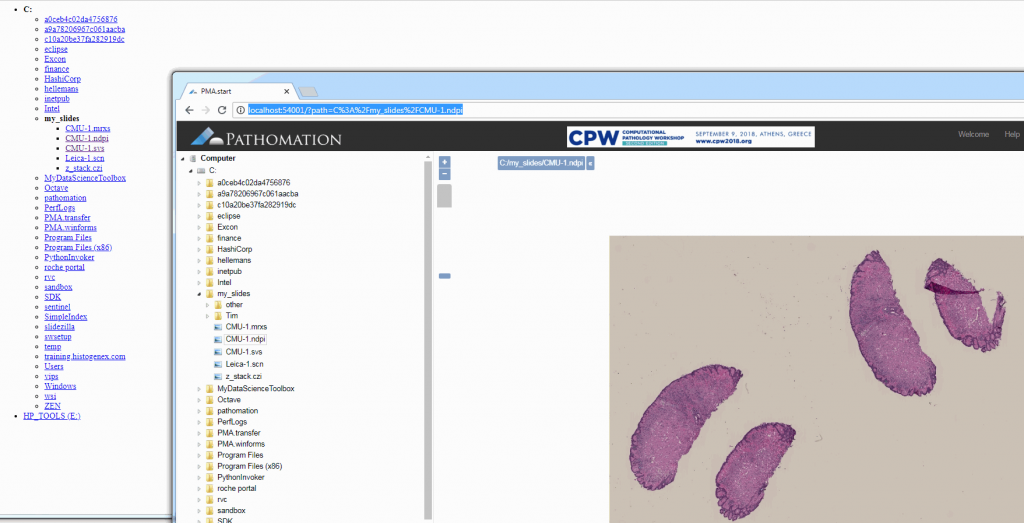
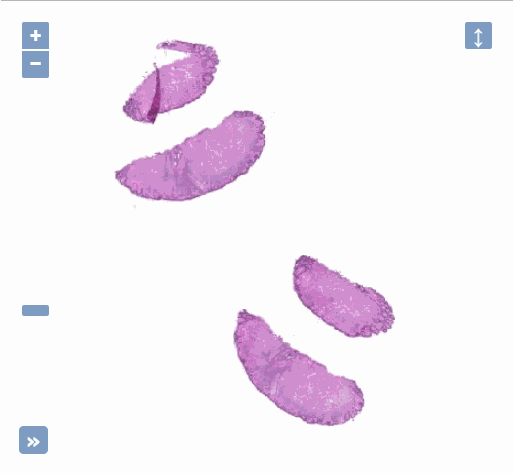

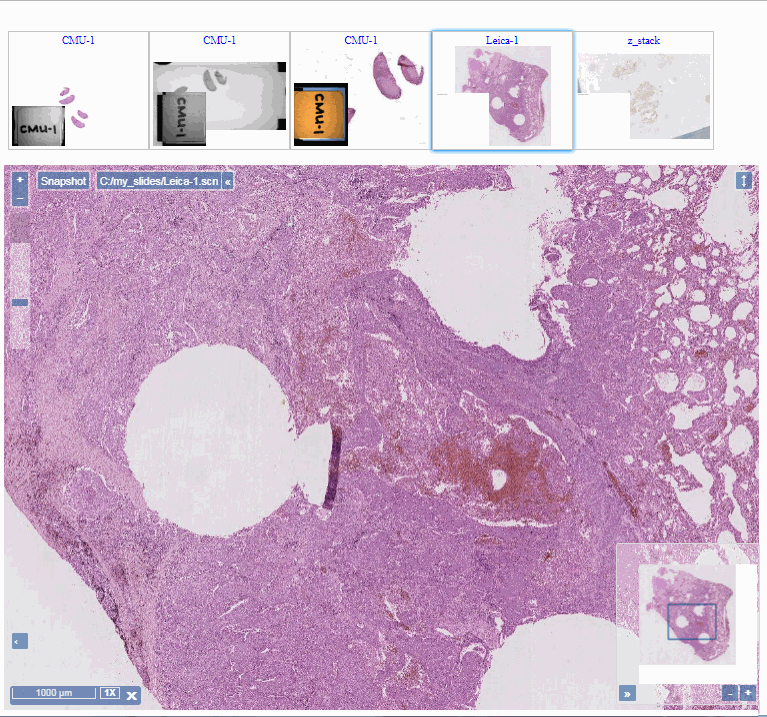
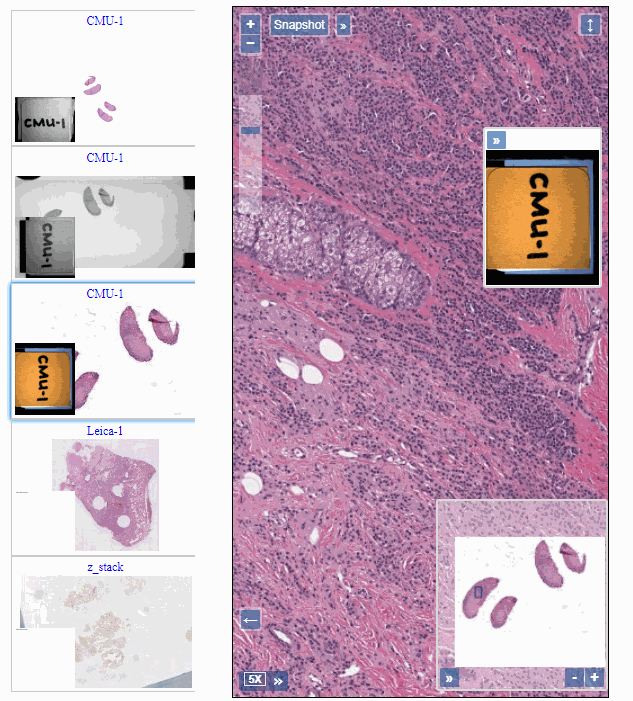
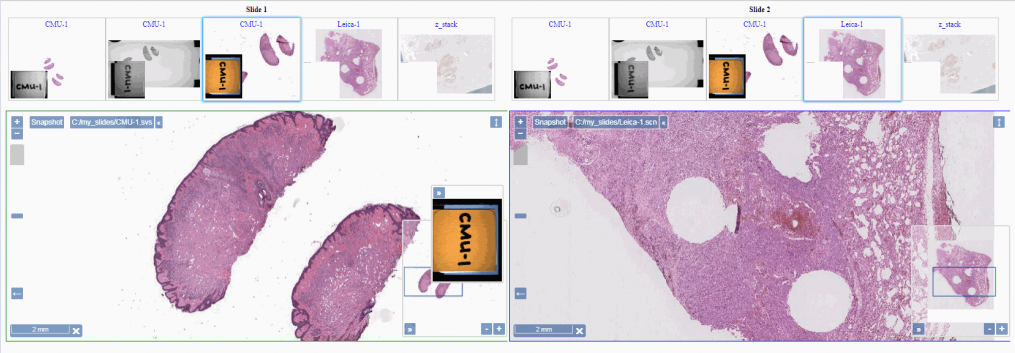


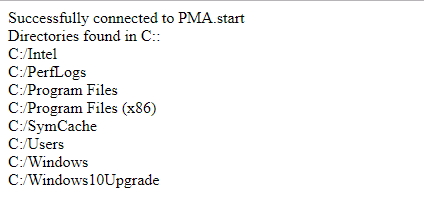

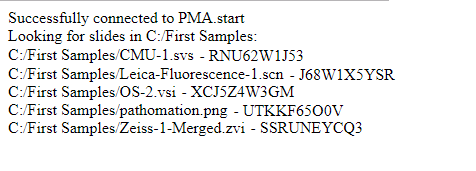


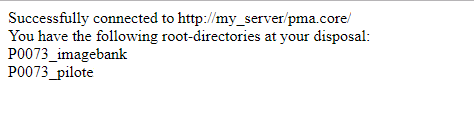
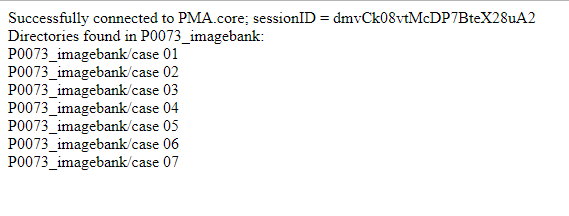


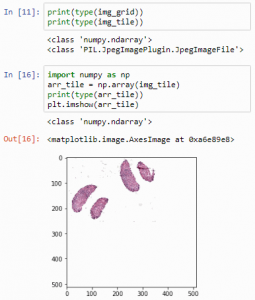
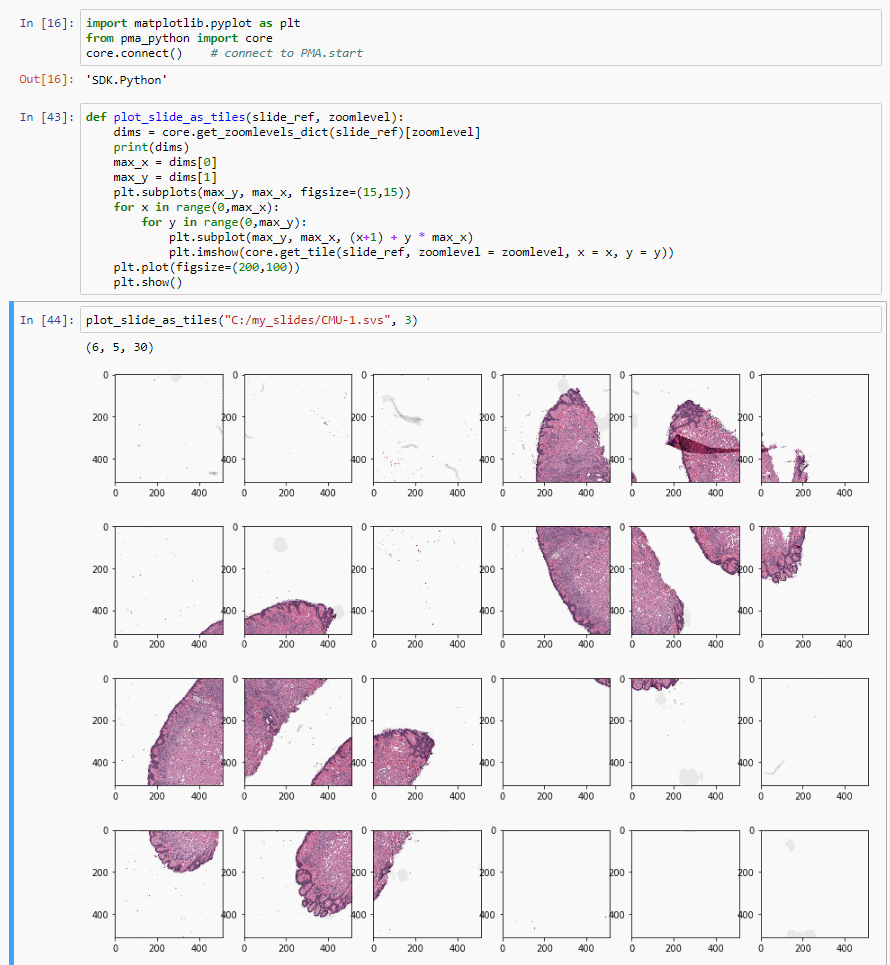
 Now let’s see if we can loop this operation: