
SDK update
Now that I have a basic understanding of Python (including the popular packages pandas, matplotlib.pyplot, and (to a slightly lesser extend) numpy), I’m moving ahead and am putting out Java, R, Eiffel, Haskell, and F# API wrapper libraries as part of our SDK!
Ok, perhaps not.
To prevent ending up with a plethora of half-finished sourcecode files across a variety of languages, we thought it more prudent this time to work on a comprehensive library in a single programming language first, and then port it to other environments.
For Python, this means writing one of more modules and publishing it in Python. Others have done this before us, so how hard could it be, right?
So we set off to write an initial module, with a number of procedures to do basic tasks such as obtaining lists of slides, navigating a hierarchical folder structure, and, of course, extracting tiles. The code was deposited in GitHub.
After GitHub typically comes support for the Python Package Installer (PyPI). We recruited somebody through UpWork to help us with this process and here we are: getting an interface to Pathomation software in Python is now as easy as issuing the command “python3.exe -m pip install pma-python”.

Oh, and we already tested this in other environments, too. The following screenshot was taken on a Mac (thank you, Pieter-Jan Van Dam):

Getting started
What can you do with our Python SDK today? If you have PMA.start installed on your system, you can go right ahead and try out the following code:
from pma_python import pma

if pma.is_lite():
    print("Congratulations; PMA.start is running on your system")
    print("You’re running PMA.core.lite version " + pma.get_version_info())
else:
    print("PMA.start not found. Either you don’t have it installed, or you don’t have the server-component running currently")
    raise Exception("PMA.start not detected")
You can use the same is_lite() method by the way to ask your end-user to make sure PMA.start IS running before continuing the script:
from pma_python import pma
from sys import exit

if (not pma.is_lite()):
    print("PMA.core.lite is NOT running.")
    print("Make sure PMA.core.lite is running and press <enter> to continue")
    input()

if (not pma.is_lite()):
    print("PMA.core.lite is NOT running.")
    exit(1)
Slides
Now that you know how to establish the availability of PMA.start as a back-end for whole slide imaging (WSI) data, you can start looking for slides:
from pma_python import pma

if not pma.is_lite():
    raise Exception("PMA.start not detected")

# assume that you have slides in C:\my_slides (note the capital C)
for slide in pma.get_slides("C:/my_slides"):
    print(slide)
But you knew already that you had slides in that folder, of course. By, the way, if NO data shows up, check the specified path. It’s case sensitive, and drive letters have to be capitalized. Also make sure to use a forward slash instead of the more traditional (on Windows at least) backslash.
Now what you probably didn’t know yet is the dimensions of the slide, both in pixels as well as micrometers.
print("Pixel dimensions of slide:")
xdim_pix, ydim_pix = pma.get_pixel_dimensions(slide)
print(str(xdim_pix) + " x " + str(ydim_pix))

print("Slide surface area represented by image:")
xdim_phys, ydim_phys = pma.get_physical_dimensions(slide)
print(str(xdim_phys) + "µm x " + str(ydim_phys) + "µm = ", end="")
print(str(xdim_phys * ydim_phys / 1E6) + " mm2")
Below is the output on our computer, having 3 3DHistech MRXS slides in the c:\my_slides folder. You can use this type of output as a sanity check, too.
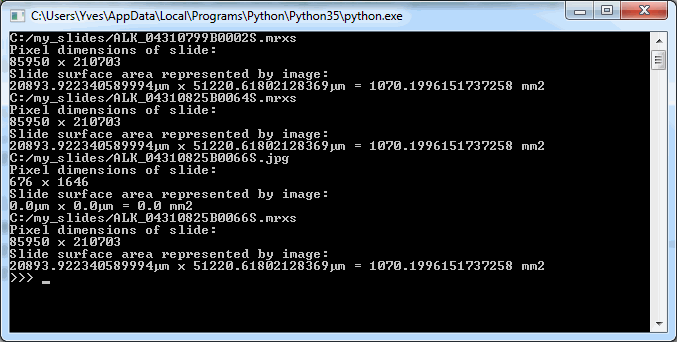
While the numbers in µm seems huge, they start to make more sense once translated to the surface area captured. As a reminder: 1 mm2 = 1,000,000 µm2, which explains why we divide by 1E6 to get the area in mm2. 1020 mm2 still not saying much? Then keep in mind that 100 mm2 equals 1 cm2, and that 10 cm2 can very will constitute a 2 cm x 5 cm piece of tissue. A physical slide’s dimensions are typically 10 cm x 4 cm. Phew, glad the data matches reality!
Determining a slide’s magnification
We can also determine the magnification at which an image was registered. The get_magnification function has a Boolean exact= parameter that works as follows: when set to True, get_magnification will round to the nearest “whole number” magnification that’s typically mentioned on a microscope’s objective lens. This could be 5X, 20X, 40X… But bear in mind that when a microscopist looks through his device, he can fine-focus on a sample, thereby slightly modifying the actual magnification used, perhaps from 40X to 38X (even though the label on the lens still says 40X of course). Scanners work in the same manner; because of auto-focusing, the end-result of a scan may be in 38X instead of 40X, or 21X instead of 20X. And this is the number that is returned when the exact= parameter is set to True.
Of course, when building a pandas Dataframe, you might as well include columns for both measurements (perhaps using the rounded measurement later for a classification task):
from pma_python import pma
import pandas as pd

if not pma.is_lite():
    raise Exception("PMA.start not detected")

# create blank list (to be converted into a pandas DataFrame later)
slide_infos = []

# assume that you have slides in C:\my_slides (note the capital C)
for slide in pma.get_slides("C:/my_slides"):
    dict = {
        "slide": pma.get_slide_file_name(slide),
        "approx_mag": pma.get_magnification(slide, exact=False),
        "exact_mag": pma.get_magnification(slide, exact=True),
        "is_fluo": pma.is_fluorescent(slide),
        "is_zstack": pma.is_z_stack(slide)
        }
    slide_infos.append(dict)

df_slides = pd.DataFrame(slide_infos, columns=["slide","approx_mag","exact_mag", "is_fluo", "is_zstack"])
print(df_slides)
The output of this script on our computer is as follows:

Note that for one slide, both the exact and the approximate magnification is 0. This is because that particular slide is a .jpg-file, which doesn’t contain any useful (pixels per micron) metadata to use to determine the magnification.
Almost there
In our next post, we’ll show how you can retrieve various types of image data from your digitized slides.