
SDK for Java
Following the release of our SDK for python, our next step is to implement the same set of functionalities for Java.
Similarly to what we already did for Python, this Java package comes with a set of methods to do basic tasks such as obtaining lists of slides, navigating a hierarchical folder structure, and, of course, extracting tiles. The code was deposited in GitHub.
To make using the SDK easier, we submitted the package to the Maven central repository

Getting an interface to Pathomation software in Java is now as easy as including this dependency tag into your pom.xml (version tag set to always retrieve latest version) :
<dependency>
    <groupId>com.pathomation</groupId>
    <artifactId>pma-java</artifactId>
    <version>[2.0,)</version>
</dependency>
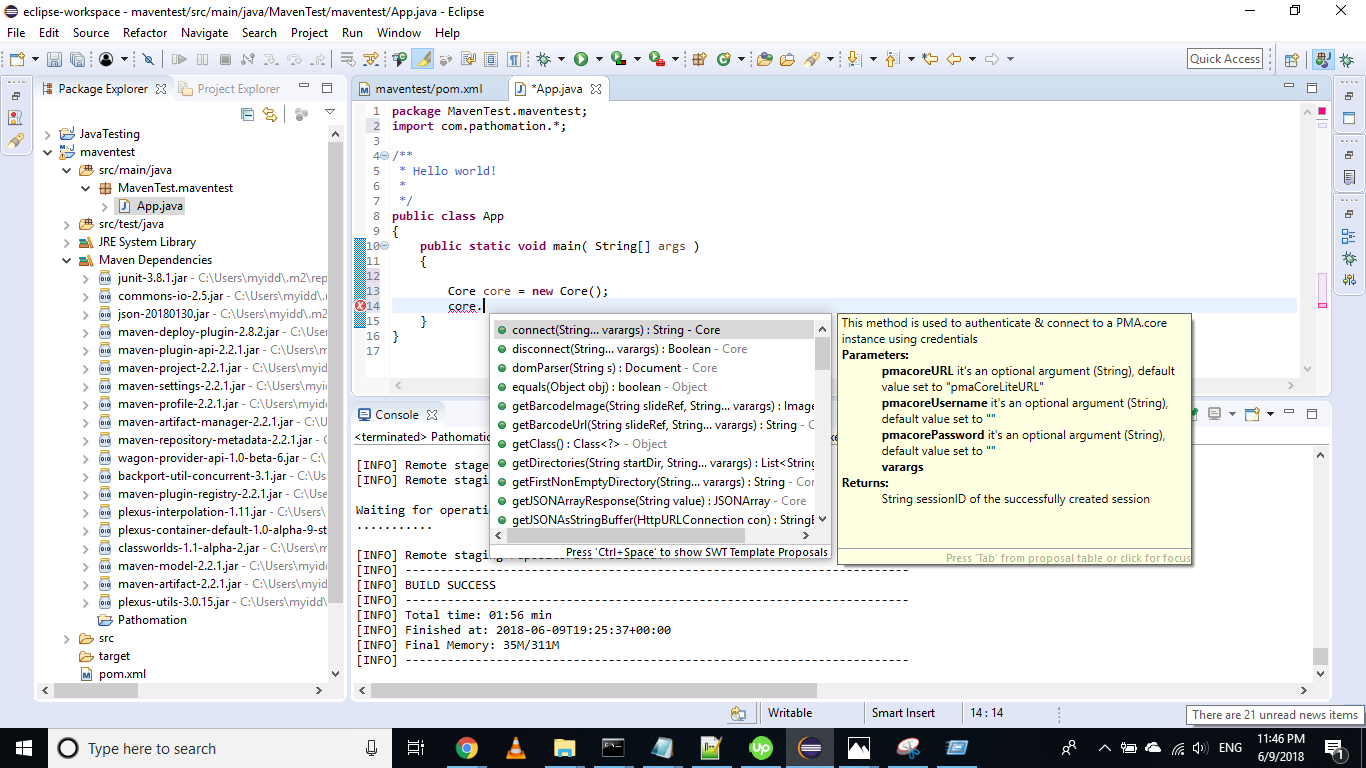
You should then be able to invoke Core methods :
Getting started
What can you do with our Java SDK today? If you have PMA.start installed on your system, you can go right ahead and try out the following code:
import com.pathomation.*;

public class Test {

    public static void main(String[] args) throws Exception {
        if (Core.pmaIsLite()) {
            System.out.print("Congratulations; PMA.start is running on your system");
            System.out.print("You’re running PMA.core.lite version " + core.getVersionInfo());
        } else {
            System.out.print("PMA.start not found. Either you don’t have it installed, or you don’t have the server-component running currently");
            throw new Exception("PMA.start not detected");
        }
    }
}
You can use the same isLite() method by the way to ask your end-user to make sure PMA.start IS running before continuing the script:
import com.pathomation.*;

public class Test {

    public static void main(String[] args) {
        if (Core.pmaIsLite()) {
            System.out.print("PMA.core.lite is NOT running.");
            System.out.print("Make sure PMA.core.lite is running and press <enter> to continue");
            System.in.read();
        }
        if (Core.pmaIsLite()) {
            System.out.print("PMA.core.lite is NOT running.");
            System.exit(1);
        }
    }
}
Slides
Now that you know how to establish the availability of PMA.start as a back-end for whole slide imaging (WSI) data, you can start looking for slides:
import com.pathomation.*;

public class Test {

    public static void main(String[] args) throws Exception {
        if (!Core.pmaIsLite()) {
            throw new Exception("PMA.start not detected");
        }
        // assume that you have slides in C:\my_slides (note the capital C)
        for (String slide : Core.getSlides("C:/my_slides")) {
            System.out.print(slide);
        }
    }
}
But you knew already that you had slides in that folder, of course. By, the way, if NO data shows up, check the specified path. It’s case sensitive, and drive letters have to be capitalized. Also make sure to use a forward slash instead of the more traditional (on Windows at least) backslash.
Now what you probably didn’t know yet is the dimensions of the slide, both in pixels as well as micrometers.
System.out.print("Pixel dimensions of slide:");
Integer xDimPix = Core.getPixelDimensions(slide).get(0),
        yDimPix = Core.getPixelDimensions(slide).get(1);
System.out.print(xDimPix.toString() + " x " + yDimPix.toString());

System.out.print("Slide surface area represented by image:");
Float xDimPhys = Core.getPhysicalDimensions(slide).get(0),
      yDimPhys = Core.getPhysicalDimensions(slide).get(1);
System.out.print(xDimPhys.toString() + "µm x " + yDimPhys.toString() + "µm = ");
System.out.print((xDimPhys * yDimPhys / 1E6) + " mm2");
Below is the output on our computer, having 3 3DHistech MRXS slides in the c:\my_slides folder. You can use this type of output as a sanity check, too.
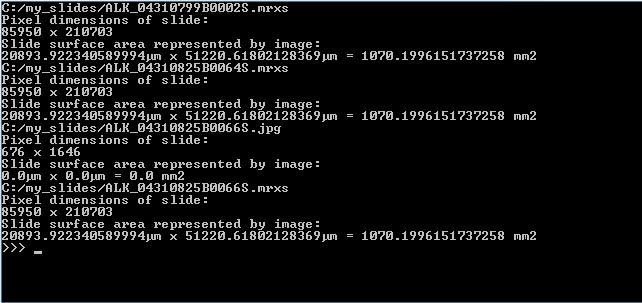
While the numbers in µm seems huge, they start to make more sense once translated to the surface area captured. As a reminder: 1 mm2 = 1,000,000 µm2, which explains why we divide by 1E6 to get the area in mm2. 1020 mm2 still not saying much? Then keep in mind that 100 mm2 equals 1 cm2, and that 10 cm2 can very will constitute a 2 cm x 5 cm piece of tissue. A physical slide’s dimensions are typically 10 cm x 4 cm. Phew, glad the data matches reality!
Determining a slide’s magnification
We can also determine the magnification at which an image was registered. The getMagnification function has a Boolean exact= parameter that works as follows: when set to True, getMagnification will round to the nearest “whole number” magnification that’s typically mentioned on a microscope’s objective lens. This could be 5X, 20X, 40X… But bear in mind that when a microscopist looks through his device, he can fine-focus on a sample, thereby slightly modifying the actual magnification used, perhaps from 40X to 38X (even though the label on the lens still says 40X of course). Scanners work in the same manner; because of auto-focusing, the end-result of a scan may be in 38X instead of 40X, or 21X instead of 20X. And this is the number that is returned when the exact= parameter is set to True.
Of course, when building a Dataframe (using library TableSaw), you might as well include columns for both measurements (perhaps using the rounded measurement later for a classification task):
import java.util.ArrayList;
import java.util.HashMap;
import java.util.Map;

import com.pathomation.*;
import tech.tablesaw;

public class Test {

    public static void main(String[] args) throws Exception {

        if (!Core.pmaIsLite()) {
            throw new Exception("PMA.start not detected");
        }
        // create blank list (to be converted into a pandas DataFrame later)
        List<Map<String, Object>> slideInfos = new ArrayList<Map<String, Object>>();

        //Initialize the components for TableSaw
        StringColumn colSlide = StringColumn.create("slide");
        DoubleColumn colApproxMag = DoubleColumn.create("approxMag");
        DoubleColumn colExactMag = DoubleColumn.create("exactMag");
        BooleanColumn colIsFluo = BooleanColumn.create("isFluo");
        BooleanColumn colIsZStack = BooleanColumn.create("isZStack");
        // assume that you have slides in C:\my_slides (note the capital C)
        for (String slide : Core.getSlides("C:/my_slides")) {
            colSlide.append(Core.getSlideFileName(slide));
            colApproxMag.append(Core.getMagnification(slide, false));
            colExactMag.append(Core.getMagnification(slide, true));
            colIsFluo.append(Core.isFluorescent(slide));
            colIsZStack.append(Core.isZStack(slide));
        }
        Table results = Table.create("Results", colSlide, colApproxMag, colExactMag, colIsFluo, colIsZStack);
        results.print();
    }
}
The output of this script on our computer is as follows:

Note that for one slide, both the exact and the approximate magnification is 0. This is because that particular slide is a .jpg-file, which doesn’t contain any useful (pixels per micron) metadata to use to determine the magnification.
Representation
PMA.start is a free desktop viewer for whole slide images. Earlier, we introduced you to Core java, a novel package that serves as a wrapper-library and helps interface with PMA.start’s back-end API.
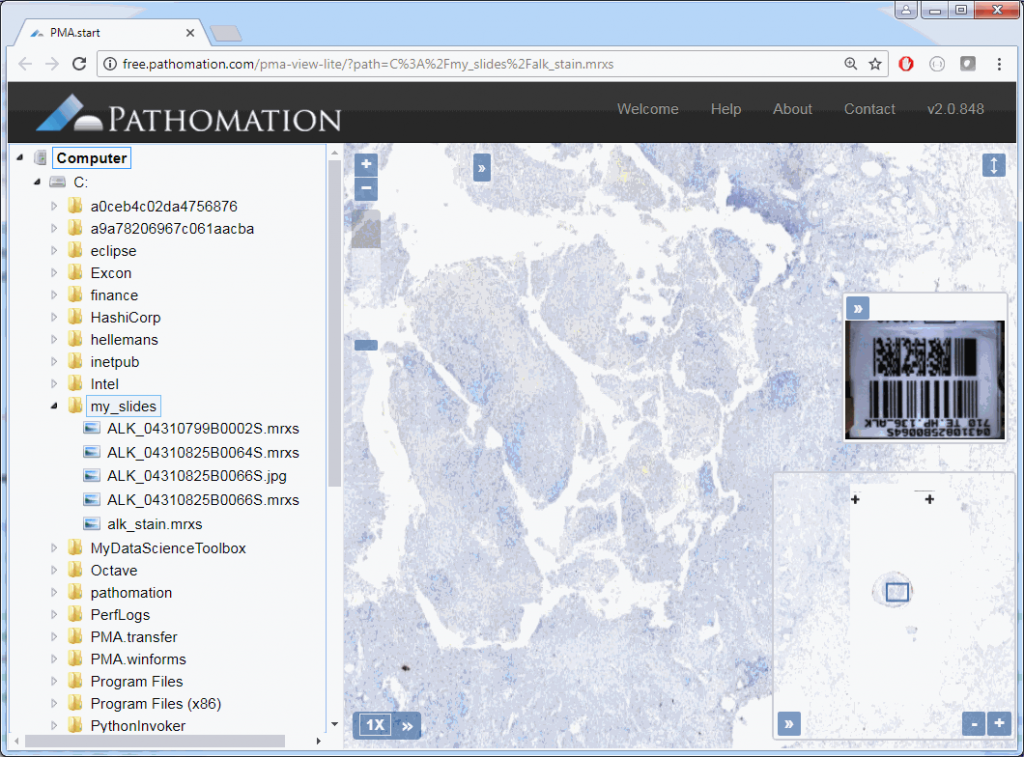
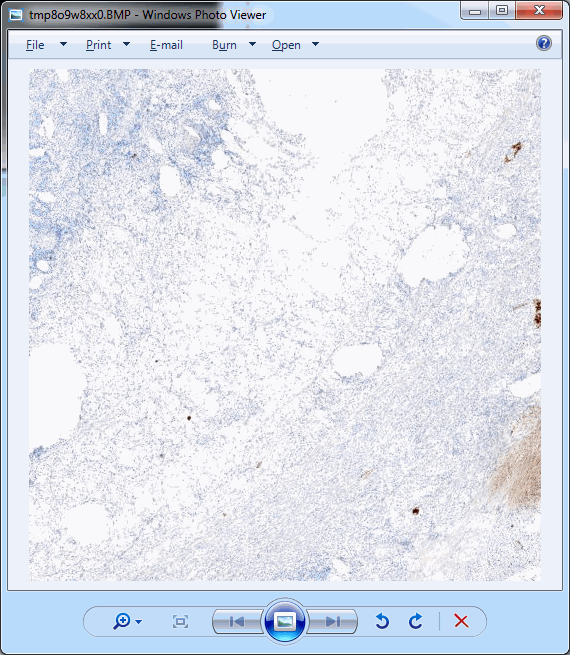
The images PMA.start typically deals with are called whole slide images, so how about we show some pixels? As it turns out, this is really easy. Just invoke the showSlide() call. Assuming you have a slide at c:\my_slides\alk_stain.mrxs, we get:
import Core.java;

public class Test {

    public static void main(String[] args)  {

        String slide = "C:/my_slides/alk_stain.mrxs";
        Core.showSlide(slide);
    }
}
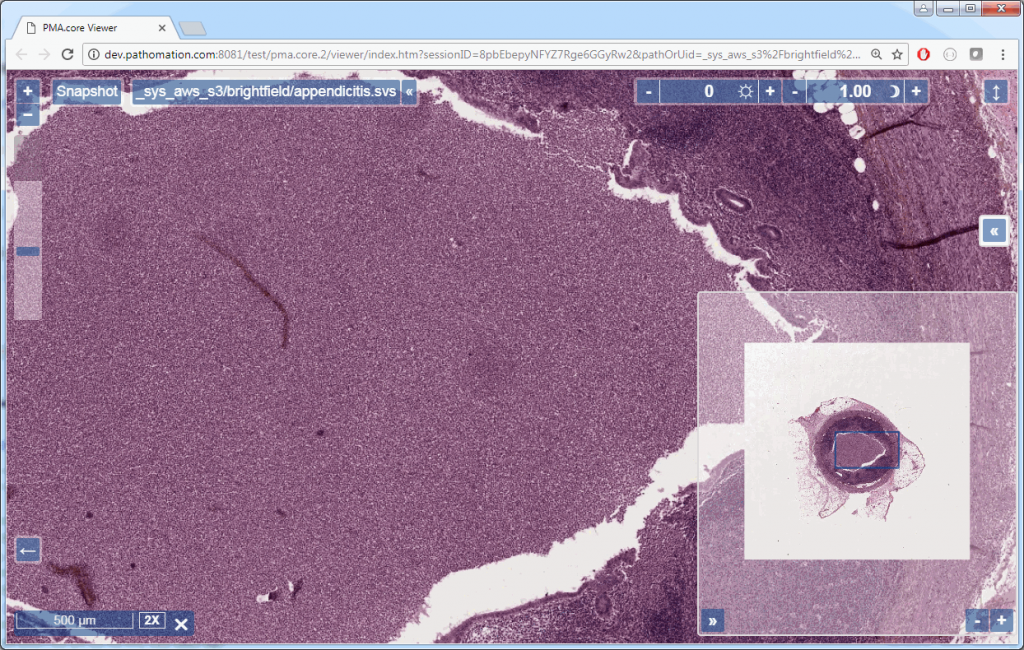
The result depends on whether you’re using PMA.start or a full version of PMA.core. If you’re using PMA.start, you’re taken to the desktop viewer:
If you’re using PMA.core, you’re presented with an interface with less frills: the webbrowser is still involved, but nothing more than scaffolding code around a PMA.UI.View.Viewport is offered (which actually allows for more powerful applications):
Associated images
But there’s more to these images; if you only wanted to view a slide, you wouldn’t bother with Java in the first place. So let’s see what else we can get out of these?
Assuming you have a slide at c:\my_slides\alk_stain.mrxs, you can execute the following code to obtain a thumbnail image representing the whole slide:
import java.awt.BorderLayout;
import java.awt.Image;
import javax.swing.ImageIcon;
import javax.swing.JFrame;
import javax.swing.JLabel;
import javax.swing.JPanel;

import com.pathomation.*;

public class Test {

    public static void main(String[] args) {

        String slide = "C:/my_slides/alk_stain.mrxs";
        Image thumb = Core.getThumbnailImage(slide);
        displayImage(thumb);
    }

    public static void displayImage(Image image) {
        JFrame frame = new JFrame();
        JLabel lblImage = new JLabel(new ImageIcon(image));
        JPanel mainPanel = new JPanel(new BorderLayout());
        mainPanel.add(lblImage);
        frame.add(mainPanel);
        frame.setVisible(true);
    }
}
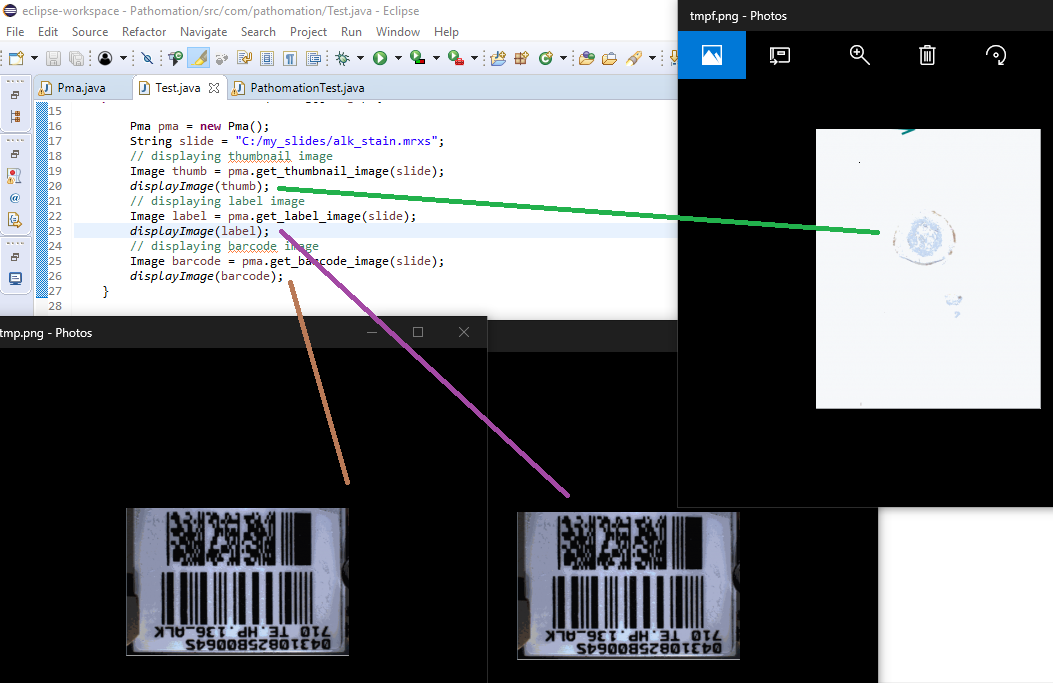
But this thumbnail presentation alone doesn’t give you the whole picture. You should know that a physical glass slide usually consists of two parts: the biggest part of the slide contains the specimen of interest and is represented by the thumbnail image. However, near the end, a label is usually pasted on with information about the slide: the stain used, the tissue type, perhaps even the name of the physician. More recently, oftentimes the label has a barcode printed on it, for easy and automated identification of a slide. The label is therefore sometimes also referred to as “barcode”. Because the two terms are used so interchangeably, we decided to support them in both forms, too. This makes it easier to write code that not only syntactically makes sense, but also applies semantically in your work-environment.
A systematic representation of a physical glass slide can then be given as follows:

The Core java library then has three methods to obtain slide representations, two of which are aliases of one another:
core.getThumbnailImage() returns the thumbnail image
core.getLabelImage() returns the label image
core.getBarcodeImage() is an alias for getLabelImage
All of the above methods return PIL Image-objects. It actually took some discussion to figure out how to package the data. Since the SDK wraps around an HTTP-based API, we settled on representing pixels through Pillows. Pillows is the successor to the Python Image Library (PIL). The package should be installed for you automatically when you obtained Core java.
The following code shows all three representations of a slide side by side:
import java.awt.BorderLayout;
import java.awt.Image;
import javax.swing.ImageIcon;
import javax.swing.JFrame;
import javax.swing.JLabel;
import javax.swing.JPanel;

import com.pathomation.*;

public class Test {

    public static void main(String[] args) {

        String slide = "C:/my_slides/alk_stain.mrxs";
        // displaying thumbnail image
        Image thumb = Core.getThumbnailImage(slide);
        displayImage(thumb);
        // displaying label image
        Image label = Core.getLabelImage(slide);
        displayImage(label);
        // displaying barcode image
        Image barcode = Core.getBarcodeImage(slide);
        displayImage(barcode);
    }

    public static void displayImage(Image image) {
        JFrame frame = new JFrame();
        JLabel lblImage = new JLabel(new ImageIcon(image));
        JPanel mainPanel = new JPanel(new BorderLayout());
        mainPanel.add(lblImage);
        frame.add(mainPanel);
        frame.setVisible(true);
    }
}
The output is as follows:
Note that not all WSI files have label / barcode information in them. In order to determine what kind of associated images there are, you can inspect a SlideInfo dictionary first to see what’s available:
Map<String, Object> info = Core.getSlideInfo(slide);
System.out.print(Collections.singletonList((HashMap<String, Object>) info.get("AssociatedImageTypes")));
AssociatedImageTypes may refer to more than thumbnail or barcode images, depending on the underlying file format. The most common use of this function is to determine whether a barcode is included or not.
You could write your own function to determine whether your slide has a barcode image:
protected Boolean slideHasBarcode(String slide) {
    Map<String, Object> info = Core.getSlideInfo(slide);
    return ((HashMap<String, Object>) info.get("AssociatedImageTypes")).keySet().contains("barcode");
}
Whole Slide Images
If you already know about pyramidical image files, feel free to skip this paragraph. If you don’t, sticks around; it’s important to understand how microscopy data coming out of slide scanners is structured to be able to manipulate it.
It all starts with a physical slide: a physical slide is a thin piece of glass, with the dimensions
When a physical slide is registered in a digital fashion, it is translated into a 2-dimensional pixel matrix. At a 40X magnification, it takes a grid of4 x 4 pixels to represent 1 square micrometer. We can also say that the image has a resolution of 0.25 microns per pixel. This is also expressed as 4 pixels per micron (PPM).
All of this means that in order to present our 5 cm x 2 cm physical specimen from the first part of this tutorial series in a 40X resolution we need (5 * 10 * 1000 * 4) * (2 * 10 * 1000 * 4) = 200k x 80k = 16B pixels
Now clearly that image is way too big to load in memory all at once, and even with advanced compression techniques, the physical sizes of these is roughly around one gigabyte per slide. So what people have thought of is to package the image data as a pyramidal stack.
Ok, perhaps not that kind of pyramid…
But you can imagine a very large image being downsampled a number of times until it receives a manageable size. You just keep dividing the number of pixels by two, and eventually you get a single image that still represents the whole slide, but is only maybe 782 x 312 pixels in size. This then becomes the top of your pyramid and we label it as zoomlevel 0.
At zoomlevel 1, we get a 1562 x 624 pixel image etc. It turns out that our original image of 200k x 80k pixels is found at zoomlevel 8. Projected onto our pyramid, we get something like this:
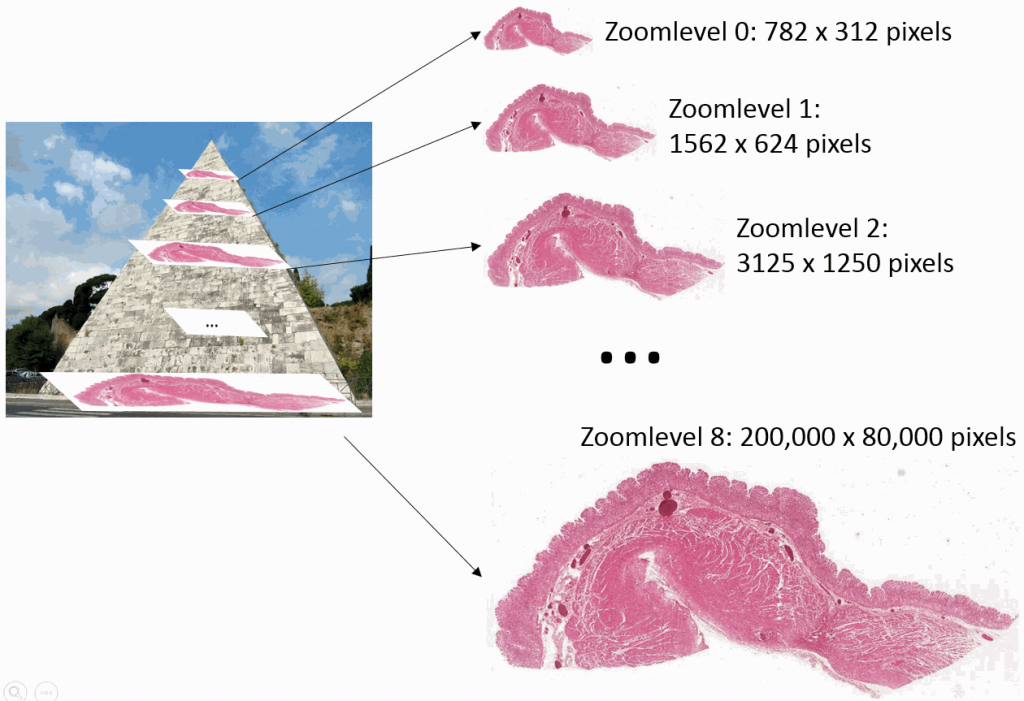
So the physical file representing the slide doesn’t just store the high-resolution image, it stored a pyramidal stack with as many zoomlevels as needed to reach the deepest level (or highest resolution). The idea is that depending on the magnification that you want to represent on the screen, you read data from a different zoomlevel.
Tiles
The pyramid stack works great up to certain resolution. But pretty quick we get into trouble and the images become too big once again to be shown in one pass. And of course, that is eventually what we want to do: Look at the images in their highest possible detail.
In order to work around this problem, the concept of tiles is introduced. The idea is that at each zoomlevel, a grid overlays the image data, arbitrarily breaking the image up in tiles. This leads to a representation like this:
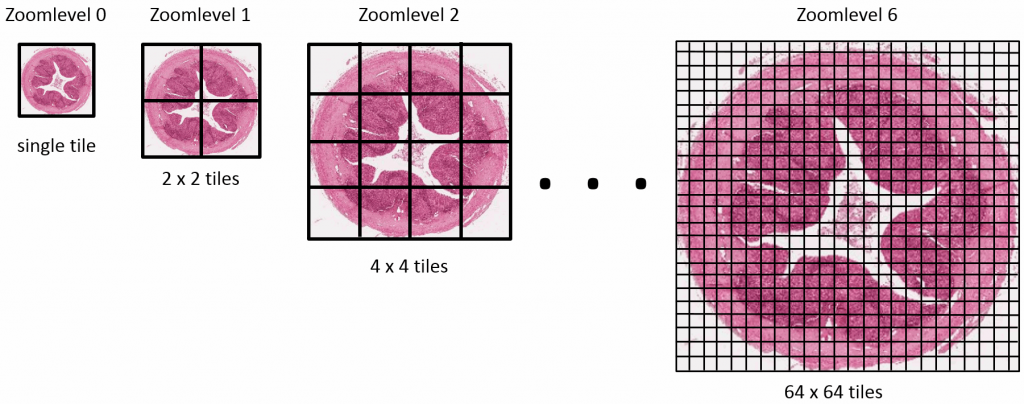
Now, for any area of the slide that we want to display at any given time to the end-user, we can determine the optimal zoomlevel to select from, as well a select number of tiles that are sufficient to show the desired “field of view”, rather than asking the user to wait to download the entire (potentially huge!) image. This goes as follows:
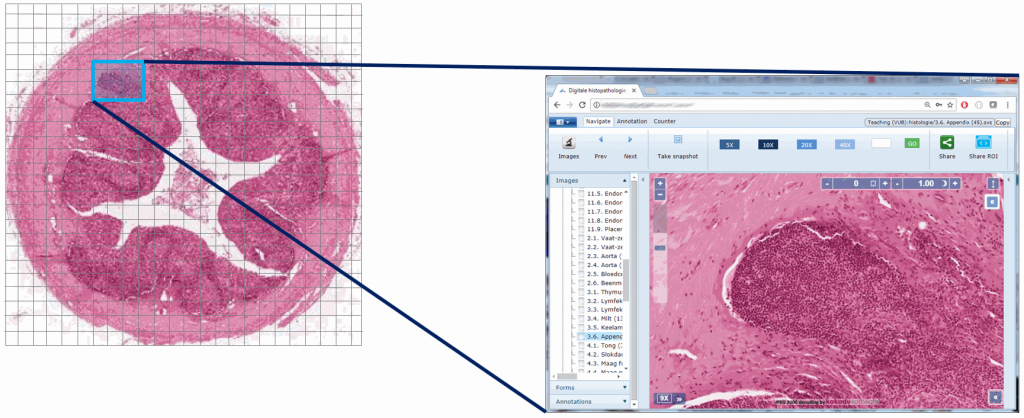
Or, put the other way around (from the browser’s point of view):
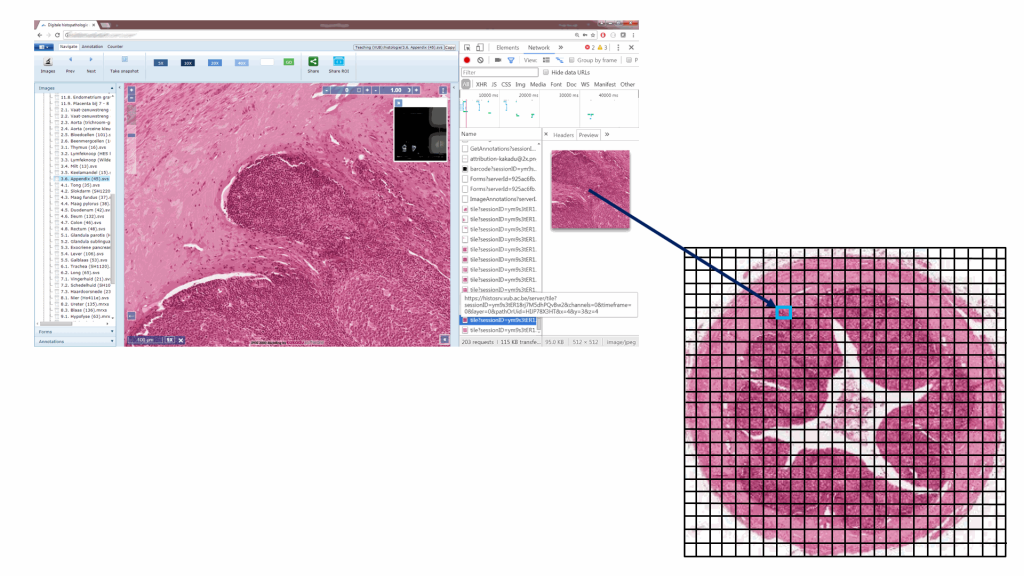
So there you have it: whole slide images are nothing but tiled pyramid-shaped stacks of image data.
Tiles in PMA.start
We can access individual tiles within the tiled stack using PMA.start, but before we do that we should first look some more at a slide’s metadata.
We can start by making a table of all zoomlevels the tiles per zoomlevel, along with the magnification represented at each zoomlevel (using library TableSaw) :
import java.util.ArrayList;
import java.util.Collections;
import java.util.HashMap;

import com.pathomation.*;
import tech.tablesaw;

public class Test {

    public static void main(String[] args) {

        List<Map<String, Object>> levelInfos = new ArrayList<Map<String, Object>>();
        String slide = "C:/my_slides/alk_stain.mrxs";
        List<Integer> levels = Core.getZoomLevelsList(slide);
        //Initialize the components for TableSaw
        DoubleColumn colResX = DoubleColumn.create("resX");
        DoubleColumn colResY = DoubleColumn.create("resY");
        DoubleColumn colTilesX = DoubleColumn.create("tilesX");
        DoubleColumn colTilesY = DoubleColumn.create("tilesY");
        DoubleColumn colApproxMag = DoubleColumn.create("approxMag");
        DoubleColumn colExactMag = DoubleColumn.create("exactMag");
        for (int lvl : levels) {
            int resX = Core.getPixelDimensions(slide, lvl).get(0);
            int resY = Core.getPixelDimensions(slide, lvl).get(1);
            List<Integer> tilesXyz = Core.getNumberOfTiles(slide, lvl);
            colResX.append(resX);
            colResY.append(resY);
            colTilesX.append(tilesXyz.get(0));
            colTilesY.append(tilesXyz.get(1));
            colApproxMag.append(Core.getMagnification(slide, lvl, false));
            colExactMag.append(Core.getMagnification(slide, lvl, true));
        }
        System.out.print(slide);
        Table results = Table.create("Results", colResX, colResY, colTilesX, colTilesY, colApproxMag, colExactMag);
        results.print();
    }
}
The result for our alk_stain.mrxs slide looks as follows:
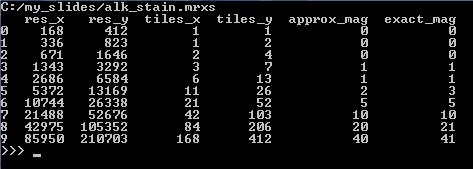
Now that we have an idea of the number of zoomlevels to expect and how many tiles there are at each zoomlevel, we can request an individual tile easily. Let’s say that we wanted to request the middle tile at the middle zoomlevel:
import java.awt.BorderLayout;
import java.awt.Image;
import java.util.ArrayList;
import javax.swing.ImageIcon;
import javax.swing.JFrame;
import javax.swing.JLabel;
import javax.swing.JPanel;

import com.pathomation.*;

public class Test {

    public static void main(String[] args) {

        String slide = "C:/my_slides/alk_stain.mrxs";
        List<Integer> levels = Core.getZoomLevelsList(slide);
        int lvl = levels.get((int) (levels.size() / 2));
        List<Integer> tilesXyz = Core.getNumberOfTiles(slide, lvl);
        int x = (int) (tilesXyz.get(0) / 2);
        int y = (int) (tilesXyz.get(1) / 2);
        Image tile = Core.getTile(slide, x, y, lvl);
        displayImage(tile);
    }

    public static void displayImage(Image image) {
        JFrame frame = new JFrame();
        JLabel lblImage = new JLabel(new ImageIcon(image));
        JPanel mainPanel = new JPanel(new BorderLayout());
        mainPanel.add(lblImage);
        frame.add(mainPanel);
        frame.setVisible(true);
    }
}
This should pop up a single tile:
.Ok, perhaps not that impressive.
In practice, you’ll typically want to loop over all tiles in a particular zoomlevel. The following code will show all tiles at zoomlevel 1 (increase to max_zoomlevel at your own peril):
List<Integer> tileSz = Core.getNumberOfTiles(slide, 1); // zoomlevel 1
IntStream.range(0, tileSz.get(0)).forEach(xTile -> {
    IntStream.range(0, tileSz.get(1)).forEach(yTile -> {
        Image tile = Core.getTile(slide, xTile, yTile, 1);
        displayImage(tile);
    });
});
The advantage of this approach is that you have control over the direction in which tiles are processed. You can also process row by row and perhaps print a status update after each row is processed.
However, if all you care about is to process all rows left to right, top to bottom, you can opt for a more condensed approach:
for (Image tile : Core.getTiles(slide, tileSz.get(0), tileSz.get(1), 4) {
    //converting the image into N-Dimensional Array
}
The body of the for-loop now processes all tiles at zoomlevel 4 one by one and converts them into an array structure, ready for image processing to occur, e.g. through opencv.