
It’s a question people ask us all the time: How can I upload my slides to PMA.core? And usually we tell them: you don’t. You put the slides somewhere, point PMA.core to it by means of a root-directory, and that’s it: it’s the DP/WSI equivalent of What you see if what you get (WYSIWYG).
Sometimes this is insufficient. “But how can we still upload them?” is asked next, after we explain the concept of root-directories, mounting points, and other technicalities.
To be clear: Pathomation’s PMA.core tile server is NOT like the others: there is no registration mechanism, or upload procedure to follow. You really do drop your files off in a folder, and that’s it.
But it’s the dropping off that can be misconstrued as an “upload” procedure in itself. Instead, we prefer the term “transfer” instead. It’s also why we names one of our helper programs for this PMA.transfer.
Procedure
There are two scenario whereby slidetransfer is particularly relevant:
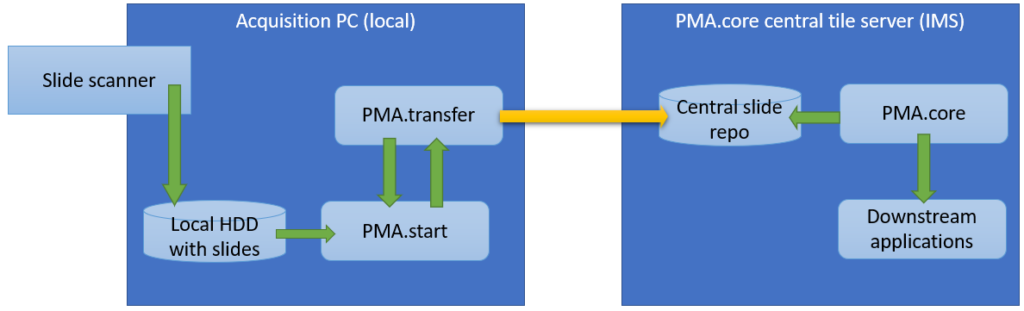
Within an organization, slide acquisition occurs on one computer, whereas the IMS solution runs on a centralized server. The challenge is to get the slides from the original acquisition PC to the central IMS (PMA.core tile server). The upload (or transfer) operation required is highlighted with the yellow arrow in the diagram below:
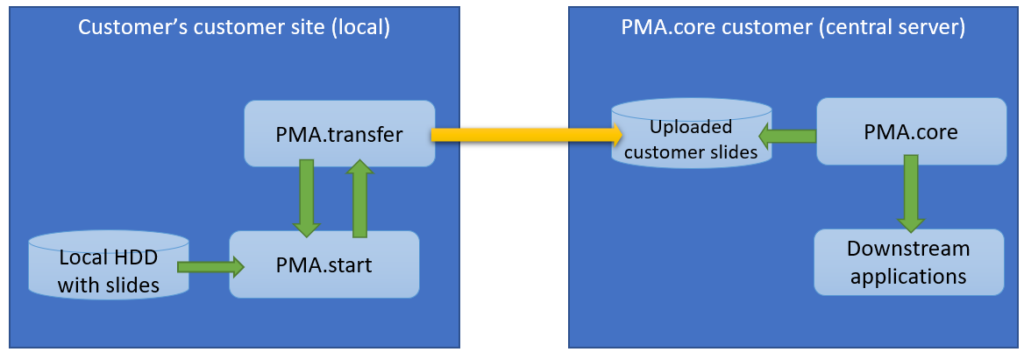
The second procedure is a variation of this; a PMA.core tile server customer has his own customers that want to transfer slides to a central repository for things like quality control or AI algorithms.
The scenario changes only a little and it’s mostly a matter of labels:
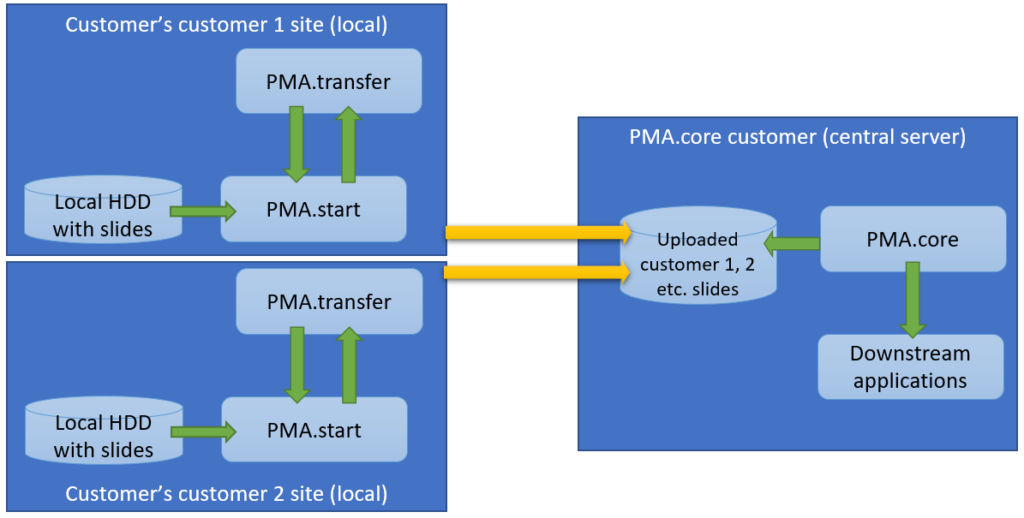
The latter is also known as a multi-tenant scenario. It’s possible to imagine for something like this to happen:
In the diagrams above we illustrate manual flow with PMA.transfer, but once this process becomes repetitive, it can be further automated by combining operating system functionality along with PMA.core SDK methods.
In this article, we present how to automate uploading your slides from the slide scanner PC to your PMA.core server (the first scenario).
Let’s have a look at how this could work in a Microsoft Windows environment.
File system auditing
The first step is to enable auditing to record when a user puts a new file in the folder you want to track. This user can be “Everyone” or a specific user, like the user that the slide scanner uses to output the digital slides.
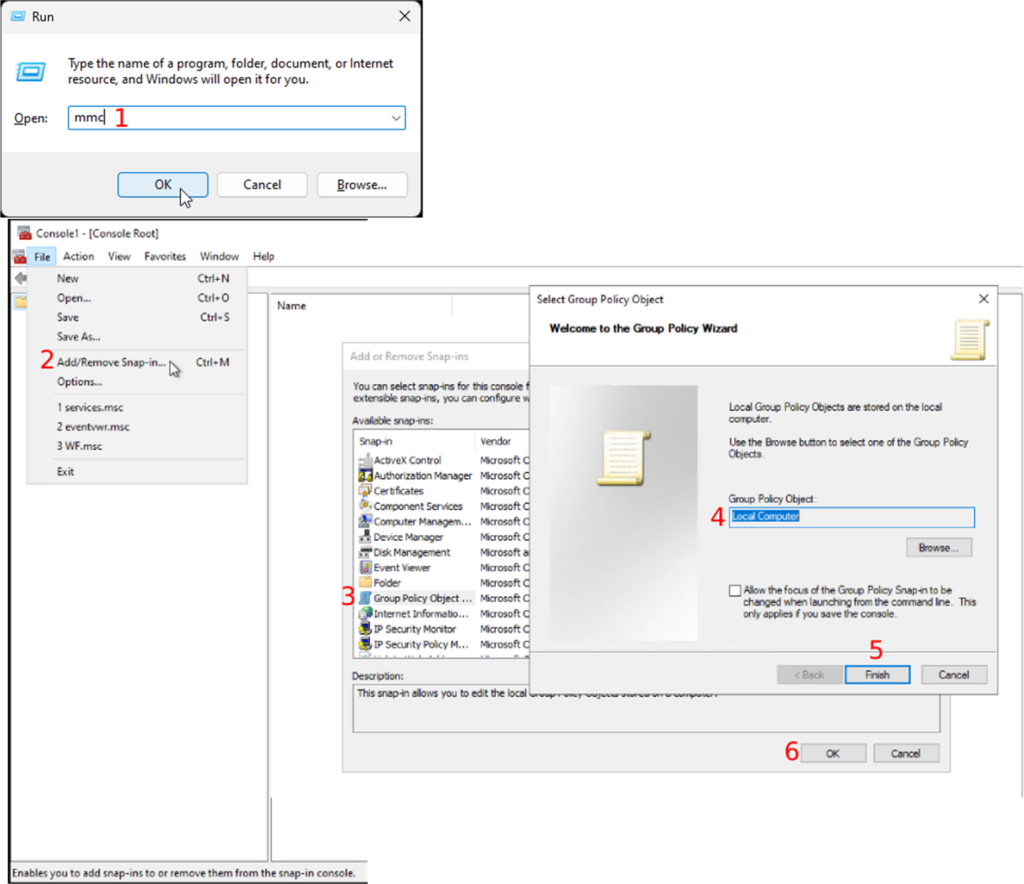
- Open the “Run” program using the shortcut “WIN + R”
- Enter “mmc” to open the Management console (Fig.1-1).
- Once the Management console is open, you will follow “File → Add/Remove Snap-in”
- Double-click on “Group Policy Object” in the “Available snap-ins” section
- Choose “Local Computer” as the “Group Policy Object”
- Continue by clicking on the “Finish” button
- Followed by the “OK” button
Continue on with the following steps:
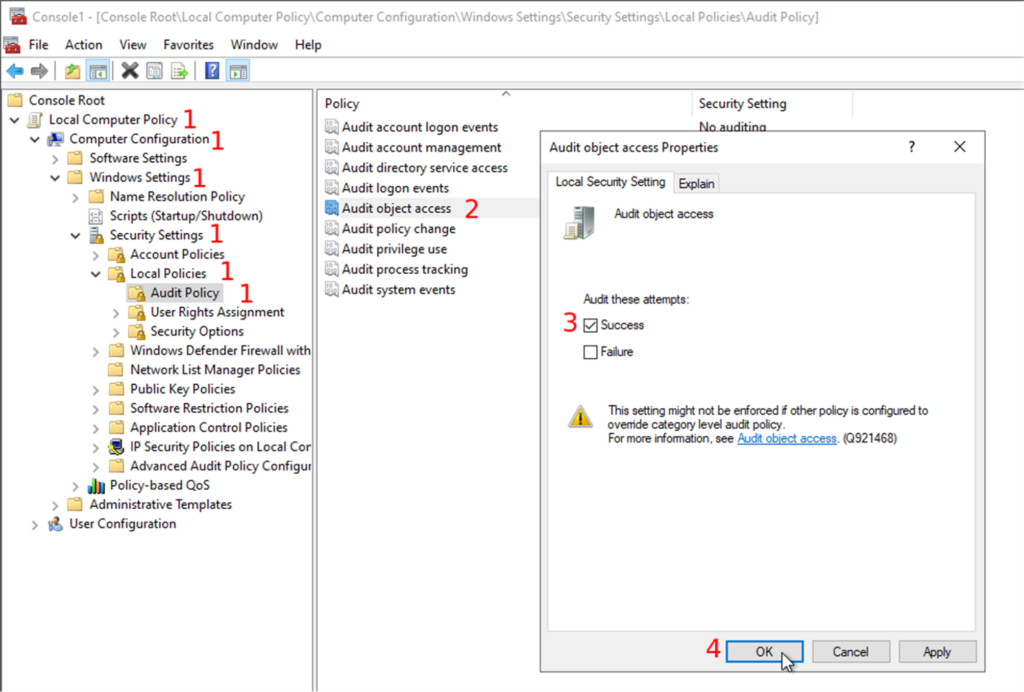
- Expand the “Local Computer Policy” and follow “Computer Configuration → Windows Settings → Security Settings → Local Policies → Audit Policy”
- Then, you will double-click on the object access audit in the list of audit policies
- Check the successful attempts checkbox in the properties window.
- You can also audit the failed attempts to do some error handling, but we will only focus on the successful attempts in this post.
- Confirm your changes by clicking on the “OK” button
Now that you have the configuration correctly set up, you can enable audit trailing on the folder that you want to track (in other words: the folder where your whole slide images will be deposited).
- Go to the folder you want to track; this could be the folder where the slide scanner outputs the digital slides.
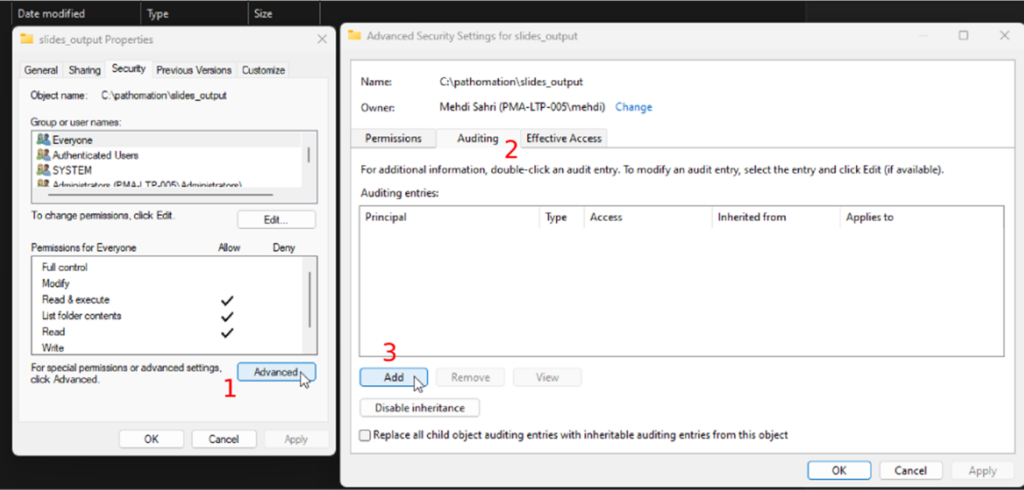
- Open the folder’s properties and the advanced security settings under the “Security” tab
- Next, you will open the “Auditing” tab
- Click on the “Add” button
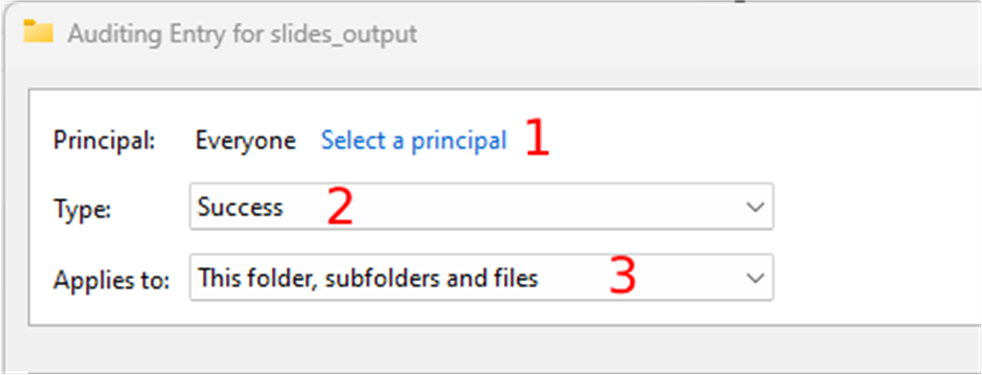
Next you can select the user that you want to track:
- Click on the “select a principal” link. This user can be “Everyone” or a specific user, like the user that the slide scanner uses to output the digital slides.
- Select the success type in the “Type” dropdown, and
- Choose the “This folder, subfolders, and files” option in the “Applies” dropdown
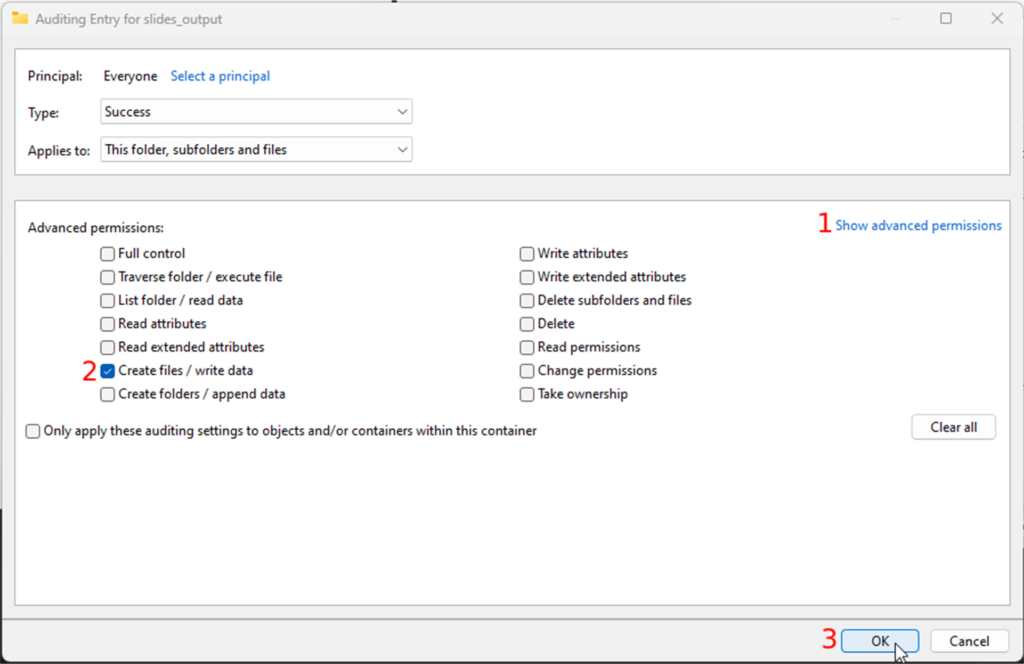
- Click on the “show advanced permissions” link in the permissions section and
- make sure only the “Create files / write data” checkbox is checked
- Confirm your changes by clicking all the OK buttons until the properties window closes
Congratulations; you will now be notified every time a new file (slide) is dropped in the folder.
The upload script
Let’s create the upload script. This script will be triggered to upload the slides to your PMA.core. Find the whole script at the end of this post.
First, you will import the needed packages. The only third-party package is the pathomation package. You can get it by running the “pip install pma_python” command in the command prompt.
There are three modules/packages used:
- os: This module will be used to perform file system actions.
- time: This module will be used to create timestamps, etc.
- pma_python: This package will be used to communicate with your PMA.core server.
The script uses timestamps, so only the recently added files get uploaded. First, it will check if the “date.txt” file exists and create it if it doesn’t. The “date.txt” file contains the timestamp of the last time the script ran. It gets read if it already exists. It gets created if it doesn’t exist, and the current timestamp gets written into it:
if os.path.exists(r"./date.txt"):
    last_timestamp = open('./date.txt','r')
    timestamp = last_timestamp.readlines()
    time.sleep(1)
    now = str(time.time())
    if timestamp[0] < now:
        print(timestamp[0] + ' ~ ' + now)
        last_timestamp = open('./date.txt','w')
        last_timestamp.write(now)
        check_connection(timestamp[0])
else:
    now = str(time.time())
    last_timestamp = open('./date.txt','w')
    last_timestamp.write(now)
    check_connection(5.5)

last_timestamp.close()
Once “date.txt” gets read or created, the “check_connection” function gets called with the timestamp or a low float number as the “last_trigger” argument. In this example, you will see that the “low float number” is “5.5”. This low float number ensures that the files in the folder get uploaded if the “date.txt” file does not exist.
The “check_connection” function checks if PMA.start is running and if you have a valid session id. If they are both true, the “last_trigger” argument gets passed to the “upload_files” function. You can expand the “check_connection” function to automatically run PMA.start, try other credentials, send emails, etc.
def check_connection(last_trigger):
    sessionID = core.connect('https://snapshot.pathomation.com/PMA.core/3.0.1', 'pma_demo_user', 'pma_demo_user')

    if core.is_lite() and sessionID is not None:
        print("PMA.start is running")
        upload_files(sessionID, last_trigger)
    else:
        print("PMA.start is not running")
        input("Press Enter to continue...")
In the “upload_files” function, you check and upload the recently added files to your PMA.core.
<code class="python"><pre>
supported_files = [".jpeg", ".jpg", ".jp2", ".png", ".vsi", ".dzi", ".vms", ".ndpi", ".ndpis", ".dcm", ".mrxs", ".svs", ".afi", ".cws", ".scn", ".lif", "DICOMDIR", ".zvi", ".czi", ".lsm", ".tf2", ".tf8", ".btf", ".ome.tif", ".nd2", ".tif", ".svslide", ".ini", ".mds", ".zif", ".szi", ".sws", ".qptiff", ".tmap", ".jxr", ".kfb", ".jp2", ".isyntax", ".rts", ".rts", ".bif", ".zarr", ".tiff", ".mdsx", ".oir"]
…
def upload_files(sessionID, last_trigger):
    list_content = os.listdir(os.getcwd())

    for list_item in list_content:
        if os.path.isfile(list_item):
            root, ext = os.path.splitext(list_item)
            if ext in supported_files:
                creation_file = os.path.getctime(list_item)
                if float(last_trigger) < creation_file:
                    print('Uploading S3...')
                    core.upload(os.path.abspath(list_item), "_sys_aws_s3/testing_script", sessionID, True)
            else:
                print(list_item, 'is not supported')
</pre></code>
First, all the objects i.e. files and directories in the tracked folder, get put into the “list_content” array. A for loop loops over all the items and performs a couple of checks to get the recently added files. The first check checks if the item in the “list_content” array is a file. This blocks directories from being uploaded.
list_content = os.listdir(os.getcwd())

    for list_item in list_content:
        if os.path.isfile(list_item):
Next, the file path gets split into 2 parts: The file’s root and the file’s extension. The file’s extension gets compared with the “supported_files” array to ensure that only supported files get uploaded to your PMA.core.
supported_files = [".jpeg", ".jpg", ".jp2", ".png", ".vsi", ".dzi", ".vms", ".ndpi", ".ndpis", ".dcm", ".mrxs", ".svs", ".afi", ".cws", ".scn", ".lif", "DICOMDIR", ".zvi", ".czi", ".lsm", ".tf2", ".tf8", ".btf", ".ome.tif", ".nd2", ".tif", ".svslide", ".ini", ".mds", ".zif", ".szi", ".sws", ".qptiff", ".tmap", ".jxr", ".kfb", ".jp2", ".isyntax", ".rts", ".rts", ".bif", ".zarr", ".tiff", ".mdsx", ".oir"]
…
root, ext = os.path.splitext(list_item)
            if ext in supported_files:
The last check compares the “created on” timestamp of the file with the “last_trigger” argument that got passed on from the “check_connection” function. The upload starts if the “created on” timestamp is bigger than the “last_trigger” argument using the “core.upload()” function. The arguments of the “core.upload()” function are:
- local_source_slide: This is the absolute path of the file.
- target_folder: This is the PMA.core folder you want to upload to.
- target_pma_core_sessionID: This is the session id you created in the “check_connection” function.
- callback=None: This argument will print the default progress of the upload if set to True. You can also pass a custom function that will be called on each file upload. The signature for the callback is “callback(bytes_read, bytes_length, filename)”.
creation_file = os.path.getctime(list_item)
                if float(last_trigger) < creation_file:
                    print('Uploading S3...')
                    core.upload(os.path.abspath(list_item), "_sys_aws_s3/testing_script", sessionID, True)
Save the script and put it in the track folder.
Create a scheduled task
In this last step, you will create a scheduled task in the Task Scheduler to run the script when the scanner outputs the digital slides in the track folder.
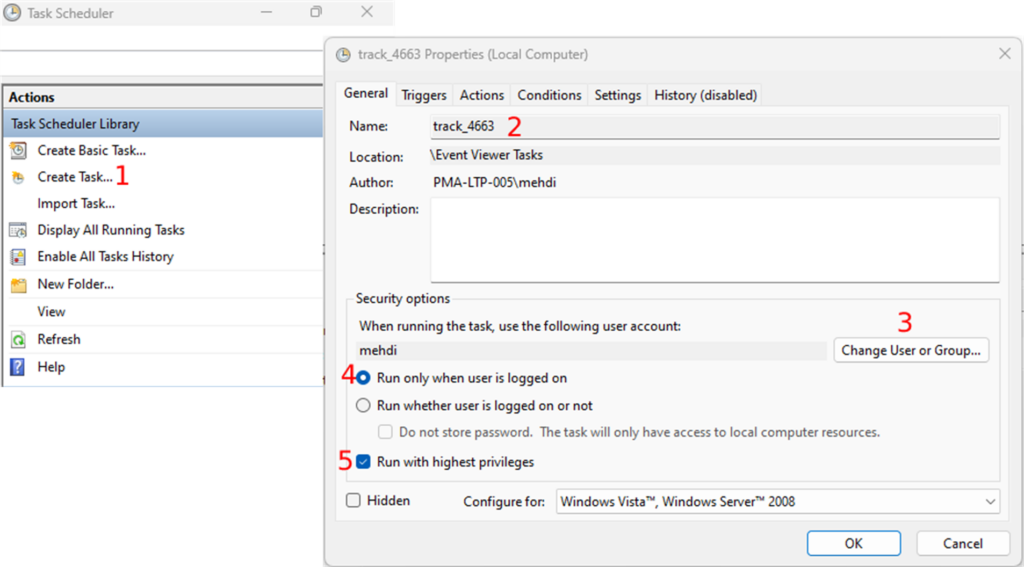
- Open the Task Scheduler and click on “Create Task” in the “Actions” section
- Under the “General” tab, enter the name of the task and
- Choose a user in the “Security options” section. You do this by clicking on the “Change User or Group” button (Fig.6-3). This is the slide scanner user that outputs the digital slides in the track folder. You can keep the default user if the current user stays logged on.
- Next, you will select the “Run only when user is logged on” radio button (Fig.6-4) and
- Check the “Run with highest privileges” checkbox (Fig.6-5).
Under the “Triggers” tab, you can now create the task’s trigger by clicking on the “New” button:
- In the “Begin the task” dropdown, you will select what the trigger will listen to.
- You will choose the “On an event” option, and
- Select the “Custom” radio button.
- Click on the “New Event Filter” button, and
- Go to the “XML” tab. Under the “XML” tab, you will check the “Edit query manually” checkbox

Paste the following XPath code:
<QueryList>
  <Query Id="0" Path="Security">
    <Select Path="Security">
            *[System[(EventID='4663')]]
    and
       *[EventData[Data[@Name='AccessMask']and(Data='0x2')]]
    and
       *[EventData[Data[@Name='ProcessName']and(Data='C:\Windows\explorer.exe')]]
</Select>
  </Query>
</QueryList>
Confirm all your changes by clicking on the OK button until you get to the “Create Task” window.
The next tab is “Actions”. The task will perform this action when the event occurs. The action here is running the script in the track folder. To create an action you
- Click on the “New” button and
- Select “Start a program” in the “Action” dropdown
- In the “Settings” section, you will browse the python executable which should be in "C:\Program Files\Python311\python.exe", and
- In the “Add arguments” field you will enter the name of the script with the “.py” extension.
- Finally, you enter the path of the track folder in the “Start in” field and
- Confirm your changes by clicking the OK button.

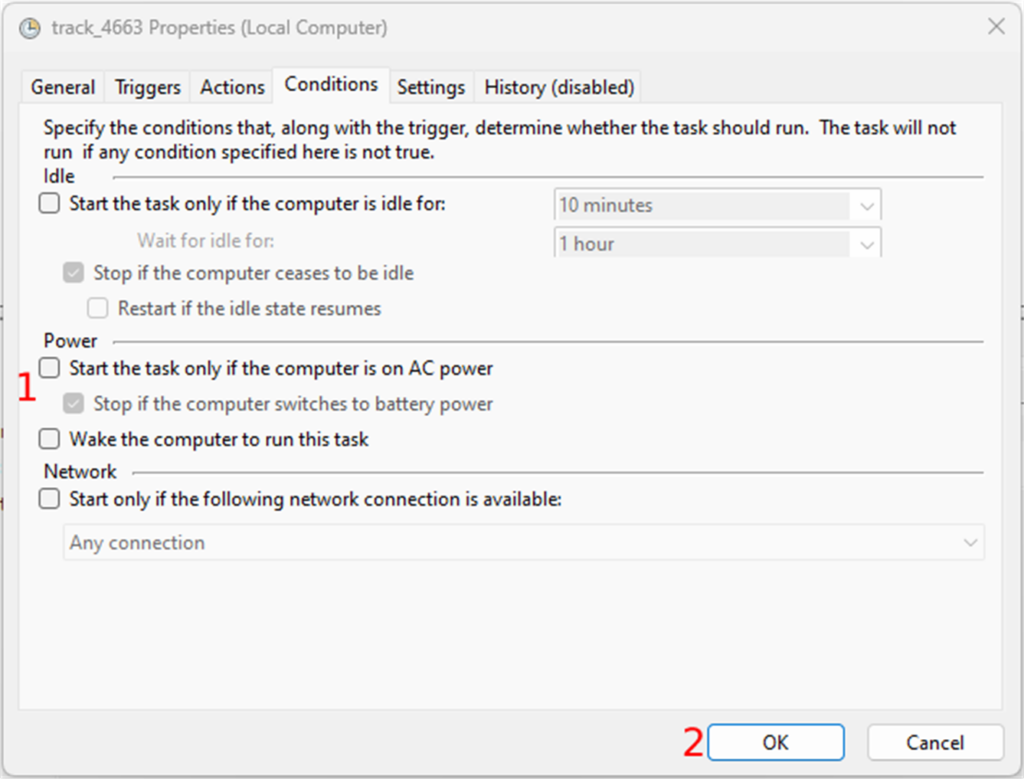
The second to last tab is “Conditions”. The only thing you need to do here is to uncheck all the checkboxes in the “Power” section
Finally, you can create the task by clicking on the “OK” button. You can test the task by selecting the task and clicking on “Run” in the “Selected Item” section. This should run the script in the track folder.
The full script:
import os
import time
from pma_python import core

supported_files = [".jpeg", ".jpg", ".jp2", ".png", ".vsi", ".dzi", ".vms", ".ndpi", ".ndpis", ".dcm", ".mrxs", ".svs", ".afi", ".cws", ".scn", ".lif", "DICOMDIR", ".zvi", ".czi", ".lsm", ".tf2", ".tf8", ".btf", ".ome.tif", ".nd2", ".tif", ".svslide", ".ini", ".mds", ".zif", ".szi", ".sws", ".qptiff", ".tmap", ".jxr", ".kfb", ".jp2", ".isyntax", ".rts", ".rts", ".bif", ".zarr", ".tiff", ".mdsx", ".oir"]

def check_connection(last_trigger):
    sessionID = core.connect('pma_core_url’, 'pma_core_username', 'pma_core_pw')

    if core.is_lite() and sessionID is not None:
        print("PMA.start is running")
        upload_files(sessionID, last_trigger)
    else:
        print("PMA.start is not running")
        input("Press Enter to continue...")

def upload_files(sessionID, last_trigger):
    list_content = os.listdir(os.getcwd())

    for list_item in list_content:
        if os.path.isfile(list_item):
            root, ext = os.path.splitext(list_item)
            if ext in supported_files:
                creation_file = os.path.getctime(list_item)
                if float(last_trigger) < creation_file:
                    print('Uploading S3...')
                    core.upload(‘local_source_slide’, ‘target_folder’, ‘target_pma_core_sessionID’, callback=None)
            else:
                print(list_item, 'is not supported')


if os.path.exists(r"./date.txt"):
    last_timestamp = open('./date.txt','r')
    timestamp = last_timestamp.readlines()
    time.sleep(1)
    now = str(time.time())
    if timestamp[0] < now:
        print(timestamp[0] + ' ~ ' + now)
        last_timestamp = open('./date.txt','w')
        last_timestamp.write(now)
        check_connection(timestamp[0])
else:
    now = str(time.time())
    last_timestamp = open('./date.txt','w')
    last_timestamp.write(now)
    check_connection(5.5)

last_timestamp.close()
Conclusion
In this article we looked at how you can gradually convert manual slide transfer workflows over to automated ones.
After you implement the steps and code from this program, you will be able to deposit slides in an audit-trailed folder on your hard disk, and subsequently be transferred to your PMA.core tile server (for testing purposes these can even reside on the same machine).
We wrote the code in this article from the point of view of Microsoft Windows, and we used the Python scripting language as glue. But other combinations are possible. Let us know if there's a particular scenario that you would like to see explored in a follow-up article.
Key to this procedure is the SDK's Core.upload() method. This is really where all the magic happens. In a subsequent article, it is our intention to offer a comparison look between how this particle method (and its Core.download() counterpart) functions in each of the respective language platforms we support: Python, Java, and PHP.