De-Identification and procedures to increase data privacy

This is a follow-up blog post. If you missed the first part, you can read it here: WSIs and pseudonymization.

De-identification

De-identification, is a term used for any process of reducing personal information, aiming at increasing personal privacy and data compliance. For example, pseudonymization is a de-identification procedure, further de-identification steps may lead to anonymization.

Pseudonymization

Essentially, pseudonymization consists in the replacement of direct identifiers by a pseudonym. It permits the WSI to be traced back to the patient as it is often needed in the clinical practice, while allowing it to be shared with other areas of medical research, often subject to different legal agreements. Due to its recognized importance, in practice all patient samples entering a pathology lab are pseudonymized at the lab registration step, each new sample gets a sequential biopsy number. In the specific case of research projects, pseudonymization is sufficient on the condition there is patient consent and approval of an Ethical Committee.

Anonymization

Anonymization, is the most radical de-identification action, – it ensures patient privacy. In the specific case of the WSI, it requires the erasure of any written data/metadata entry from the WSI so that the data is irreversibly altered in such a way that a data subject can no longer be identified directly or indirectly, either by the data controller alone or in collaboration with any other party (ENISA, 2019).

Additional security steps for pseudonymized data

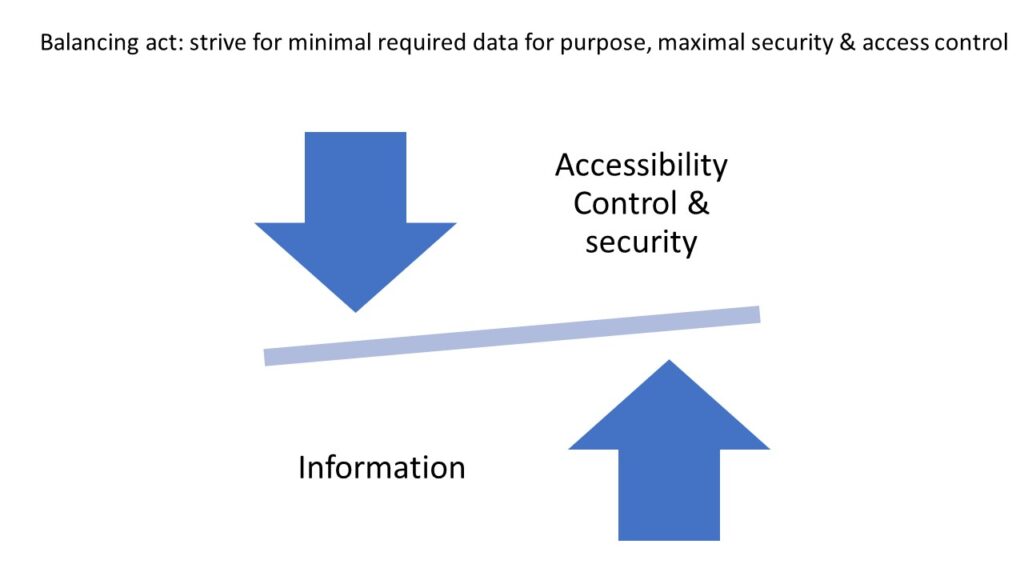
Further measures can be employed to secure patient data from unauthorized access. Increasing the number of steps and gatekeepers needed to identify a patient, increases security. For example, Provenance information management, where a WSI can be traced back to the original biological material, without exposing patient information might be employed to further protect the likelihood of unauthorized access, despite the use of pseudonymization. (Holub et. al; 2022).

Pathomation’s PMA Core: a security and privacy gatekeeper

At Pathomation we offer a series of tools and configurable options to ensure data compliance with major personal data privacy laws (GDPR, HIPAA). As data processors, whenever we store client data in our servers, the data is received pseudonymized, – Scenario 3 of the ENISA guidelines “[…]the data controller [our clients] again performs the pseudonymisation but this time the processor is not involved in the process but only receives the pseudonymised data from the controller.”

Despite managing pseudonymized data, which confers a considerable degree of privacy, the design of our  IT infrastructure and systems, ensures that the data is kept secure and access is controlled.

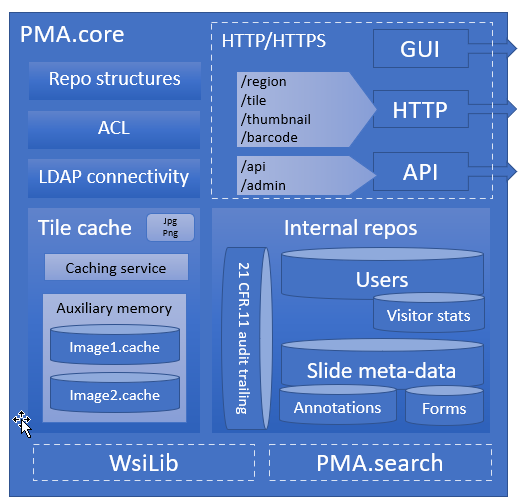
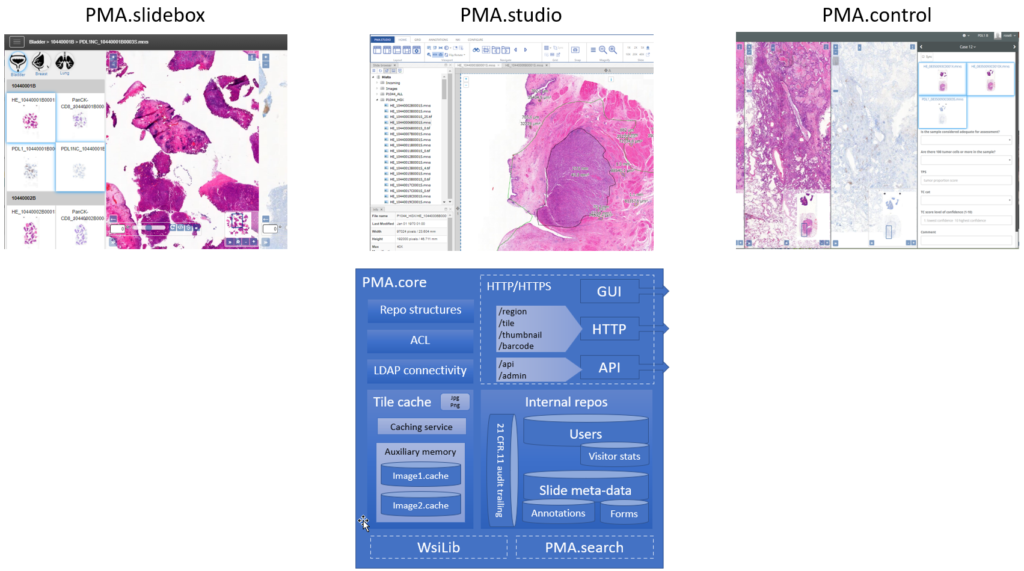
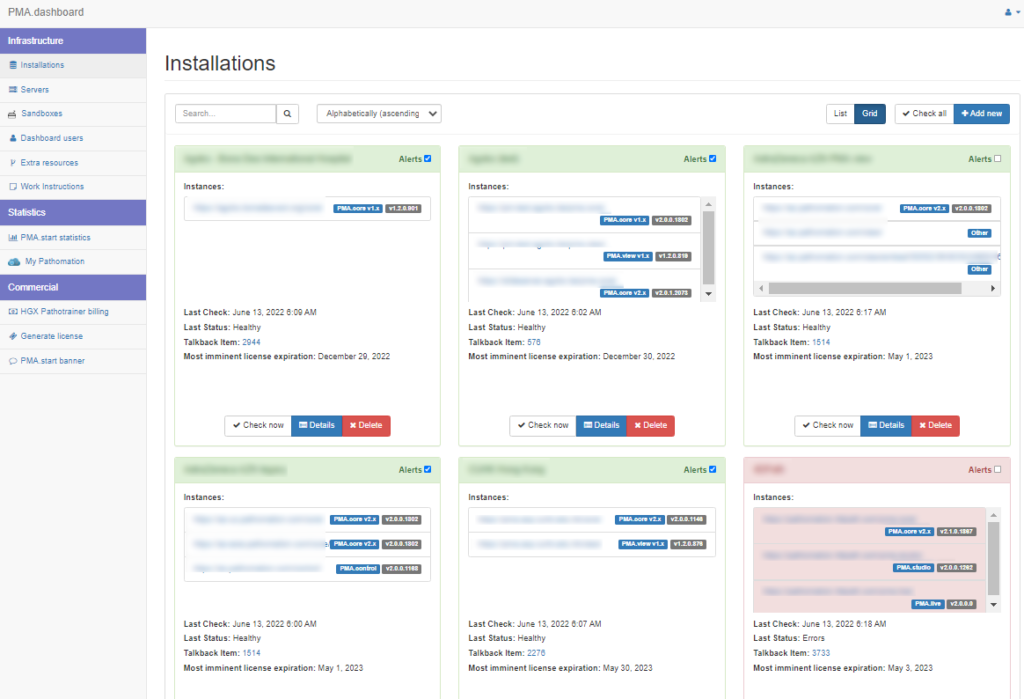
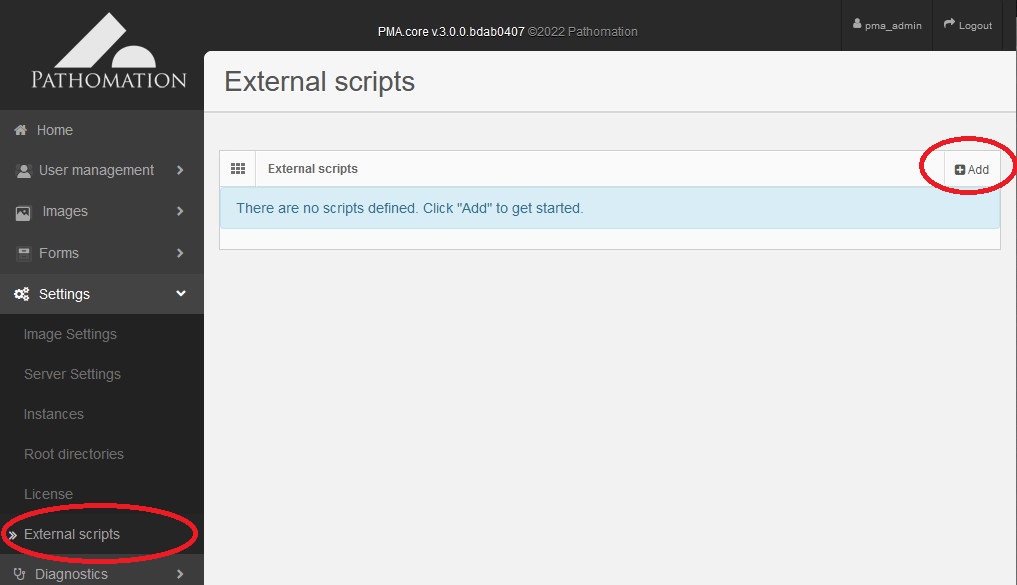
For example, our Image Management Solution (IMS) PMA.core, the centerpiece in our software platform for everything slide-management, is also the guardian of sensitive information. PMA-core is CE-IVD labelled for clinical diagnostic use, offering best practices and data management tools covering among others, robust permissions, encryption, passwords, audit trailing and data anonymization tools.

Thinking of data management practices aiming at ensuring data privacy in a daily workflow, with PMA-core is now possible to incorporate  the following management practices and tools into your workflow:

De-identification tools: Beyond pseudonymization

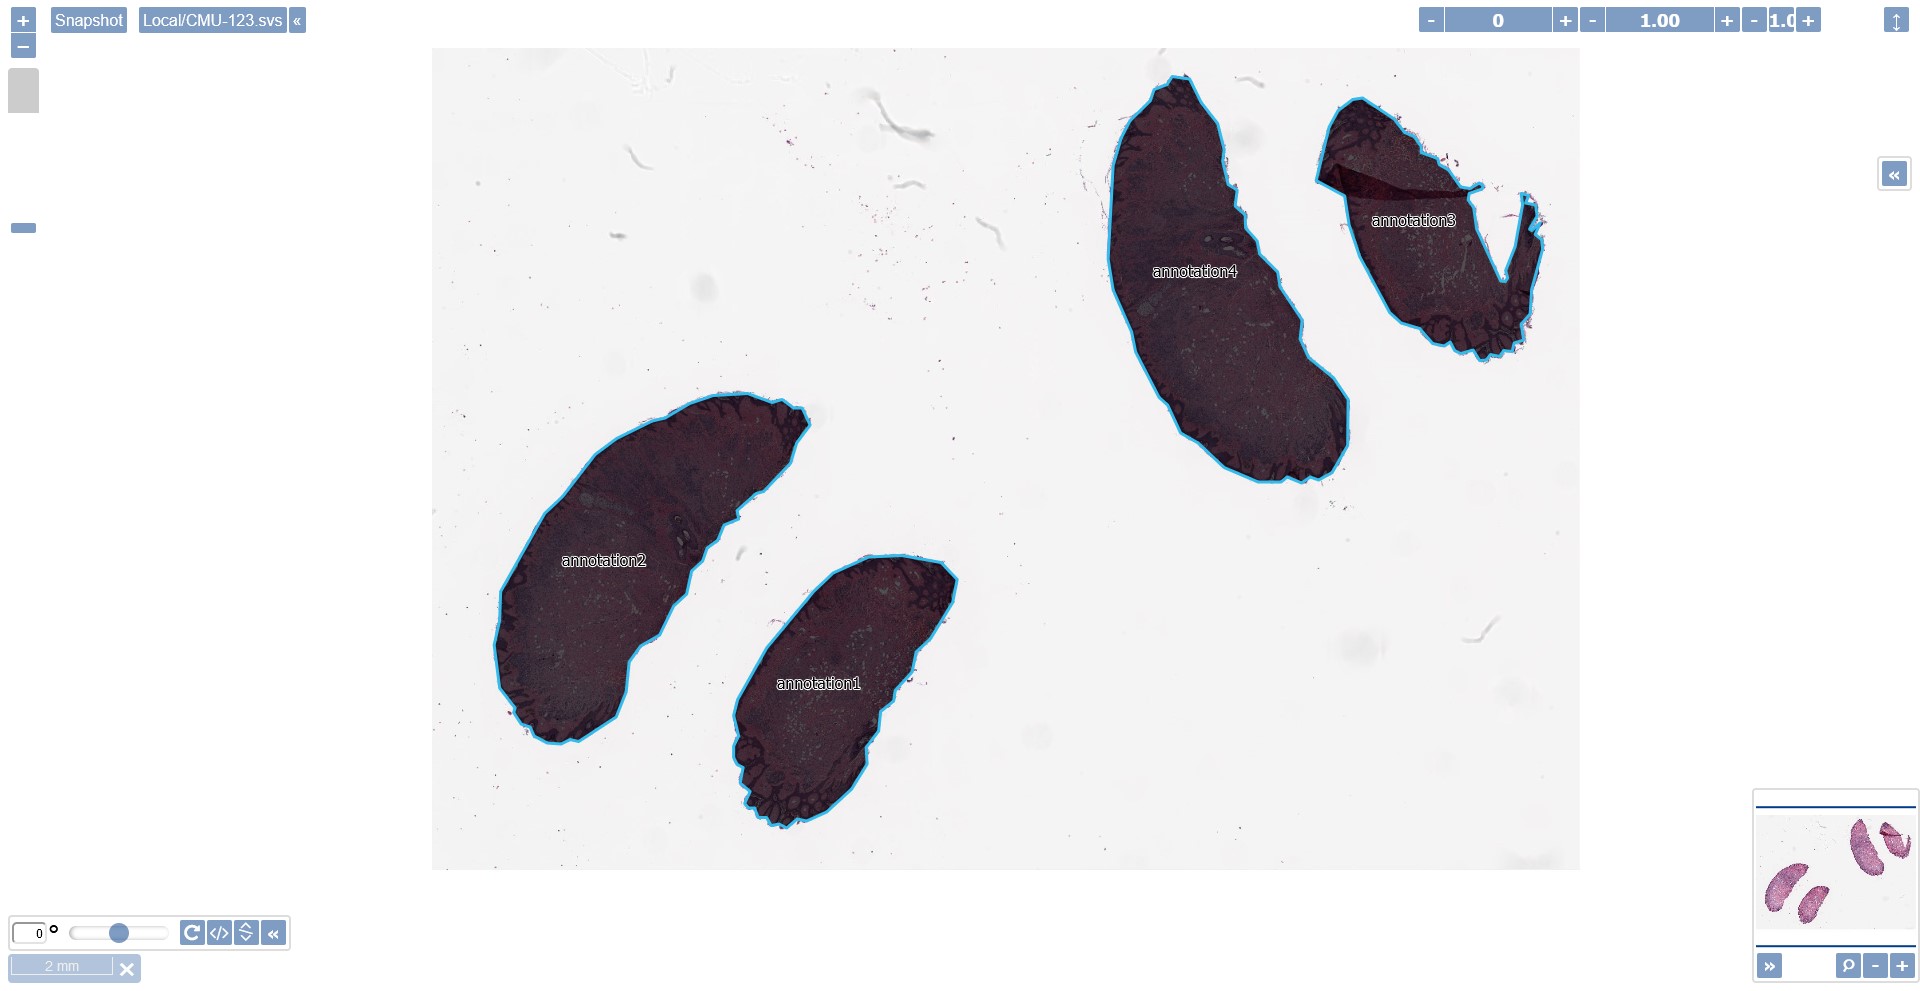
When presenting a viewport to serve slide content, one can opt to hide  elements in the viewport that could lead to inadvertently revealing sensitive information: both the label (barcode) and filename widgets can easily be hidden with a single line of JavaScript code. Check our online viewport configuration demo for relevant technical information on this.

The viewport configuration is useful in an environment where sometimes you do, yet sometimes you don’t want to show slide identification information. At root-directory level, therefore, one can opt to stipulate that label information is never to be revealed. A hybrid environment can thus be created in a medical school, where human pathology samples for teaching can be prevented from ever exposing label information, while in diagnostic routine these remain visible.

Permissions

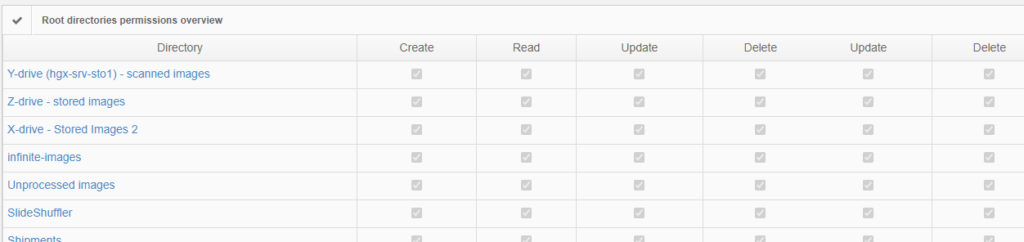
The above are software solutions. PMA.core never manipulates the original raw data. This means that the original whole slide image will always retain the original slide label information unless you opt to anonymize the data. Hypothetically somebody could download an original slide from one PMA.core, and open it somewhere else. In order to prevent people from downloading selected data that they’re not allowed to see, PMA.core as a final back-stop supports granular permission settings: you can hence specify that people can view a slide (which essentially means piecemeal controlled serving of individual tiles), but they’re not allowed to download it; meaning they could never gain access to the original data.

Anonymization

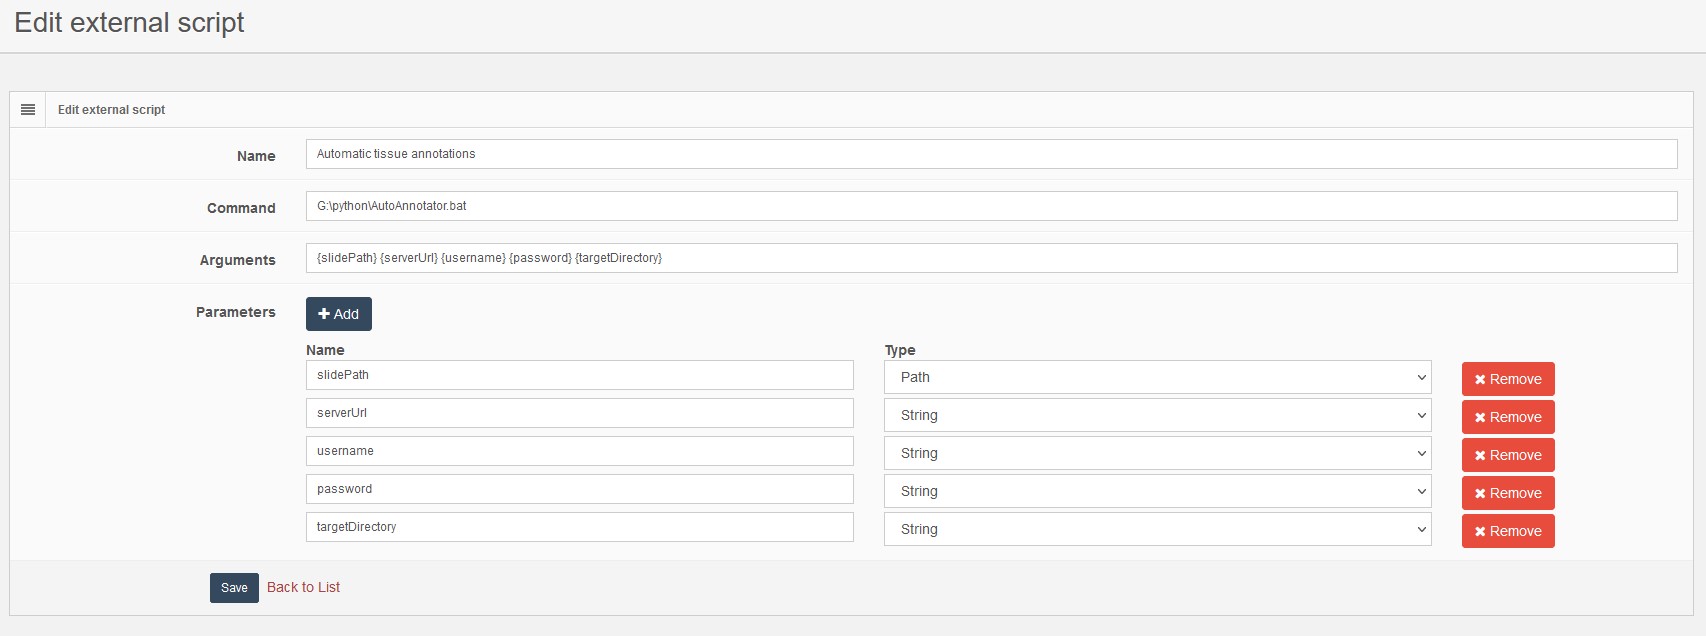
Eventually you decide that a particular image or slide collection can (or must be) anonymized. In fact, whenever you need to share WSIs publicly such as along a congresses and other symposia or provide pathology training, any information that could lead to patient identification should be removed. In other words, pseudonymization is no longer enough, you must anonymize the WSI.  In that case we offer you our in-house developed tool, Dicomizer. It is possible to export any WSI file format into a Dicom standard image, while at the same being able to remove even metadata embedded in the image files, together with the label on the WSI.
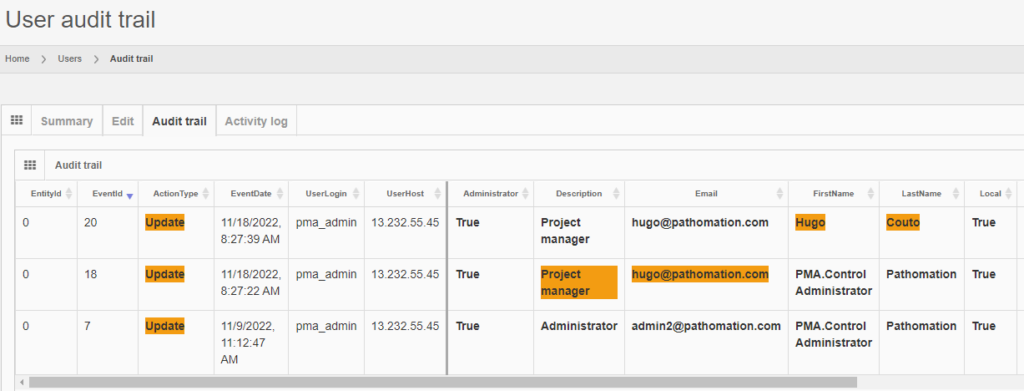
Trail Audit

Under GDPR,  data processors have a legal obligation to maintain records of their processing activities. We facilitate this obligation by providing real time trail audit; which translates in the ability to understand who has used a particular image and when.

On top of all these, we love to bespoke our applications and services to accommodate your very specific needs.

Glossary of terms

  • GDPR (ambit 26) The principles of data protection should apply to any information concerning an identified or identifiable natural person. Personal data which have undergone pseudonymisation, which could be attributed to a natural person by the use of additional information should be considered to be information on an identifiable natural person.
  • Datacontroller/dataprocessor: Under GDPR, there are two key entities: the data controller determines the purposes for which and the means by which personal data is processed. The ‘why’ and ‘how”. The data processor processes personal data on behalf of the controller. The controller can be also the processor.
  • Pseudonymization: GDPR (Article 4(3b) “the processing of personal data in such a way that the data can no longer be attributed to a specific data subject without the use of additional information, as long as such additional information is kept separately and subject to technical and organizational measures to ensure non-attribution to an identified or identifiable individual.”
  • Anonymization: Recital 26, EU GDPR: “(…)information which does not relate to an identified or identifiable natural person or to personal data rendered anonymous in such a manner that the data subject is not or no longer identifiable.

Data compliance: WSIs and Pseudonymization

GDPR & Patient Data: Aiming at Privacy by Design

GDPR (General Data Protection Regulation) in force in the European Europe since May 2018, regulates how personal/patient data is handled in Europe. The GDPR defines the obligations that data controllers and data processors must comply to.

Health data under the GDPR is considered sensitive data, as such, data processing is prohibited unless there is individual’s explicit consent, which clearly must define how the data must be processed, by whom and for what. On top of explicit consent, there are yet five additional lawful basis for processing data: Contract, Legal obligation, Vital Interests, Public Task and Legitimate Interest (Art. 9 GDPR).  In practice some of these lawful basis are observed in the direct therapeutic relationship.

Yet, because what is lawful might not be necessarily ethical, and by the end of the day the data controller/processor are accountable for any data breach or ethical issues, the role of the Ethical Committee within a health care organization, is often essential to define ethical safeguards and ensure the ethical management of patient data, which will impact security as well.

Essentially, the GDPR aims to safeguard the management of personal data in a lawful, fair and transparent manner, limit the purpose of data, increase integrity and confidentiality and make data controllers/processors accountable for the ethical and lawful utilisation of data.

When it comes to ensure personal privacy, fulfilling legal and ethical obligations can be complex, but is it now understood that along with sound technical and organisational infrastructures and procedures, de-identification methods, (as explorer along this article) can be an important part of meeting these legal and ethical obligations. (M. Hintze, 2016). Health care companies specifically have developed technical and organizational measures intended to protect personal health data by design in their products.

WSI: New Health Data

Whole Slide Imaging (WSI) is a relatively new category of patient data.  As such, recently, some efforts have been made to better understand how WSIs (whole slide images) can be utilized in a balancing act: maximizing individual and public benefit, while at the same time, restricting and protecting its access, whenever such poses a potential privacy risk and non-compliance with data privacy laws (e.g. GDPR). Although by itself the patient’s photographic tissue image falls under the category of de facto anonymity of the GDPR, the existence of patient-ids and/or other tags attached to the WSI, increase the likelihood of patient identification, and potential privacy issues. (Holub et al., 2022).

The novelty of this type of personal data is revealed when histopathologists describe their knowledge and confidence when dealing with WSIs as personal data. In a survey (n=198) conducted by the Oxford University Hospitals, addressed to histopathologists members of major pathology associations in the UK, 41% of the respondents did not know when WSIs would fall under relevant legal frameworks, while 47% were not confident “At all” when it came to understand the WSI consent in a research context (Coulter et al.; 2022).

Digital imaging Storage and management standards are widely adopted in the field of Radiology, which facilitates the adoption of sound data compliance practices. When it comes to digital pathology and data management standards adoption differences,  alongside with workflow specificities and the novelty of the field, another major difference lies in the role of the pathology professional societies. The ARS took the lead and through  the DICOM initiative managed to impose standards and provide clear guidelines for Radiologists and industry. The Pathology societies have not played such an active role yet, and previous efforts to make WSI part of DICOM have not been successful due to the complexity of WSI and differences in pathology clinical workflows. Despite the absence of reference literature from professional pathology societies, general guidelines and use cases published in the recent years focusing on how to lawfully and ethically process WSIs as patient data, point to pseudonymization as a relevant strategy to ensure data compliance, and perhaps most importantly, as a strategy to avoid data breaches and its negative consequences for both patients and organizations. In fact pseudonymization is often part of basic but sound strategies when it comes to protect personal data in general, as explained by Thomas Zerdick (2021).

If you do not need personal data, do not collect personal data (…)if you really need personal data, then start by pseudonymising this personal data. Thomas Zerdick.

In a follow-up to this post we’ll look at practical steps that you can take to ensure compliance, assuage your Data Protection Officer (DPO), and generally sleep better at night.

If you’re interested in finding out what features Pathomation’s PMA.core CE-IVD certified tile server offers today with regards to anonymization and pseudonymization, we refer you to our wiki overview page.

The second part of this post can be found here.


Free alternatives to Pathomation

Evil money-grabbing thieves

Pathomation is a for-profit company. We pride ourselves in offering various commercial products. Over the years, we’ve developed a comprehensive software platform for digital pathology and virtual microscopy. This platform consists of various components, which can be purchased, rented, or even licensed.

We strive to contribute to the Open Source community where we can. Some of our developers get referenced occasionally in papers, and our SDKs are publicly available through GitHub. On occasion, we contribute to Open Source projects ourselves.

Sample slides

Occasionally, people also ask us about where to find sample slides.

A great inventory of publicly available whole slide images can be found at both OpenSlide and the OMERO project:

What else do you need?

Oh yes, a way to actually read these data!

Reading WSI data

There are two well established Open Source projects for WSI data and virtual microscopy:

As you’re getting started adding digital pathology features to your own software, there are other routes to explore, too:

  • Work with slide scanner vendors
  • Adapt or translate code from BioFormats
  • Adapt or translate code from OpenSlide

All of these have downsides however:

  • Scanner vendors: You can start negotiating with any particular scanner vendor to adapt their proprietary SDK. Congrats; after months of lobbying work, you’ll have the (rather unpleasant) job of tasking one of your engineers to incorporate a new arcane DLL into your code, for a single framework (so expect to repeat this process over and over again for the next couple of years as your platform gains broader adoption)
  • Bioformats: is open source, so you could learn from their code and translate parts of it into your own. You can try it at least. Bioformats is a Java stack. If you can integrate that directly, you’re lucky. You could possibly transcribe the original Java-code to your own platform of course (C#, C++, Python, Rust, Haskell, Martian…). Same thing here: you’ll have the (still rather unpleasant, IMHO) task of tasking one of your engineers to actually do all of this, for a single file format (and again expect to repeat this process over and over again for the next couple of years as your platform gains broader adoption)
  • OpenSlide: lots of support, lots of bindings, but a bit outdated (limited file format support), limited functionality (not a server, no concept of “tiles”, …), and not adapted for today’s regulatory environment (GAMP, CE-IVD(R), 21CFR.11, …).

Of course all of this might change in the future. But as you sit and wait, we are here to help now, and  you may already consider what Pathomation has to offer as an alternative:

PMA.start

A central theme in our platform is the PMA.core tile server. A light-weight version of PMA.core is available free of change as PMA.start through https://free.pathomation.com.

PMA.start (and the entire Pathomation software stack by extension) supports any number of native file formats. So, you have to choices to go with here actually:

The advantage of this approach? Once you’re in the DICOM or TIFF world, you’re pretty much independent from any proprietary software vendor. Use Paint.Net to make snapshots of particular Regions of Interest (ROIs), use Photoshop to run a sequence of filters to detect hormone receptors in breast biopsies.

The downside: this doesn’t scale particularly well with large datasets or high throughput.

It is our view then that reading native file formats directly will most likely remain the most efficient way to offer digital pathology services in the foreseeable future.

The hidden cost of free software

Our point with all the above is: free is not free. You can always download free software, but after 10 years I daresay it’s NEVER going to do what you actually need it to do. But you’ll need to invest R&D, write your own unit and integration tests, add additional regulatory and compliance layers, combine development stacks and frameworks (the proverbial round peg in square hole)… Assuming that you have these people in-house, or can find them: these DON’T work for free.

Last but not least, there’s an opportunity cost here as well: again, if you have super-dev-guy/girl; don’t you want him/her to work on the core mission of your company (like saving patients’ lives, or developing awesome eXplainable AI)?

Plan ahead if you can

We’re not against Open Source software. We don’t advocate a radical choice between the two. We think this can be an inclusive and/and story, where both models can live in harmony.

We do think however that in many scenarios, Pathomation is the right (and even the better) course of action from the start. Adapt PMA.start early on in your projects as an individual single user solution. Then, as you learn more and expand the scope of your application, talk to us on how to scale up and how to adapt PMA.core as a tile server in your enterprise architecture or organization.

We can resolve the file format handling problem once and for all _for_ you, so you have more time and energy to focus on your _actual_ application.

Even in the early stages; the limited cost that comes with our commercial solution and proper implementation support hugely outweighs the incurred costs from trying to tackle this middleware problem yourself.

Bioinformatics is coming

The back-story of Pathomation is well-known: once upon a time, there was an organization that had many WSI scanners. All these scanners came with different pieces of software, which made it inconvenient for pathologists to operate digitally. After all, you don’t alternate between Microsoft Office and Apache OpenOffice depending on what kind of letter you want to write and which department you want to address it to.

Tadaaaah, ten years later Pathomation’s PMA.core tile server acts as a veritable Rosetta stone for a plethora of scanner vendors, imaging modalities, and storage capacities alike.

There’s a second story, too, however: Pathomation could not have been founded with a chance encounter of a couple of people with exactly the right background at the right time. As it happened, in 2012, the annual Digital Pathology Association in Baltimore (coinciding with a pass-through of hurricane Sandy) had a keynote speech by John Tomaszewski about the use of bioinformatics tools to (amongst others) determine Gleason scores on prostate slides. One of the co-founders of Pathomation was in the audience and thought “what a great idea…”.

Bioinformatics meets digital pathology

Pathomation reached out to the bioinformatics community early on. Within the ISCB and ECCB communities however, interest was initially low: only one or two talks (or even posters) at the Vienna, Berlin, and Dublin editions discussed anything even remotely related to microscopy. The few people that did operate in this intersection of both fields, expressed mostly frustration having to spend a seemingly outrageous amount of time just learning how to extract the pixels from the raw image data files.

A simple observation emerged: bioinformatics could contribute a lot more to digital pathology, if only we could make it easier to port the data back and forth between the two communities. Say: A universal honest broker for whole slide imaging.

But having such software (in the form of its CE-IVD certified PMA.core tile server and freeware “starter kit” PMA.start) is not enough. We still had to get the word out.

So Pathomation next set out on its own and started organizing its own digital / computational pathology workshops. Coinciding with the European-based bi-annual ECCB events in The Hague (The Netherlands) and Athens (Greece) The proceedings of these are still available online.

A maturing relationship

Fast forward to 2022 and things are a bit different.

As Pathomation has forged on as a middleware provider, so has bioinformatics gradually started to contribute to digital pathology. As we already hypothesized 10 years ago: the datasets in pathology (and by extension: microscopy, histology, time lapse data, MSI etc) are too interesting not to be explored with tools that have already contributed so much to other fields like genetics and medicine.

When you go to OUP’s leading Bioinformatics journal and search for “pathology”, more than 10,000 hits spring up.

Correspondingly, a search for “bioinformatics” in the Journal of Pathology Informatics (JPI) yields significantly fewer results. That’s not unexpected, as oftentimes “bioinformatics” wouldn’t be mentioned as a wholesale term, but one would rather reference a particular protocol, method or technique instead. Chubby Peewee, anyone?

The relationship between digital pathology and bioinformatics is clearly well established and maintained.

Building bridges

Occasionally we’re asked what we offer in the field of image analysis (IA). We’ve always maintained our stance that we don’t want to get into this directly ourselves by means of offering an alternative product (or software component) to well established packages like ImageJ, QuPath (open source) or Visiopharm, HALO, or Definiens (commercial).

Instead we’ve pursued our mission of becoming the one true agnostic broker for digital pathology. This means that we look at all of these (and more) and determine how we can best contribute to help people transfer information back-and-forth between different environments.

SDKs

Many in silico experiments start of as scripts. In bioinformatics, one of the first extensively supported scripting languages was Perl, in the form of the BioPerl framework. It still exists and is in use today, but (at the risk of alienating Perl-aficionados; we mean no offense) has been surpassed in popularity by Python (and BioPython).

Looking at the success of (bio)python, the first language we decided to support in the form of providing an SDK for it was Python: our PMA.python library is included in the Python Package Index (PyPI), and very easy to install through an interactive framework like Jupyter or Anaconda.

Several articles on this blog tackle digital pathology challenges by means of our own PMA.python library, and can be used as an inspiration for your own efforts:

All our SDKs are available as open source through GitHub, and since PMA.python, we’ve also added on PMA.java and PMA.php.

We have a development portal with sections on each programming language that we support, and we use the respective “best practice” mechanisms in each to provide exhaustive documentation on provided functions and methods as well.

Plugins

The plugin concept is a powerful one: many companies that build broadly used software have realized that they can’t themselves foresee all uses and provide a way for third-party providers to extend the software themselves through a plugin mechanism. In fact, software has a better chance of becoming broadly used when it offers this kind of functionality from the start. It’s called “the network effect”, and the network always wins.

Not everybody wants (or needs) to start from the ground up. There are many environments that can serve as a starting point for image analysis. Two specific ones related to digital pathology are ImageJ and QuPath. As we needed a proving ground for our own PMA.java SDK anyway, we decided to work towards these two environments. Today, we have plugins available for both.

Our plugins are available from our website, free of charge. You can download our plugins for image analysis, which are bioinformatics related. For more mundane applications, we also offer plugins to content management systems (CMS) and learning management systems (LMS).

The PMANN interface

If there is no plugin architecture available, oftentimes an intermediary file can be used to exchange data. We apply this technique ourselves in PMA.studio, where a virtual tray can persist over times by exporting it to and importing it back from a CSV file as needed.

So it is with commercial providers. Visiopharm has its own (binary) MLD file format to store annotations in, and Indica Labs’ HALO uses an XML-based file.

What you typically want to do, is run an algorithm repeatedly, with slightly different parameters. This results then in different datasets, that are subject to comparison and often even manual inspection or curation.

The PathoMation ANNotation interface assists in this: As the analytical environments are oftentimes unsuited for curators to work with (both in terms of complexity as well as monetary cost), a slide in PMA.core can be instructed to look for external annotations in various locations. You can have slide.svs associated with algo1.mld,  algo2.mld, and algo3.mld. You can interpret the overlaying datalayers computationally, or you can visualize them in an environment like PMA.studio.

What’s more: PMANN allows you to overlay data from multiple environments simultaneously. So you can do parameter optimization in one environment, but you can also run an algorithm across different environments and see which environment (or method like deep learning or random forest) performs the best.

Don’t reinvent the wheel

Bioinformatics is a much more mature field than digital pathology, with a much broader community. At Pathomation, we strongly believe that many techniques developed are transferable. Data-layers and data-sets are equally apt to enrich each other. Genetics and sequencing offer resolution, but tissue can add structure as an additional source of information to an experiment outcome, and help with interpretation. The work of Ina Koch that we referenced earlier is a typical example of this. Another great example is the TCGA dataset, which has been incorporating whole slide images as well as sequencing data for a couple of years now.

At Pathomation, we aim to offer connectivity. Connectivity to different slide scanner vendors (by supporting as many file formats as possible), but also by allowing different software tools to exchange data in a standard manner. To this end, Pathomation also recently signed up for the Empaia initiative.

We strongly believe that as a physician or researcher alike, you should be able to focus on what you want to do, rather than how you want to do it. We build middleware, SDKs, and plugins to help you do exactly that.

Do you have experience with coupling bioinformatics and digital pathology? Have you used our software already in your own research? Let us know, and you may find yourself the subject of a follow-up blog post.

What we do

Middleware

At the end of the day, what we do is straightforward: Pathomation makes middleware software for digital pathology.

Now depending on who you talk to, one or more terms in that statement may take some explaining:

  • Pathomation: it’s not phantomation (ghostbusters, anybody?), photomation (photonics, quantum physics; nah, to be honest we’re probably not smart enough)… It’s Pathomation, from Pathology – Automation.
  • Middleware software: Middleware acts as a broker between different components. Your typical example of middleware would be a printer driver, which allows a user to convert text and pixels from the computer screen to ink on paper. On that note, “pixel broker”, is another way how we like to describe ourselves. The slide scanner converts the tissue from the glass slide into a (huge!) collection of pixels, and we make sure these pixels can be read and presented properly, regardless of what scanner was used to generate them, and regardless of where they are stored
  • Digital pathology: it started in the 60s at Massachusetts General Hospital in Boston with tele-pathology. In the 2000s, engineers figured out that they could automate microscopes to take sequential pictures of various regions of interest on glass slides, and then stitch those to create (again: huge!) compound images that would let pathologists bypass the traditional microscope altogether and use the computer screen as a virtual microscope.
  • Pathology: the medical sub-specialty that diagnoses disease at the smallest level. Up to 70% of therapeutic treatment is attributable to one pathological exam or another. That’s… huge actually, and it’s why it’s all the more important to make the pixels from the scan flow to that storage location to that computer screen as smooth as possible.

But here’s another way of looking at is: Pathomation is the Rosetta Stone to your digital pathology content.

Pathomation is a rosetta stone for digital pathology

We make middleware software that optimizes the transport of pixels. We show the pathologist the pixels he or she needs, when he or she wants, where he or she desires to have them.

The central piece of software we develop for that is called PMA.core, and on top of PMA.core we have a variety of end-user front-end applications like PMA.slidebox, PMA.studio, or PMA.control.

Growing software

We didn’t start off with these though. So bear with us as we take a little trip down memory lane.

Once you have a successful piece of software, it doesn’t take long for people to ask “hey, can I also use it for this (or that)?”. Therefore, on top of PMA.core, we built several Software Development Kits (SDKs) that make it easier for other software developers to integrate digital pathology into their own applications (image analysis (AI/DL/ML), APLIS, LIMS, PACS…).

The next question is: “I don’t know how to program. I just have a WordPress blog that I want to embed some slides in.” So we wrote a series of plugins for various Content Management Systems (CMS), Learning Management Systems (LMS), and even third-party Image Analysis (IA) tools.

Eventually, we got into integrated end-user application development, too. As far as we’re concerned, we have three software packages that cater to end-users:

  • PMA.slidebox caters to educational applications whereby people just want to share collections with students, conference participants, or peers. A journal could benefit from this and publish virtual slides via a slidebox to serve as supplemental material to go with select author papers.
  • PMA.studio wants to be a pathologist’s cockpit. You can have slides presented in grid layouts, coming from different PMA.core servers. But if you’re an image analyst working with whole slide images (WSI), that works, too. Integrate data sources, and annotations. Have a video conference, and prepare high-resolution images (snapshots) for your publications… Do it all from the convenience of a single flexible and customizable user interface. If you’re an oncologist or surgeon that only occasionally wants to look along, PMA.studio may be a bit of overkill. But to build custom portals for peripheral users, you have those SDKs of course.
  • PMA.control goes above and beyond the simple collections that you place online with PMA.slidebox. With PMA.control, you can manage participants, manage what content they see at that what time, organize complex training sessions, organize the development and evaluation of new scoring schemes etc. With PMA.control, you are in… control.

A platform

Pathomation solves one problem really well. Because the problem manifests itself in many ways, we offer a number of routes to address it.

Different scanners output different file formats, that need to be distributed in different ways.

Due to the diverse applications of virtual microscopy and digital pathology, we conceived our own toolbox different from the beginning. Instead of a single application, we set off from the start to build a platform instead.

Pathomation offers a software platform.

  • You start with PMA.core, which handles virtual slides, user management, data capture, and audit trailing. All applications need these capabilities.
  • On top of PMA.core comes a range of connectable components. These can take the form of an application (desktop, web, mobile), but can also be connecting pieces to other external software. We do not offer Image Analysis, but we give you the right connectors to pass your data on to your favorite AI environment. We do not have our own LIMS, but we offer technical building blocks (APIs) for independent vendors to embed slide handling capabilities on their end on top of our central PMA.core.

So whether you’re looking to build custom portals for your own user-base (PMA.UI framework), or are looking for a one-stop solution to evaluate new histological scoring protocols (PMA.control); we have you covered.

Contact us to continue the conversation!

 Thoughts on Software Development Life Cycle (part 3)

This is part 3 in a series of software development. The earlier parts are available here:

In this episode, we want to pick up where we left of, and discuss how a small company like ourselves, can effectively still have an efficient software validation process, without slowing things down and ending stranded in a hopeless bureaucracy.

Indeed it’s a bad joke that, once you have your software validated, (CE) certified, and government approved, you stop developing it any further, because the overhead (i.e. cost) of going through the whole process again, doesn’t justify the (typically small) incremental gains that are to be had from releasing a new version.

No Sir, at Pathomation we like to be creative and innovate, and we’ve always said that administration should not stand in the way of that. So what did we do? Like with our original software development itself, we looked at automation to provide part of the answer.

Remember the schematic from last time?

We came up with a whole datababase schema to put behind this and optimize workflow from one type of documentation to the next.

Custom granularity is what we’re after here, and we like to think we come pretty close!

Because SSMS isn’t known for user-friendly data entry, we also built a set of PHP scripts around it, so we can easily populate it (and most importantly: never have to worry about synchronizing Word-documents by hand again!)

We’ll use parts of the PMA.core project for sample data and illustrate our approach throughout the rest of this article.

Oh, and if you’re curious about the other product names you see in the list: have a look at our product portal.

Requirements and specifications

One of the key documents to keep track of when developing software are the user requirement specifications (URS).

After writing out a general description of what our software is supposed to do (the System Overview document – .sov extension in the schema), we can start to  capture in more granular detail what the different bells and whistles are going to be.

There’s a lot of room for interpretation at this level: Since PMA.core’s bread and butter is supporting as many different slide scanners as possible; Each file format is a separate URS entry.

For each URS, a specification is written up. Subsequently, tickets can be assigned to it. Tickets can originate from different locations:

Talkback is our historical original ticketing system based Corey Trager’s excellent BugTracker.Net project.

As we grew our team, we outgrew BugTracker and upgraded to Jira.

Features can be the result of a helpdesk-ticket. Keeping in mind what requirements originate from actual user requests (and not Pathomation’s CTO’s crazy brain) is useful to prioritize.

A completely annotated URS ends up looking like this:

We have all information in a single page. What a difference from a few years ago, where we had to puzzle these pieces together from several Word-documents.

When are you done with your software? When you’ve written sufficient tests to prove that all your user requirement specifications effectively work as intended.

Risk assessment and testing

In order to get a grasp on what “sufficient” testing means, a risk assessment has to occur first.

We provide product owners with a wizard-like approach to determine the risk analysis for each URS individually. Let’s have a look at this one:

The Risk Analysis then becomes as follows:

Do this for each URS, and you can come up with a granular test plan. In the future, we’d like to couple this back to the URS detail screen itself: A feature with high-risk, should have 3 tests; a feature with medium-risk, should have 2 tests; and a feature with low-risk can be sufficiently documented by providing a video.

Reporting

Remember our original Word-mess?

We (and you too) still need these documents at the end of the day for filing. You can complain about paper generating, but when to think about it: it absolutely makes sense to still produce these textual snapshots.

Just look at it from the other side: Imagine you’re a regulatory agency and you get applications from 100 companies. Each company deposits a database and a set of scripts to interface it with the message “oh, just get the scripts up and running and you’ll get all our information. it’s super-easy, barely an inconvenience”. The only alternative then is for the agency to provide its own templates for all 100 companies to fill out.

Luckily that direction is easy from where we’re standing. What we do to provide the necessary regulatory documentation is extract the proper information from the database, format it properly as HTML, and then print those webpages to PDF documents.

A traceability matrix? Well, that’s just a matter of a couple of outer joins and summarize the outcome in a table.

Documentation. Validation. Done.

What’s left?

We used the technique described in this article to obtain our self-certified CE-IVD label for our PMA.core software.

We also worked with external independent consultants to make sure that our technique would indeed withstand outside scrutiny. After all, any software developer can self-certify their own software.

It’s important to note that in addition to keeping track of a number of documentation items, we also performed a validation study in two hospitals, with two different slide scanners. This confirmed everything we did so far, indeed applied to a clinical setting as well.

Now it’s onto PMA.core 3.1. This will be a minor release, with a focus on additional security features like LDAPS and improved IAM / EC2 integration.

For PMA.core 3.1, we’re not doing the whole process described in here from scratch. How we solve this problem then in an incremental fashion, is food for a next article.

Thoughts on Software Development Life Cycle (part 2)

See our earlier article on the processes that we developed at Pathomation to improve our software development practices.

Software validation

Much has been written about software testing, verification, and validation. We’ll spare you the details, subtleties, and intricacies of these. Fire up your favorite search engine. Contact your friendly neighborhood consultant for a nice sit-down fireside chat on semantics if you must.

Suffice it to say that validation is the highest level of scrutiny you can throw against your code. And, like many processes, at Pathomation, we take a pragmatic approach.

Pragmatic does not need to mean that we bypass rules or cut corners. Au contraire.

The need

The process sometimes gets a bad rep. If software validation is so involving, why even do it at all? After all:

  • You have a ticketing system like jira or Bugzilla in place, right?
  • You have source code control like git or svn in place, right?
  • Your developers can just test their code properly before they commit, right?
  • Right?…

Anybody with any real-life experience in software development knows it’s just not that simple.

At Pathomation, we have jira; we have git; we add Slack on top of that for real-time communication and knowledge transfer; etc. And yet, there was something missing.

Consider the following typical problems during non-validated SDLC:

  • Regression bugs
  • Incorrect results
  • Wrong priorities
  • Bottlenecks and capacity planning problems

Are you rolling your eyes now and thinking “Du-uuuuh”? Do you think these are just inherent to software development in general? Well, let’s see if there’s a way to reduce the impact of these at least a bit.

GAMP

Writing software is sort of like a manufacturing process. So with terms like GLP (Good Lab Practice) and GMP (Good Manufacturing Practice) already in existence, it made sense to expand the terminology to GAMP, which stands for Good Automated Manufacturing Process (and yes, is derived from GMP).

In essence, GAMP means that you’ve documented all the needs that your software addresses, have processes in place to follow-up on the fullfillment of these needs (the actual code writing process), and subsequently have a system in place to provide that the needs are effectively met.

GAMP helps organizations to prove that their software does what you say it does.

There a different levels of GAMP, and as the levels increase, so does the burden of proof.

  • Gamp levels 1-3 are reserved for really widespread applications. Think about operating systems and firmware. When you install Windows on a server, you expect it to do what it does. You may still check out a couple of things (probably specific procedures tied to your unique situation), but roughly speaking you can rely on the vendor that the software does what you expect it to do, and that bugs will be handled and dealt with accordingly.
  • Gamp level 4 is tied to software that can still be considered COTS, but is somewhat less widespread than, say, an operating system. It may be an open source application that you think is a good fit in your organization: it may have a wide user base, but it’s hard at the same time to beat the resources of the big tech companies. A certain level of scrutiny is still warranted.
  • Gamp level 5 is for niche software applications. It requires the highest level of checks, tests, and reporting. To some extent, everybody that builds their own software (including the big techs) is expected to do their own Gamp 5 validation.

We like to brag that we see a lot of users. But regardless how many satisfied users we have, we’ll never come even close to software that has the user bandwidth of Microsoft Office, Google Chrome, or even specialty database management systems like MongoDB or Neo4J.

PMA.core (including the PMA.UI visualization framework) is niche and custom software. Therefore, all of its derived components must go through extensive Gamp 5 validation procedures.

Next stop: Amazon. Read instructions. Clear.

Hard times and manual labor

In principle, it’s all very simple: you document everything that you do and provide evidence that you’ve done it, and that at the end of the day things work as planned and expected.

But at the very least, you need somebody to monitor this entire process, and, most importantly: keep it going. So we did contract with an external organization, and it sort of worked. That is, after a lot of frustration, we ended up with a list of documents that was good enough to claim that version 1.0 of our software was now validated:

The experience was not a fun one; nor a creative one; nor a productive one; nor… There were many things it wasn’t. In typical Pathomation (remember, we’re rebels at heart) we started wondering how we could improve the process. We identified two major bottlenecks:

  • Lack of involvement: it’s all too easy to throw money at a problem hoping that it will go away. It doesn’t. Read our separate rant about consultants for a somewhat different perspective on the consultancy world.
  • Inefficient procedures. No, wait, that’s too polite. How about hopelessly obsolete antiquated workflows? Getting there. Except for the word “flow”. What we did; it didn’t flow at all; think of molasses flowing; or lava…

Essentially we ended up sending back and forth a bunch of Word document. A lot of them… and they were long…

And you dread the moment when you want to add anything afterwards, because that involves making modifications in long documents that all need to reference each other correctly. Like below:

A user requirement specification (URS) needs to have functional specifications (FS), followed by technical specifications (TS). Since the all these are spread out across separate Word documents, you need a fourth document to track the items across the documents; a traceability matrix (TM). The TM is stored as an Excel spreadsheet, because stored tables in a Word document would just be silly… apparently??

They say insanity is repeating the same process over again and expecting different results, right? That was our conclusion after our first couple of iterations and experience with the software validation process as a whole.

A tunnel… with light!

Realizing that we would first and foremost have to take more ownership of the validation process, we thought about tackling the “not a fun one; nor a creative one; nor a productive one” accolades. Pathomation is an innovative software company itself. Could we put some of that innovation and software savviness into the software validation process itself, too?

We started by looking back at the delivered documents from our manual procedure. After some doodling on paper, we deduced a flow-chart that we agreed would be pretty much common to each validation project:

Our 30k view in place, our next step was to start thinking about what the most efficient way could be to fill it our for new products and releases going forward. That is the story we’ll be elaborating on in part 3 of this mini-series.

Thoughts on Software Development Life Cycle (SDLC) – part 1

What we do

At the end of the day, what we do is straightforward: Pathomation makes middleware software for digital pathology.

Now depending on who you talk to, one or more terms in that statement may take some explaining:

  • Pathomation: it’s not phantomation (ghostbusters, anybody?), photomation (photonics, quantum physics; nah, to be honest we’re probably not smart enough)… It’s Pathomation, from Pathology – Automation.
  • Middleware software: Middleware acts as a broker between different components. Your typical example of middleware would be a printer driver, which allows a user to convert text and pixels from the computer screen to ink on paper. On that note, “pixel broker”, is another way how we like to describe ourselves. The slide scanner converts the tissue from the glass slide into a (huge!) collection of pixels, and we make sure these pixels can be read and presented properly, regardless of what scanner was used to generate them, and regardless of where they are stored
  • Digital pathology: it started in the 60s at Massachusetts General Hospital in Boston with tele-pathology. In the 2000s, engineers figured out that they could automate microscopes to take sequential pictures of various regions of interest on glass slides, and then stitch those to create (again: huge!) compound images that would let pathologists bypass the traditional microscope altogether and use the computer screen as a virtual microscope.
  • Pathology: the medical sub-specialty that diagnoses disease at the smallest level. Up to 70% of therapeutic treatment is attributable to one pathological exam or another. That’s… huge actually, and it’s why it’s all the more important to make the pixels from the scan flow to that storage location to that computer screen as smooth as possible.

So there you have it: we make middleware software that optimizes the transport of pixels. We show the pathologist the pixels he or she needs, when he or she wants, where he or she desires to have them.

The central piece of software we develop for that is called PMA.core, and on top of PMA.core we have a variety of end-user front-end applications like PMA.slidebox, PMA.studio, or PMA.control.

Growing software

We didn’t start off with these though. So bear with us as we take a little trip down memory lane.

Once you have a successful piece of software, it doesn’t take long for people to ask “hey, can I also use it for this (or that)?”. Therefore, on top of PMA.core, we built several Software Development Kits (SDKs) that make it easier for other software developers to integrate digital pathology into their own applications (image analysis (AI/DL/ML), APLIS, LIMS, PACS…).

The next question is: “I don’t know how to program. I just have a WordPress blog that I want to embed some slides in.” So we wrote a series of plugins for various Content Management Systems (CMS), Learning Management Systems (LMS), and even third-party Image Analysis (IA) tools.

Eventually, we got into integrated end-user application development, too. As far as we’re concerned, we have three software packages that cater to end-users:

  • PMA.slidebox caters to educational applications whereby people just want to share collections with students, conference participants, or peers. A journal could benefit from this and publish virtual slides via a slidebox to serve as supplemental material to go with select author papers.
  • PMA.studio wants to be a pathologist’s cockpit. You can have slides presented in grid layouts, coming from different PMA.core servers. But if you’re an image analyst working with whole slide images (WSI), that works, too. Integrate data sources, and annotations. Have a video conference, and prepare high-resolution images (snapshots) for your publications… Do it all from the convenience of a single flexible and customizable user interface. If you’re an oncologist or surgeon that only occasionally wants to look along, PMA.studio may be a bit of overkill. But to build custom portals for peripheral users, you have those SDKs of course.
  • PMA.control goes above and beyond the simple collections that you place online with PMA.slidebox. With PMA.control, you can manage participants, manage what content they see at that what time, organize complex training sessions, organize the development and evaluation of new scoring schemes etc. With PMA.control, you are in… control.

Development

How do we develop it all? We’re a small company after all, with a small team, and many people wear multiple hats.

First, we like technological centipedes. If your ambition is to become an expert on jquery, SQL, or vue.js, and only do that, Pathomation is not the place for you. Even when you’re a full-stack developer, we’ll encourage you at least to get out of your comfort zone and write an occasional Jupyter notebook to test someone else’s code as part of our QA process.

Second, we have a workflow process that is tailored to our size, and we use the tools that we find useful. We don’t treat Scrum and Agile as gospel, but we adapt what we think makes sense.

Pipelines and dashboards

Sometimes people think we’re crazy for supporting so many tools and technologies. Sometimes we think we’re crazy for supporting to many tools and technologies.

But the truth of the matter is: we really want to remain flexible. We strive to be the go-to digital pathology middleware solution on the market, and that’s not going to happen by carving out a niche within a niche (as in: “everybody should just use PHP to build digital pathology portals from hereon”). We could probably have a more comprehensive PMA.java SDK if all we did was focus on Java, but we wouldn’t be able to help you with that if you come to us with a PyTorch algorithm or a Drupal blog.

All technologies come with their own peculiarities though, and as much as we adhere to the above centipede principle, no one can know it all. Or should even know it all.

So we’re big fans of dashboards and pipelines. To give you an idea:

  • We use standard applications like Jira, Slack, and Git extensively on a daily basis
  • We also have our own dashboard portal, that integrates meta-data from the above into KPIs that make sense to us.
  • A KPI is a KPI; we prefer knowledge. We’re lucky enough that we still have relatively short decision processes and everyone in the company understands what we’re doing. Because of this, we typically stay away from Google Analytics, because nobody gets anything out of a KPI.
  • Scrum and Agile are full of rituals. If you want to perform rituals though, your calling may be in religion rather than technology. Not that we frown upon religious callings. We’re just saying there’s a difference. Stand-up meetings are a good example. For high-profile projects, we’ve found stand-up meetings to be extremely valuable. But when that (phase of the) project is over, there’s no need to keep the meeting schedule around anymore. If we did that, it would be the only thing we would do anymore.
  • We look at standard methodologies as kitchen appliances; you use the ones you need when you need them. No need to institutionalize them. Some days you need a conventional oven; some days you need a microwave. There’s a reason they both exist. Chefs tell us that hybrid appliances that claim to do both, don’t really provide either functionality particularly well.

Does it work?

Sure, Pathomation is a small company, and we’re unconventional. Some call us rebels, renegades… Some partner with us exactly because of this even.

But of course, being rebellious cannot be a goal in itself; or even a merit.

What we’ve come to realize in the last year or so particularly is that products are only parts of the equation. What a company needs, in addition, to become successful is a set of processes.

The question then becomes: So does it work?

We think it does.

What it comes down to is that we do have a process that works now. Developers receive their input via Jira; managers can monitor respective projects through Jira dashboards. Build pipelines for different environments (no matter how diverse) are all organized through Jenkins. We’re on Microsoft Teams for meetings and chats, both at the office and at home. And for real-time technical support amongst the developers, there’s Slack.

Even though we use COTS software, we’ve still tuned it to match our own scale and pace. We still prefer on-premise installations instead of cloud, and we probably only have begun to scratch the surface of the possibilities in Jira (Confluence has recently been added to our arsenal).

There’s no right or wrong, or why you should follow our lead. Each company is different and should probably find what works for them. And realize that standardization can be a two-edged sword.

But even so: does it work? How do these processes in our case lead to better software?

We recently obtained our CE-IVD mark for PMA.core. So: yes.

But the tools and techniques described in this article don’t give the complete picture. So in a follow-up article, we plan to elaborate on what else was needed in addition to what we describe here, to get to yet another level of quality.

Extending PMA.core functionality with external scripts

Pathomation offers a comprehensive platform with a variety of technical components that help you build tailor-made digital pathology environments and set up custom workflows. Centered around PMA.core, our powerful tile server, everything else can be connected and integrated. You want a feature that PMA.core does not support or you have a script/code to implement it. Great! You can.

PMA.core allows the registration and execution of third party command line scripts via its External Scripts admin page and its Scripts Run API. You can utilize this to create anything you need from simple workflow tasks like batch renaming/moving of slides to fancy AI and tissue recognition algorithms. Assuming you have found one such a fancy script and you want to integrate it into PMA.core let’s see the process step by step.

Preparing for integration

As an example we will use the sample script (provided here) that recognizes tissue automatically using the OpenCV computer vision library and imports the recognized areas as annotations all in one go. The sample tissue recognition script requires Python and OpenCV to be installed and configured in your system. That script also requires some parameters to be executed successfully like the PMA.core server url, username and password and the path to the slide to analyze.
For this reason we will create an intermediate .bat file to facilitate the execution of the python script with the correct parameter values as described bellow(replace \path\to\script with the path the script is located).

python.exe "\PATH\TO\SCRIPT\AutoAnnotator.lite.py" -l %2 -u %3 -p %4 -t %5 -f %1

Registering a script

To register your script with PMA.core navigate to the Settings -> External Scripts page and click Add.

Adding a new external script with PMA.core interface

You need to provide the following information describing our script and the parameters required to execute it.

  • Name: A unique name for the script used to fetch it and distinguish from other, for our example enter Automatic tissue annotations
  • Command: The command line to execute, a bat file, cmd file or exe, for our example enter \path\to\script\AutoAnnotator.bat
  • Arguments: The arguments passed to the script, for our example enter {slidePath} {serverUrl} {username} {password} {targetDirectory}
  • Parameters: A dynamic list of parameters passed to the script by PMA.core, for our example enter the list of parameter as shown in the following image.
The settings required to register our script

In the arguments section any text you enter will be passed to the executed command as is. An exception to this is the text enclosed by curly brackets (for example {slidePath}). If the text inside the curly brackets equals a parameter name, PMA.core will replace it with the value supplied at the execution step. PMA.core supports three types of parameters that validates accordingly at execution phase: String, Number, Path. Number parameters are validated as a floating point value, and Path is validated by checking the existence and permissions of the specified value.
After clicking Save you should see your newly created script and its settings in the main index page

List of external scripts registered to PMA.core

Executing the script

Now that we have registered the script correctly we can execute it using the Scripts Run API. In the index page of the interface on the url column you can copy/paste a helper url with all the required parameters to execute the script. In our example the helper url is:

/scripts/Run?name=Automatic tissue annotations&slidePath={Path}&serverUrl={String}&username={String}&password={String}&targetDirectory={String}

and we will replace {Path} in slidePath with the virtual path to the slide we want to annotate, the {String} in serverUrl with the PMA.core serverUrl, the {String} in username with our PMA.core username, the {String} in password with our PMA.core password, and the {String} in targetDirectory with the path to a local temporary folder.

After executing the script using the API you will get a JSON response with the following fields:

{
  "ScriptName": The executed script name,
  "Success": A boolean value indicating whether the script executed successfully or not,
  "ErrorMessage": An optional error message if any occured,
  "Result": The output of the script 
}

After a successful execution of our script in a sample slide you should be able to see the generated annotations containing the tissues as recognized by the script’s algorithm.

The final result of the tissue recognition algorithm

Required files

Automatic tissue recognition python script (AutoAnnotator.lite.py)

PMA.UI on React.JS with Collaboration using PMA.live

PMA.UI is a Javascript library that provides UI and programmatic components to interact with Pathomation ecosystem. It’s extended interoperability allows it to display WSI slides from PMA.core, PMA.start or Pathomation’s cloud service My Pathomation. PMA.UI can be used in any web app that uses Javascript frameworks (Angular.JS, React.JS etc) or plain HTML webpages.
PMA.live (now called PMA.collaboration) is a Javascript library that provided functionality to share your PMA.UI app/page with other users keeping all parts of the page synchronized, allowing for drawing annotations simultaneously, share multiple viewports just like with multi-head microscopes but over the internet.
We will create an example React application and integrate both PMA.UI and PMA.live as an example. You can use an existing React application or create a new one using create-react-app e.x.

npx create-react-app CollaborationReact

First we have to install PMA.UI and PMA.live library using npm by running

npm i @pathomation/pma.ui
npm i @pathomation/pma.collaboration

inside application’s directory.

Next step is to add JQuery in our app. Open index.html file inside public directory and add

<script src="https://code.jquery.com/jquery-3.6.0.min.js"
    integrity="sha256-/xUj+3OJU5yExlq6GSYGSHk7tPXikynS7ogEvDej/m4=" crossorigin="anonymous"></script>

in the head tag.

It’s time to implement the main functionality of PMA.UI and fire up 4 simultaneous slide viewports in the same page. We will use the PMA.UI components to easily do that namely the context, slideloader and autologin. So go ahead and replace the default App.js with the following initialization page

const imageSet = ["Reference/Aperio/CMU-1.svs", "Reference/Aperio/CMU-2.svs", "Reference/3DHistech/CMU-1.mrxs", "Reference/3DHistech/CMU-2.mrxs"];

const createSlideLoader = (context, element) => {
  return new SlideLoader(context, {
    element: element,
    overview: { collapsed: false },
    dimensions: { collapsed: false },
    scaleLine: true,
    annotations: { visible: true, labels: true, showMeasurements: false },
    digitalZoomLevels: 2,
    loadingBar: true,
    highQuality: true,
    filename: true,
    barcode: false
  });
}

function App() {
  const viewerContainer = useRef(null);
  const slideLoaderRefs = useRef([]);
  const context = useRef(new UIContext({ caller: "Vas APP" }));
  const [slideLoaders, setSlideLoaders] = useState([]);
  const location = useLocation();

  useEffect(() => {
    if (slideLoaderRefs.current.length == 0) {
      slideLoaderRefs.current = [...Array(20)].map((r, i) => slideLoaderRefs[i] || createRef());
    }
    let autoLogin = new AutoLogin(context.current, [{ serverUrl: pmaCoreUrl, username: username, password: password }]);

  }, []);

  useEffect(() => {
    if (slideLoaderRefs.current.filter(c => !c || !c.current).length > 0) {
      return;
    }

    let slLoaders = [];
    for (let i = 0; i < slideLoaderRefs.current.length; i++) {
      slLoaders.push(createSlideLoader(context.current, slideLoaderRefs.current[i].current));
    }

    setSlideLoaders(slLoaders);
  }, [slideLoaderRefs.current]);

  return (
    <div className="App">
      <div ref={viewerContainer} className="flex-container">
        {slideLoaderRefs.current && slideLoaderRefs.current.map((r, i) =>
          <div className={"flex-item"} key={i} ref={slideLoaderRefs.current[i]}></div>)
        }
      </div>
    </div >
  );
}

export default App;

To properly show all 4 viewers in the same page we need some css to style it up, so we need to add this to index.css. This will split the page to a grid of 2×2 viewers using css flex.

.flex-container {
  display: flex;
  flex-direction: row;
  flex-wrap: wrap;
  width: 100%;
  height: 850px;
}

.flex-item.pma-ui-viewport-container {
  flex: 0 0 50%;
  height: 400px
}

.ml-1 {
  margin-left: 15px

Well that was easy to set up!

Collaboration

So let’s synchronize this page for all the user’s joining so they can see and interact with the same slides. For this we will be using the PMA.live server and to pma.collaboration package we installed earlier. To enable users to collaborate they have to join the same session, as it is called, one user will be the master of the session which controls the current viewports, slides and annotations(even though this can be changed with a setting for all users with a setting called EveryoneInControl).

PMA.live uses SignalR and the WebSocket protocol to achieve real time communication between participants, so we need to include this scripts in our page. We can include this scripts in the index.html as we did for jQuery, but we need to be sure that the scripts are properly loaded before trying to initialize any PMA.collaboration in our React application. So we will use the same trick used by Google Maps to load the scripts asynchronously and notify our React app when they are ready. So create a new file called collaborationHelpers.js with the following function.

export const loadSignalRHubs = (collaborationUrl, scriptId, callback) => {
    const existingScript = document.getElementById(scriptId);
    if (!existingScript) {
        const script = document.createElement('script');
        script.src = `${collaborationUrl}bundles/signalr`;
        script.id = scriptId;
        document.body.appendChild(script);
        script.onload = () => {
            const script2 = document.createElement('script');
            script2.src = `${collaborationUrl}signalr/hubs`;
            script2.id = scriptId + "hubs";
            document.body.appendChild(script2);

            script2.onload = () => {
                if (callback) {
                    callback();
                }
            };
        };
        return;
    }
    
    if (existingScript && callback) {
        callback()
    };
};


To notify our React app that the scripts are ready and to proceed with the initialization we need to create a new state in the App.js page called loadedScripts which we will set to true when the scripts are loaded in our previous useEffect function
useEffect(() => {
    if (slideLoaderRefs.current.length == 0) {
      slideLoaderRefs.current = [...Array(20)].map((r, i) => slideLoaderRefs[i] || createRef());
    }

        let autoLogin = new AutoLogin(context.current, [{ serverUrl: pmaCoreUrl, username: "zuidemo", password: "zuidemo" }]);
    loadSignalRHubs(collaborationUrl, "collaboration", () => {
      setLoadedScripts(true);
    });
  }, []);

So now everything is ready to establish a connection to the PMA.live backend, and also joining a session (joining a non-existing session will just create a new one) 
const initCollaboration = (nickname, isMaster, getSlideLoader, collaborationDataChanged, chatCallback) => {
  return Collaboration.initialize(
    {
      pmaCoreUrl: pmaCoreUrl,
      apiUrl: collaborationUrl + "api/",
      hubUrl: collaborationUrl + "signalr",
      master: isMaster,
      getSlideLoader: getSlideLoader,
      dataChanged: collaborationDataChanged,
      owner: "Demo",
      pointerImageSrc: "…",
      masterPointerImageSrc: "…"
    }, []).
    then(function () {
      var sessionName = "DemoSession";
      var sessionActive = false;
      var everyoneInControl = false;
      return Collaboration.joinSession(sessionName, sessionActive, nickname, everyoneInControl);
    }).
    then(function (session) {
      // after join session
      ////var appData = Collaboration.getApplicationData();
      if (isMaster) {
        Collaboration.setApplicationData({ a: 1 });
      }
    });
}

The initialize method tells to the PMA.live Collaboration static object where to find PMA.core, PMA.live backend, whether or not the current user is the session owner, what icons to show for the users’ and the master’s cursor and accepts a couple of callback functions. The joinSession method will create a session if it does not exist and then join it. If the session doesn’t exist, it is possible to specify whether or not it is currently active and if all users can take control of the synced viewports or only if the session owner can do this. Once the session has been created, only the session owner can modify it and change it’s active status or give control to others.

In order for PMA.live to be able to sync slides, it has to know the viewports it should work with. Earlier in our code we created an array of maximum of 20 slideloaders which we kept in a react ref object. Now let’s go back to the implementation of the “getSlideLoader” callback that we used during the initialization of PMA.live. This function will be called by PMA.live when it needs to attach to a viewport in order to control it. So we will need to return the appropriate slideLoader from this React Ref array with this function

const getSlideLoaderCb = (index, totalNumberOfImages) => {
    if (!master && totalNumberOfImages < numberOfImages) {
      for (let i = totalNumberOfImages; i < numberOfImages; i++) {
        slideLoaders[i].load(null);
      }
      setNumberOfImages(totalNumberOfImages);
    }

    return slideLoaders[index];
  }

So now we can initialize the collaboration in a useEffect which executes after the SignalR and Hubs scripts are properly initialized

useEffect(() => {
    if (loadedScripts && viewerContainer.current && slideLoaderRefs.current && slideLoaders.length > 0) {
      if (slideLoaderRefs.current.filter(c => !c || !c.current).length > 0) {
        return;
      }

      if (collaborationInit) {
        return;
      }

      initCollaboration("demo user", master, (index, totalNumberOfImages) => {
        return getSlideLoaderCb(index, totalNumberOfImages);
      },
        () => {
          let data = Collaboration.getApplicationData();
          let session = Collaboration.getCurrentSession();
          setCollaborationData({ data: data, session: session });
        })
        .then(() => {
          setCollaborationInit(true);
        });
    }
  }, [loadedScripts, viewerContainer, master, slideLoaders.length, collaborationInit, slideLoaderRefs, slideLoaderRefs.current.length]);

Finally, let’s talk about the “collaborationDataChanged” callback. Besides the out of the box slide syncing capabilities, it gives you the ability to exchange data between the users, in real time. This could be useful for example if you wanted to implement a chat system on top of the session. Every user can change the session’s data by invoking the Collaboration.setApplicationData method. It accepts a single object that will be shared among users. Whenever this method is called, all other users will receive it through the collaborationDataChanged callback. To do this is a React way we simply set the application data to a React state object whenever the callback is called.

To allow other users to join our application as guests we will implement a query string parameter called master. When this parameter is set to false users joining this session will be guests. We keep this value in a React state called master. So we change our initial useEffect function to add this

var urlSP = new URLSearchParams(location.search);
if (urlSP.get("master") === "false") {
   setMaster(false);
}

Congratulations you’ve done it! You can now have a working React application with PMA.UI and collaboration featured enabled.


You can download a complete demo here

Additional developer resources are provided here