How to handle slide meta-data?

What is slide meta-data?

In order to know to interact with something, we first need to know what it is. Or, at least, we need you to know what it means for us. Just so we’re clear what we’re talking about.

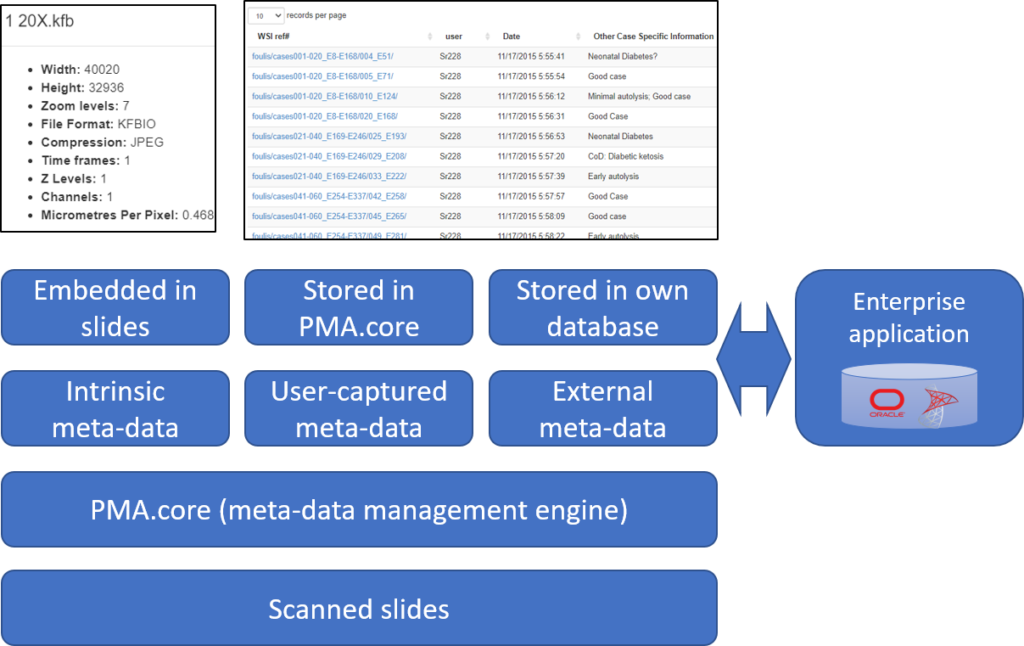
For the sake of this article, we distinguish three different kinds:

  • Intrinsic meta-data: information stored within a slide’s file format. A trivial example is the slide’s pixel size, and a more advanced feature is the time it took the scanner to produce the slide.
  • User-captured meta-data (forms): Pathomation’s central tile server component, PMA.core, allows for the definition of table structures. Forms are a basic data structure in PMA.core that’s picked up again and used to capture and present user-attributed data in other several Pathomation platform components, including PMA.studio, PMA.slidebox, and PMA.control.
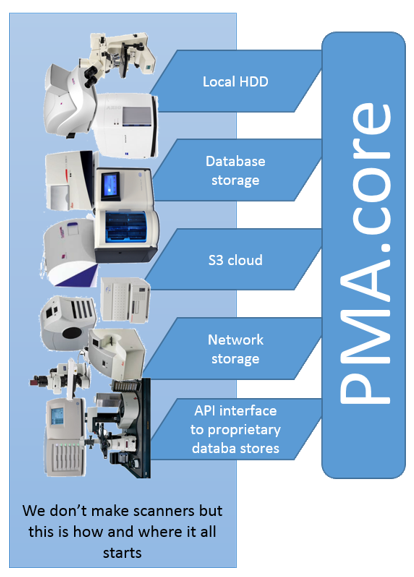
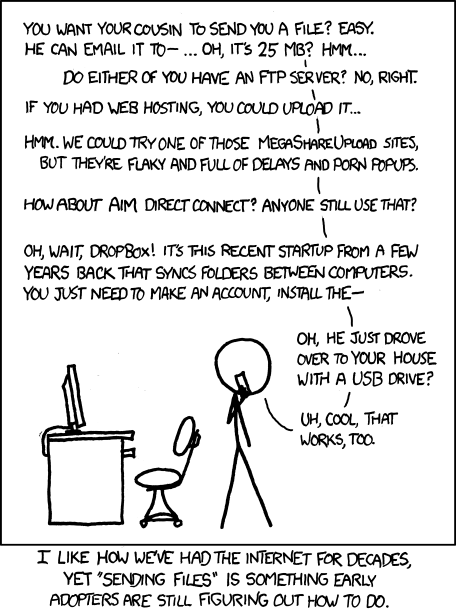
  • External data: if you have tons of external data in a separate repository and want access to it through the Pathomation software platform for digital pathology and virtual microscopy, you can link to it in real-time.

Below you can find an overview of what kind of meta-data is supported by what component and in what capacity

  Slide info Forms External data
PMA.start Read Not supported Not supported
PMA.core Read Define / read Read
PMA.view Read Not supported Not supported
PMA.studio Read Read / write Read
PMA.slidebox Read Read / write Read
PMA.control Read Read / write Read

Slide info

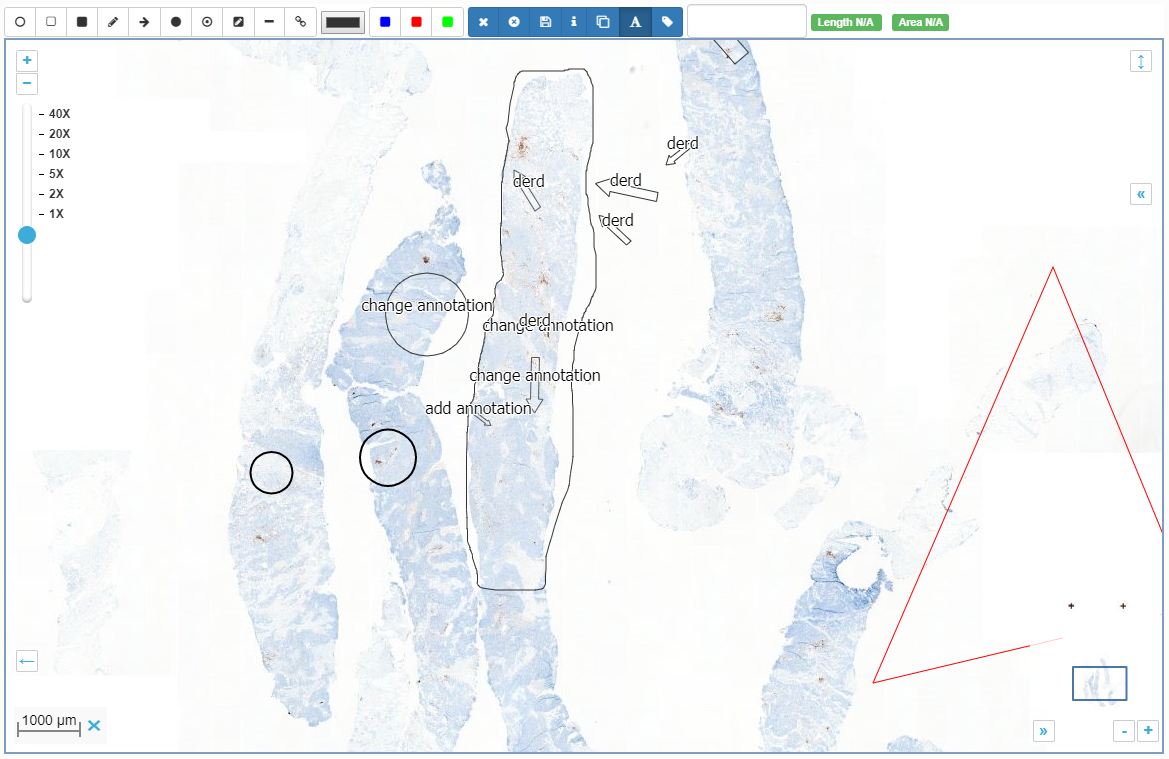
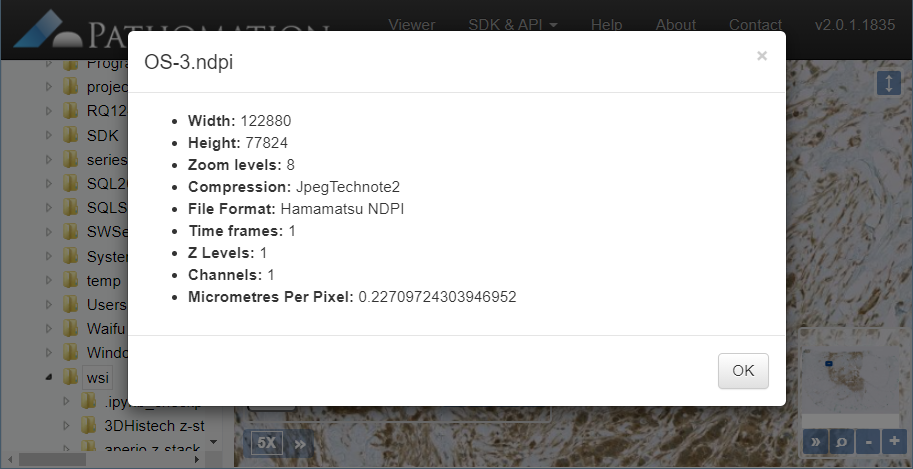
Intrinsic slide meta-data can be shown in PMA.start by clicking on the filename in the viewport.

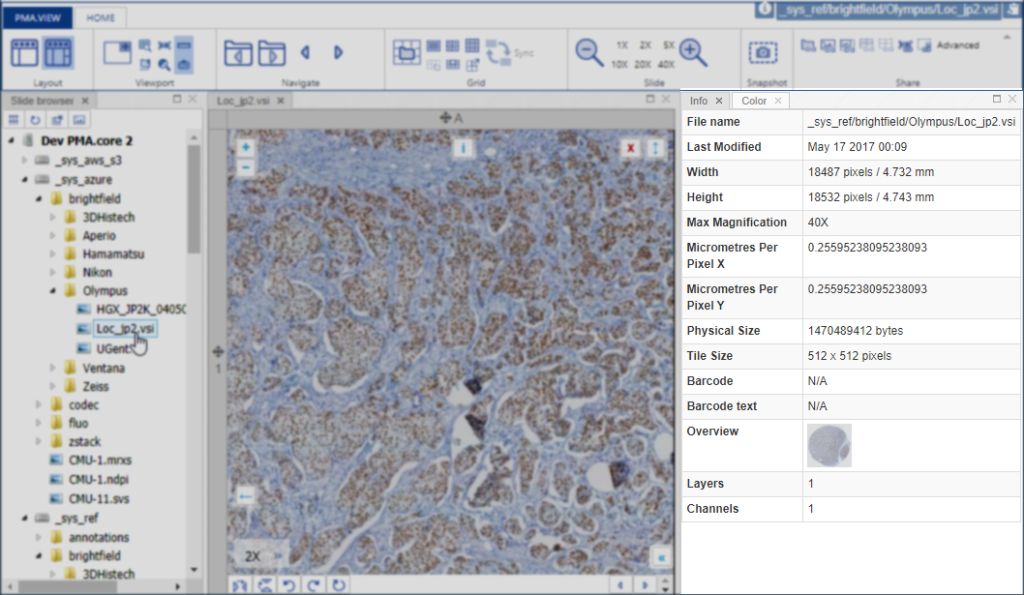
In the upcoming versions of both PMA.view and PMA.studio, we provide a separate info-panel for this.

There can be more slide info available than is actually shown in our various front-end interfaces. Some information is really specific, too specialized, or irrelevant even to show to most users. Other fields are scanner-specific and don’t make sense to include on a systematic basis.

At the API and SDK level, we provide dedicated SlideInfo calls that return full hierarchical dictionary structures that do give exhaustive slide information and can be consumed as you see fit for your specific application or workflow.

Data with a twist

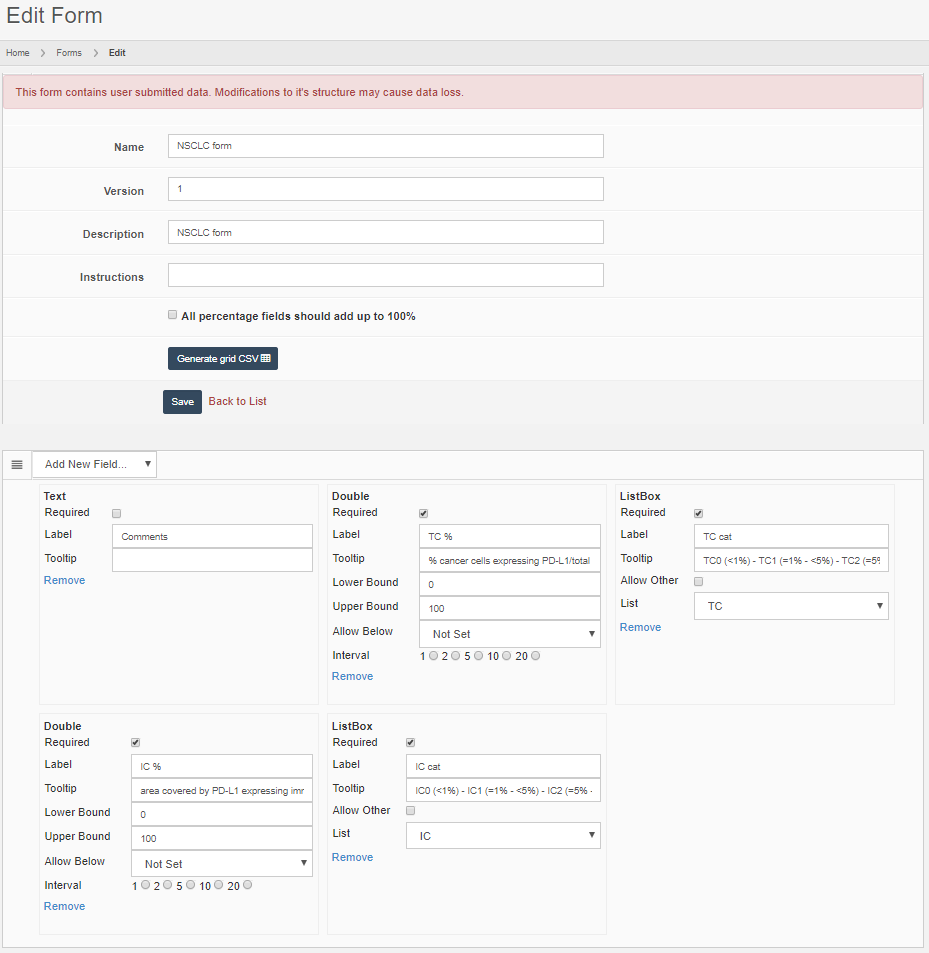
Forms are defined in PMA.core through the form editor.

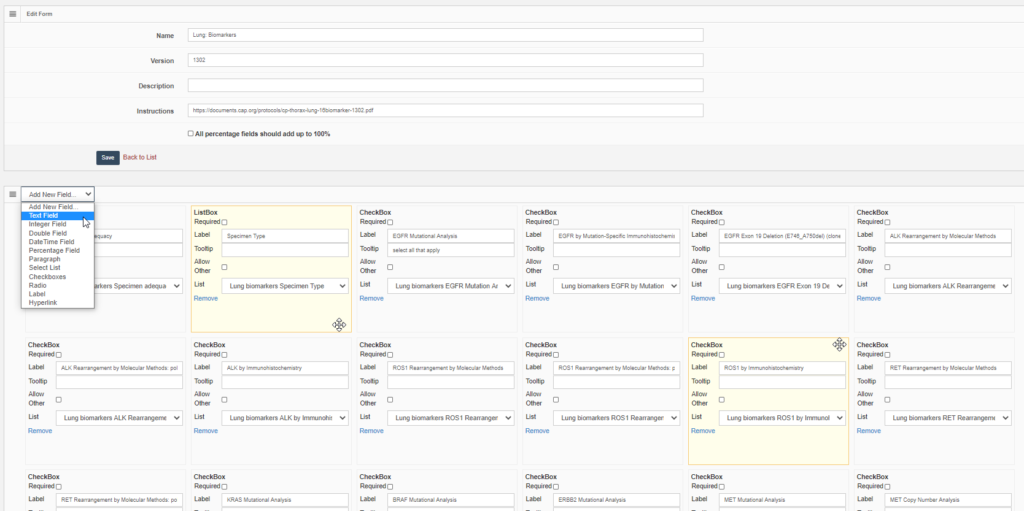
PMA.core’s forms support trivial datatypes like text or numbers (of course). We also offer scientifically relevant twists on traditional data capture. An example is that numerical data fields allow the option to be recorded as “below detectable limit”, since it’s very hard to prove that something is not present in a sample. Oftentimes, a numerical zero just means that our detection apparatus just lacks the sensitivity the unmask the presence of a specific phenomenon.

What can you do in forms? Pretty advanced things. We can model the CAP-recommended cancer protocols as PMA.core forms.

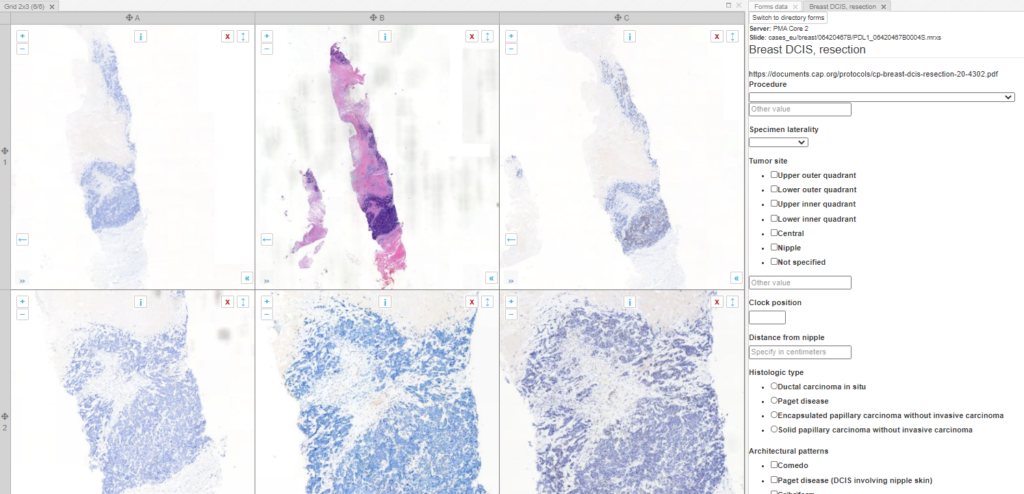
PMA.core offers different ways to interact with forms, but it doesn’t provide a data entry module. That’s because it doesn’t really make sense to enter data at this level. Data entry is done in the context of an application or workflow. Our upcoming PMA.studio will support data entry, and PMA.control offers several interaction modes. Underneath, PMA.control interaction modes rely on data stored as PMA.core forms.

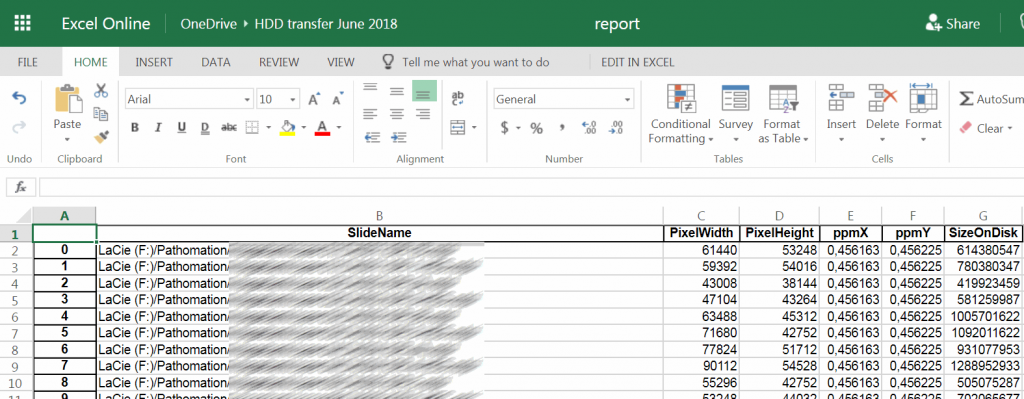
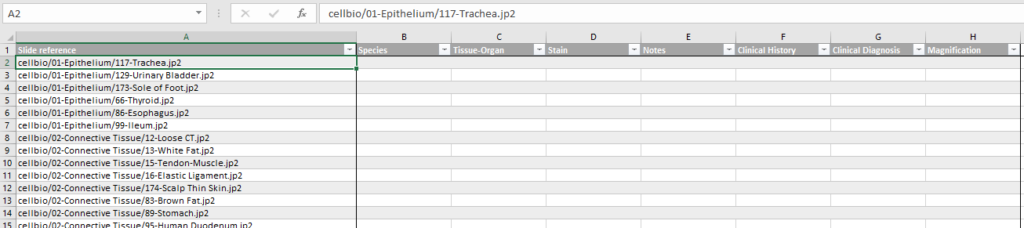
You can ask PMA.core to generate a spreadsheet template based on a select folder of slides and a particular already defined form.

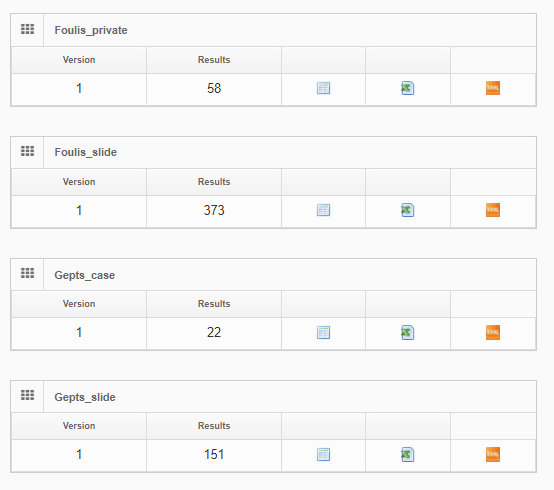
At Pathomation, we pride ourselves to be a truly open platform, so PMA.core offers several data formats to export captured form data to, including CSV, XML, and ARFF.

Use cases for external data

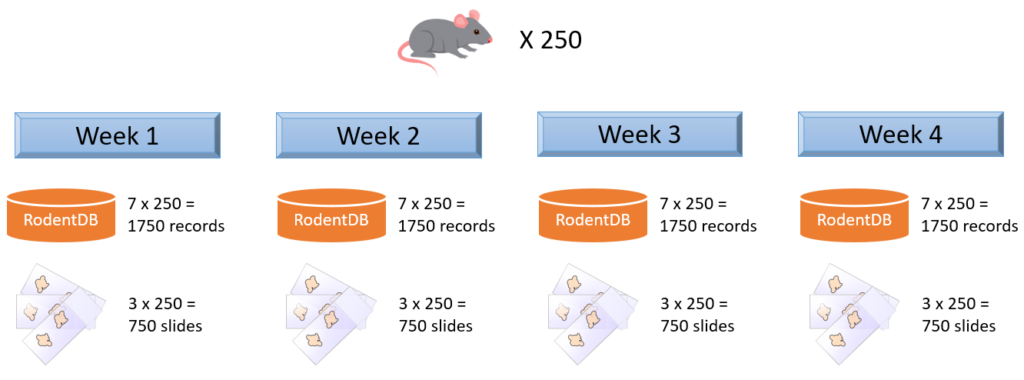
Imagine that you organize a toxicology experiment with a rodent population. In a separate database, you’ve been keeping data about each specimen’s vital statistics, dietary and behavior observations, as well as their phenotypic expression and genotypic make-up. Observations happen daily, so that’s 1750 new records per week.

You take weekly biopsies of the animals to monitor their response to a new drug you’re testing. The biopsies are prepared and stained in triplicate (good for a total of 750 new slides per week), and each slide has a barcode that can be used to trace back to the original individual animal. Your slide scanner takes care that the barcode is encoded in the slide’s filename.

Both the slide population and the separate database keep evolving. Replication between your database and a PMA.core form is considered at some point, but deemed inefficient and error-prone, because we are talking about experimental and evolving data structures here.

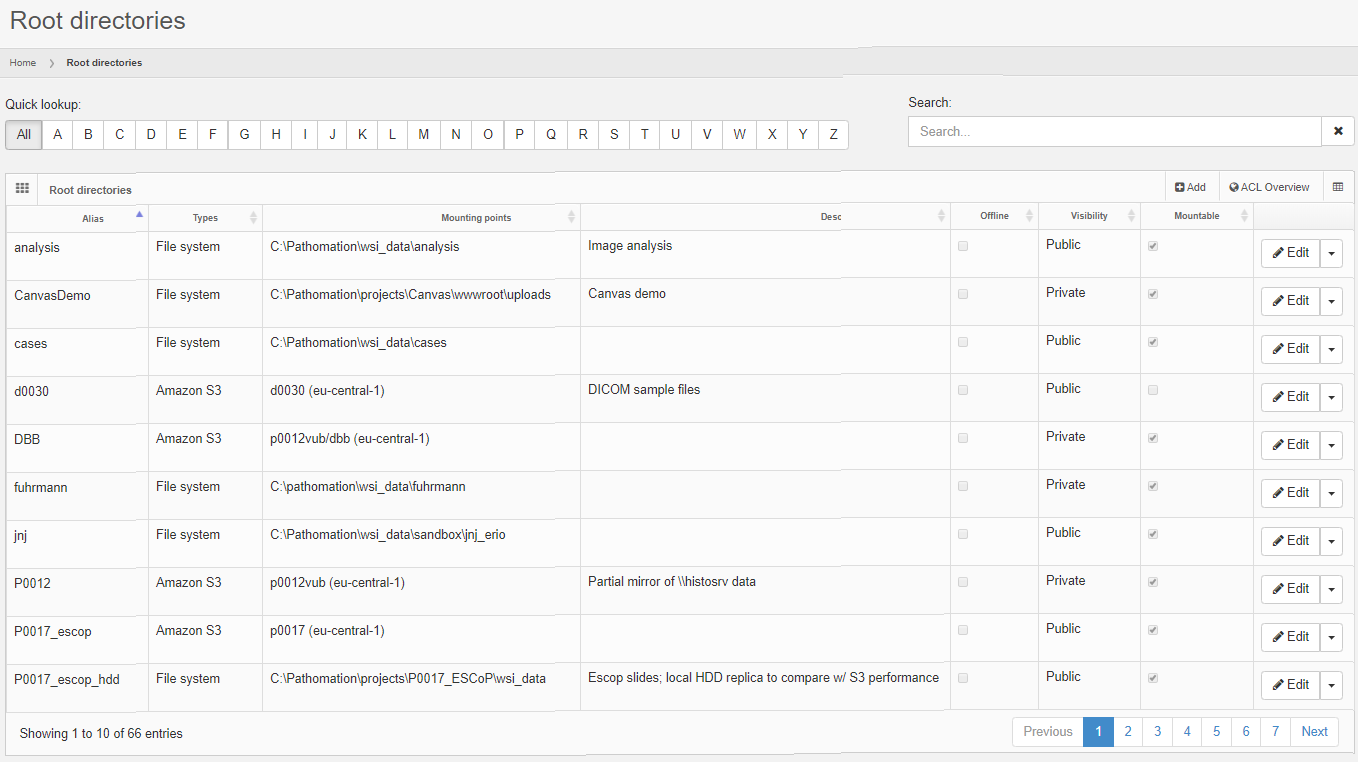
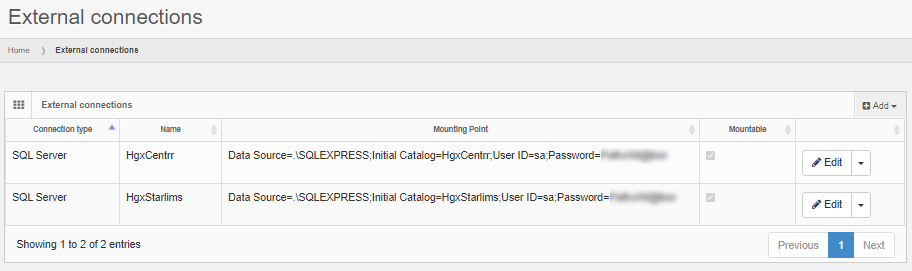
The solution is to define an external data source in PMA.core. This goes in two steps: first a connection string is defined to connect to the database server.

Next, the external connection is used to formulate any number of queries against.

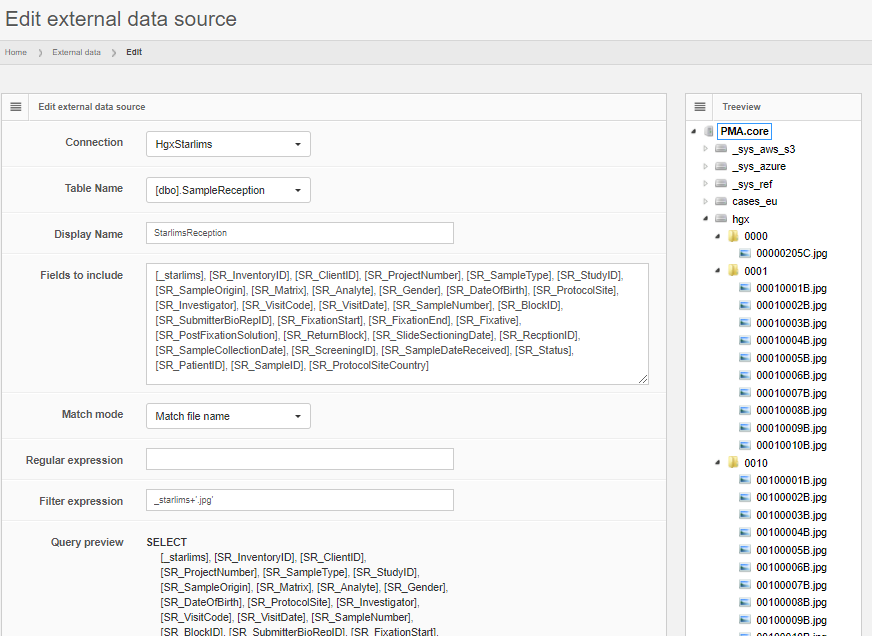
Data can be previewed within PMA.core, and subsequently is automatically propagated to other environments like PMA.studio.

External data are everywhere. They can be in proprietary databases as in our example above, but they can also be in a (AP)LI(M)S, VNA, PACS, or EHR system. In all those cases, replication is hard and impractical at best, and can even lead to data inconsistencies and errors at worst.

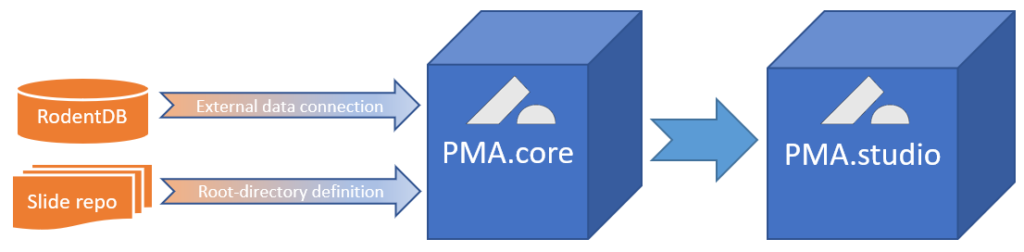
The Pathomation platform for digital pathology and virtual microscopy allows for a more elegant solution.

A look at PMA.core

The core

PMA.core is the centerpiece of the Pathomation software platform for digital microscopy. PMA.core is essentially a tile server. It does all the magic described in our article on whole slide images, and is optimized to serve you the correct field of view, any time, any place, on any device. PMA.core enables digital microscopy content when and where you want it.

Our free viewer, PMA.start, is built on top of PMA.core technology as well. PMA.start contains a stripped version of PMA.core, lovingly referred to as PMA.core.lite 🙂

PMA.core supports the same file formats as PMA.start does, and then some.

It acts as an “honest broker”, by offering pixels from as many vendor formats as possible.

Storage

With PMA.start, you’re limited to accessing slide content that’s stored on your local hard disk. External hard disks are supported as well, but at one point you end up with multiple people in your organization that need to access the same slide content. At that point, PMA.core’s central storage capabilities come into play.

PMA.core is typically installed on a (Windows) server machine and can access a wider variety of storage media than PMA.start can. You can store your virtual slides on the server’s local hard disk, but as your data grows, this is probably not the place you want to keep them. So you can offload your slides to networked storage, or even S3 bucket repositories (object storage).

Pathomation does not, in contrast with other vendors, require a formal slide registration or import process to take place. Of course our software does need to know where the slides are. This is done by defining a “root-directory”, which is in its most generic terminology “a place where your slides are stored”.

A root-directory can be location on the server’s hard disk, like c:\wsi. You can instruct your slide scanner to drop off new virtual slides on a network share, and likewise point PMA.core to \\central_server\incoming_slides\. Finally, you can store long-term reference material in an AWS bucket and define a root-directory that points to the bucket. The below screenshot shows a mixture of S3- and HDD-derived rootdirectories in one of our installations:

After defining your root-directory, the slides are there, or they are not, and representation of them is instant. An implication of this that you can manage your slides with the tools that you prefer; any way you want to. You can use the Windows explorer, or even using the command-line, should that end up being more convenient for you. Your S3 data can be managed through the AWS console, CloudBerry tools, or S3 explorer.

Security – Authentication

Another important aspect of PMA.core is access control. PMA.start is “always on”; no security credentials are checked when connecting to it. PMA.core in contrast requires authentication, either interactively through a login dialog, or automatically through the back-end API. In either case, upon success, a SessionID is generated that is used to track a user’s activity from thereon.

User accounts can be created interactively through the PMA.core user interface, or controlled through use of the API. Depending on your environment, a number of password restrictions can be applied. Integration with LDAP providers is also possible.

User accounts can be re-used simultaneously in multiple applications. You can be logged in through the PMA.core user interface, and at the same time use the same credentials to run an interactive script in Jupyter (using the PMA.core interface to monitor progress).

The interface in PMA.core itself at all times gives an overview what users are connected through what applications, and even allows an administrator to terminate specific sessions.

Security – Authorization

Our software supports authorization on top of authentication.

User permissions in PMA.core are kept simple and straightforward: a user account can have the Administrative flag checked or not, meaning that they can get access to PMA.core directly, or only indirectly through other downstream client application like PMA.view, PMA.control or the API. Another useful attribute to be aware of is CanAnnotate, which is used to control whether somebody can make annotations on top of a slide or not. Finally, an account can be suspended. This can be temporary, or can be mandated from a regulatory point of view as an alternative for deletion.

A root-directory can be tagged either as “public” or “private”. A public root-directory is a root-directory that is available to all authenticated users. In contrast, when tagged as “private”, the root-directory has an accompanying Access Control List (ACL) that determines who can access content in the root-directory.

The screenshot below shows the Administrative and Suspended flags for my individual user account, as well as what public and private root-directories I do or do not have access to:

Future versions of PMA.core can be expected to offer CRUD granularity.

A powerful forms engine

Form data exists everywhere. Information can be captured informally, like the stain used, or as detailed as an Electronic Lab Request Form (ELRF). This is why Pathomation offers the possibility to define forms as structured and controllable data entities. A form can consist of a couple of simple text-fields, or be linked to pre-defined (ontology-derived) dictionaries. Various other Pathomation software platform components help in populating these forms, including PMA.view.

Forms can be accompanied by ACLs. In order to avoid redundancy, a form ACL consists of a list of root-directories rather then user accounts. In a project-oriented environment, it makes more sense that certain forms apply to certain root-directories which represent types of slides. Similarly, in a clinical environment, it makes sense to have slides organized in root-directories per application-type or by processing-stage. Freshly scanned slides that haven’t undergone a QA-check yet can be expected to have different form-data associated with them than FISH-slides.

On-slide annotations

PMA.core support graphical on-side annotations. We support three types:

  • Native annotations embedded within a vendor’s file format
  • Third-party annotations coming from non-specific (image analysis) software
  • Pathomation annotations

Pathomation-created annotations are the easiest to understand. You have a slide, and you want to indicate a region of interest on it. This region of interest can be necrotic tissue, or proliferated tumor cells. For teaching purposes, you could have a blood smear and highlight the different immune-celltypes.

Pathomation annotations are stored as WKT and can be anything that can be encoded in WKT (which is a lot). You need a downstream client to create them, but the basic viewer included in PMA.core can be used to visualize them, and our PMA.UI JavaScript framework can be used to create your own annotation workflows.

You could run an algorithm that does tissue detection and pre-annotates these regions for you.

In addition to making your own annotations, Pathomation can be used to integrate annotations from other sources. Certain file formats like 3DHistech’s MRXS file format or Aperio’s SVS file format have the ability to incorporate annotations. If you have such slides, the embedded annotations should automatically show when viewing the slide using any Pathomation slide rendering engine.

Last but not least, we can integrate third-part annotations. Currently, we support three formats:

Third-party as well as native annotations are read-only; you cannot modify them using Pathomation software.

Even more slide metadata

What about other structured data?

We think our forms engine is pretty nifty, but we’re not as arrogant (or clueless) to pretend that we foresee everything you ever want to capture in any form, shape, or size. It is also quite possible that a slide meta-database already exists in your organization.

For those instances where existing data stores are available, we offer the possibility to link external content. Rather than importing data into PMA.core (also a possibility actually), we allow you to specify an arbitrary connection string that points to an external resource that may represent an Oracle database. Your next step is to define the query to run against this resource, along with a field identifier (which can be a regular expression) that is capable to match specific records with individual slides.

Examples of external data sources can be:

  • Legacy IMS data repositories that are too cumbersome to migrate
  • Proprietary database systems developed as complement to lab experiments
  • Back-end LIMS/VNA/PACS databases that support other workflows in your organization

Do try this at home

In this post, we’ve highlighted the main features of our PMA.core “honest broker” WSI engine aka tile server aka pixel extractor aka Image Management Server (IMS).

Warning: sales pitch talk following below…

If you’ve liked interaction with PMA.start and work in an organization where slides are shared with various stakeholders, you should consider getting a central PMA.core server as well. PMA.core is the center-piece of the Pathomation software platform for digital microscopy, and whether you prefer all-inclusive out-of-the-box viewing software, or are developing your own integrated processing pipelines, PMA.core can be the ideal middleware that you’ve been looking for. Contact us today for a demo or sandboxed environment where you can try out our components for yourself.

Ok, we’re done. Seriously, PMA.core is cool. Let us help you in your quest for vendor-agnostic digital pathology solutions, and (amongst others) never worry about proprietary file formats again.

Integrity for all

Transferring whole slide images

The following is a cartoon from XKCD dating from a few years back. If you’ve ever been involved in the transfer of whole slide images, this will be very recognizable.

With whole slide imaging data, the above actually is more complicated. The step that is being skipped in the cartoon is the file integrity check. And with whole slide images, as a single virtual slide can consist of multiple files, it can become really complex really fast.

If you’re a professional user of PMA.core, you no doubt have already appreciated the convenience of the “integrity check” tool: it allows you to select a set of slides, and check if they actually really whole slide imaging data.

Can your image management solution do this? 🙂

But we admit, buying PMA.core just to verify virtual slide integrity is probably overkill.

DIY slide integrity

It turns out, PMA.start is just a well capable to verify virtual slide integrity. But first some background about why you would even want to do this.

The fundamental reason why you want to route all of your slide manipulation operations through PMA.start or its bigger brother PMA.core is that the software knows and understands what a slide is. When you copy a number a multi-file slides from one device to another and you refer to our software components in your code for verification purposes, you cannot make any mistakes in terms of accidentally copying only parts of files the slides. If a mistake does crop up in your report, you can simultaneously check whether something was perhaps wrong with the original slides and files. Digital pathology is hard enough as it is; at least do it on a unit of data (the “slide” rather than the “file”) that makes sense!

As much of slide transfers occur “ad hoc” (on a “need to transfer” basis sort of speak), we wrote an integrity check procedure ourselves as an Anaconda Jupyter notebook.

In order to get PMA.python to work with Anaconda, you’ll first have to get it through PyPI. Start an anadonda prompt and type in “pip install pma_python”.

Great, now you’re ready to import our nifty library in your Jupyter notebooks.

Here’s a good way to start all of your notebooks:

The first block confirms the availability of the library; the second block confirms that PMA.start is running on your system.

This is where Jupyter really shines: you can subdivide your Python (or R) code in separate discrete parts and execute them in an order you want. It becomes really convenient to tweak your scripts and even faster to debug them.

Our strategy for doing an integrity check on a folder an its subfolders is straightforward: loop over all the slides in the folder and see whether we can request the slide information from each one:

def loop_over_directories(dir):
    slides = {}
    for subdir in core.get_directories(dir):
        slides.update(loop_over_directories(subdir))
        for slide in core.get_slides(dir):
            slides[slide] = core.get_slide_info(slide)
    return slides

The result of this function is a dictionary that as keys has paths to all the slides, and as values has information objects (or None in case the slide turned out to be corrupt).

We can now invoke the function on an external hard disk’s folder after copying to see if it goes ok. By means of a sanity check, we’ll also output some parameters on the first slide encountered, as well as the number of items in the dictionary:

slides = loop_over_directories("LaCie (F:)/Pathomation")
topslide = slides[list(slides.keys())[0]]
print(topslide["Filename"], topslide["Width"], topslide["Height"])
len(slides)

The output in Jupiter looks like this:

Our next step is to convert part of the dictionary data to a pandas DataFrame, which in turn it written out as an Excel file. The Excel file is subsequently stored on the external hard disk to provide a check-list for the client and confirm data integrity on their end upon receipt.

df = pd.DataFrame(columns=["SlideName", "PixelWidth", "PixelHeight", "ppmX", "ppmY", "SizeOnDisk"])
df.set_index(["SlideName"])
for slide in slides:
    info = slides[slide]
    if info == None:
        print("Unable to get slide information for", slide)
    else:
        df = df.append({"SlideName": slide,
            "PixelWidth": info["Width"],
            "PixelHeight": info["Height"],
            "ppmX": info["MicrometresPerPixelX"],
            "ppmY": info["MicrometresPerPixelY"],
            "SizeOnDisk": info["PhysicalSize"]}, ignore_index=True)
print (df.shape[0], " out of ", len(slides), " check out OK")

Great, but what if things don’t work out they’re supposed to?

As it turns out, we had been copying a collection of slides (about 60GB in total) overnight from an FTP site. Chances are that in the time that takes, something will go wrong. This turned out have happened in our case, as well, and the output flagged correctly that there was a mistake.


The flagged item was minor actually; one of the files had indeed failed to copy and had resulted in a file size with 0 bytes. We downloaded the file anew, and now everything checked out.

Did we need PMA.start to find out that a file was the wrong size? No, we could have used a range of other tools. But the point is that many things can go wrong with whole slide image transfer. The final goal is to check slide integrity, and once a problem is detected, other tools can be used to dig further and resolve them.

There are other potential problems, too: you may be sending someone slides who’s unable to read them. By including a test report from your end with the data, you’re telling them that the files are indeed all right, and that other problems may be at play (perhaps they’re not using the right viewer or import module for the file format that you sent them).

Troubleshooting and debugging is all about eliminating possibilities. We like to think PMA.start (and it’s bigger brother PMA.core) can help you get there faster than anything else on the market today.

You can download the Jupyter notebook discussed in this post. Just modify the folder_to_check variable in the third codeblock to point to the location that you want to validate.