Customizing the next generation of slide viewer software

It’s coming, it’s coming, it’s coming, it’s coming…

And we’re really excited about it!

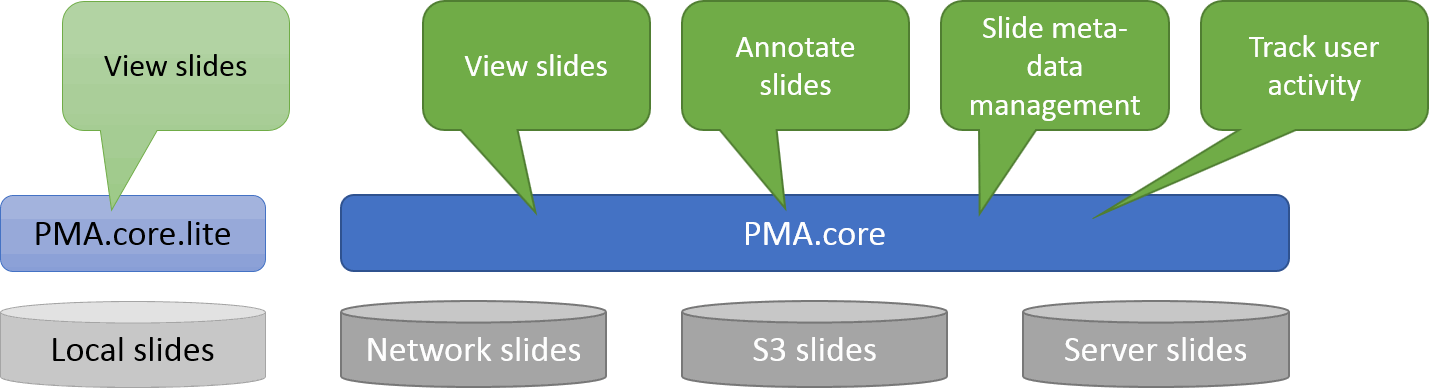
We’re in the process of wrapping up PMA.studio. This is going to be our flagship product for the next three years. It’s got everything a microscopy enthusiast needs, ranging from powerful viewport manipulation options, over annotations, to live conferencing. Remember our earlier article about how PMA.core handles (external) slide meta-data? All of that and more is in there, too.

In this blog post, we want to give developers as well as customers in our OEM and reseller program a sneak peek at PMA.studio and specifically focus on the opportunity for custom add-on development and white labeling.

PMA.studio is currently in testing phase for various use cases already, ranging from comparative validation studies to enterprise-wide deployment as a central histological information cockpit. If you are interested in joining the effort and helping us track down last minute bugs, do shoot us an email and we can see if you’re a good fit for our beta-program.

You can find more information about PMA.studio itself in the landing page that we’re building for the software at https://www.pathomation.com/pma.studio.

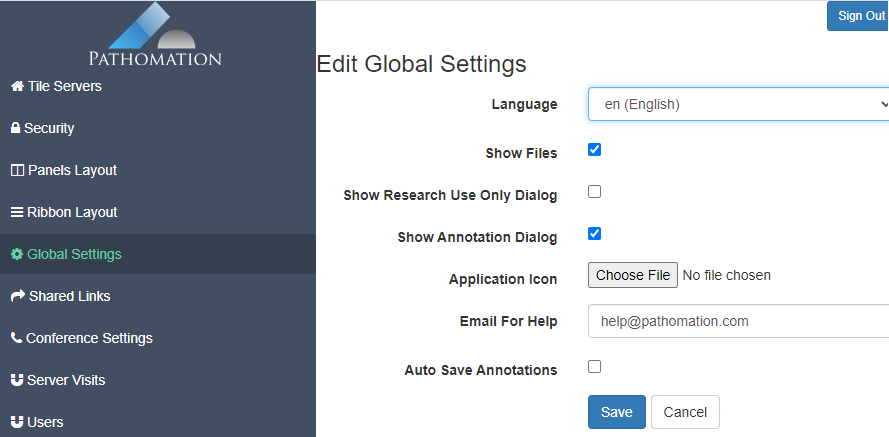
Administrative console

PMA.studio has a separate interface apart for administrative tasks.

PMA.studio admin console

In the administrative console, you can register any number of PMA.core instances to be used by PMA.studio to retrieve slides from. Once in use, for each registered PMA.core instance, you can see what users have sought access to it.

There’s a general dialog where you can set system-wide settings, like the address to contact in case of trouble, or the company / institute logo to use. This is where white labeling starts.

PMA.studio global settings

Like for PMA.view 1.x, the administrative console in PMA.studio can be used to customize the ribbon interface at top of the interface. The syntax is XML. We don’t have any formal definition of the format, and typically work with customers to get the result they want.

You can play around with the XML code yourself if you want. The default toolbar provides enough example code to allow simple re-arrangements of buttons and move features between different tabs.

PMA.studio ribbon editor

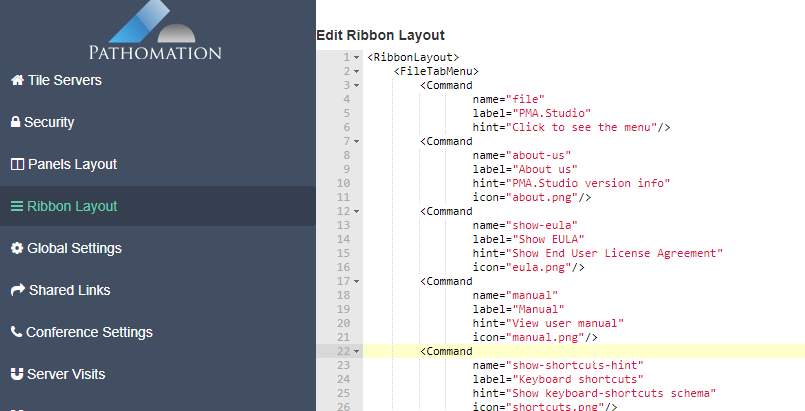
If you run into trouble, there’s always the option to restore the code back to a default toolbar.

Custom annotations

PMA.studio supports annotations. We have a separate tutorial on the subject as part of our beta-program.

There are situations where you don’t want users to go off and make their own annotations at will.

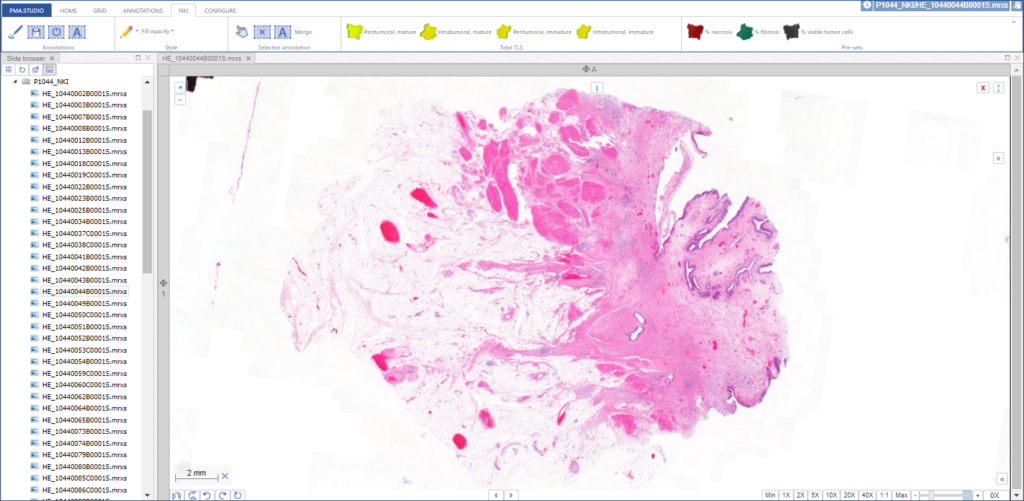
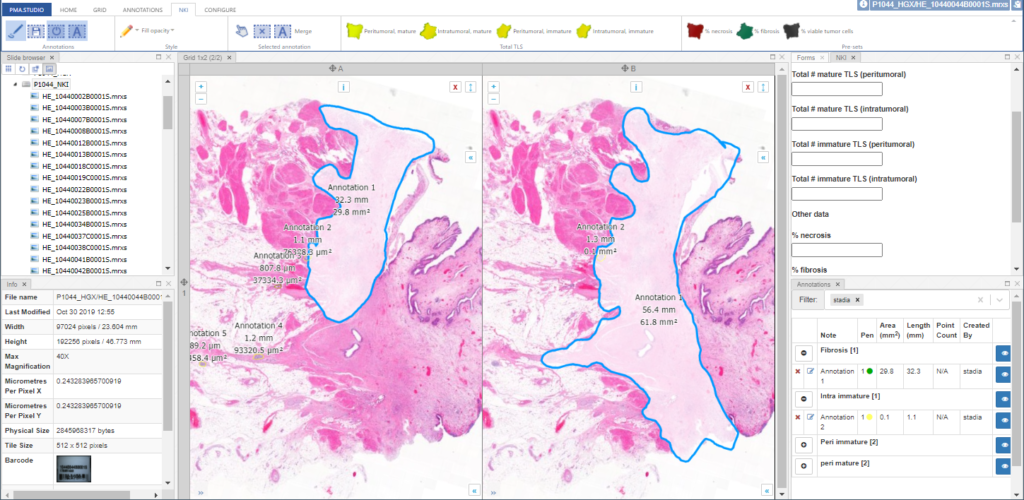
You may want your pathologists to annotate invasive tumor margins or necrotic areas for a study protocol. It’s useful then that people align, and everybody uses the same color scheme. So in addition to providing standard annotation tools, it’s possible to define buttons on your toolbars w/ pre-set attributes and parameters.

Here’s a great example of a project we participated in recently, for which participants had to indicate six different types of tissues / cells:

PMA.studio custom ribbon

The underlaying XML for this extra ribbon tab is as follows:


<Tab label="NKI" hint="custom ribbon tab" name="nki_annotations" enabled="true" visible="true">
    <Ribbon label="Total TLS" width="30%">
        <Tool type="buttons" size="large">
            <Command name="preset-peri_mat" icon="an_m_peri_tls.png" hint="Total # mature TLS (peritumoral)" label="Peritumoral, mature"
                pma-classification="peri mature"
                pma-shape="ClosedFreehand"
                pma-color="#ffff33"
           />
            <Command name="preset-intra_mat" icon="an_m_intra_tls.png" hint="Total # mature TLS (intratumoral)" label="Intratumoral, mature"
                pma-classification="Intra mature"
                pma-shape="ClosedFreehand"
                pma-color="#cccc00"
           />
           <Command name="preset-peri_immat" icon="an_im_peri_tls.png" hint="Total # immature TLS (peritumoral)" label="Peritumoral, immature"
                pma-classification="Peri immature"
                pma-shape="ClosedFreehand"
                pma-color="#999900"
            />
            <Command name="preset-intra_immat" icon="an_im_intra_tls.png" hint="Total # immature TLS (intratumoral)" label="Intratumoral, immature"
                pma-classification="Intra immature"
                pma-shape="ClosedFreehand"
                pma-color="#ffff66"
            />
            </Tool>
        </Ribbon>
        <Ribbon label="Pre-sets" width="30%">
            <Tool type="buttons" size="large">
                <Command name="preset-necrosis" icon="an_necrosis.png" hint="Tumor" label="% necrosis"
                    pma-classification="Necrosis"
                    pma-shape="ClosedFreehand"
                    pma-color="#aa0000"/>
                <Command name="preset-fibrosis" icon="an_macro.png" hint="Tissue" label="% fibrosis"
                    pma-classification="Fibrosis"
                    pma-shape="ClosedFreehand"
                    pma-color="#00aa00"/>
            <Command name="preset-via_tumor" icon="an_tumorcells.png" hint="Tissue" label="% viable tumor cells"
                pma-classification="Viable tumor cells"
                pma-shape="ClosedFreehand"
                pma-color="#000000"/>
        </Tool>
    </Ribbon>
</Tab>

The pay-off of this kind of configuration is two-fold: the protocols are consistently executed as intended. In addition, the training needed for novel users to interact with the software is reduced because they only have a few options to choose from. Less can definitely be more in these scenarios.

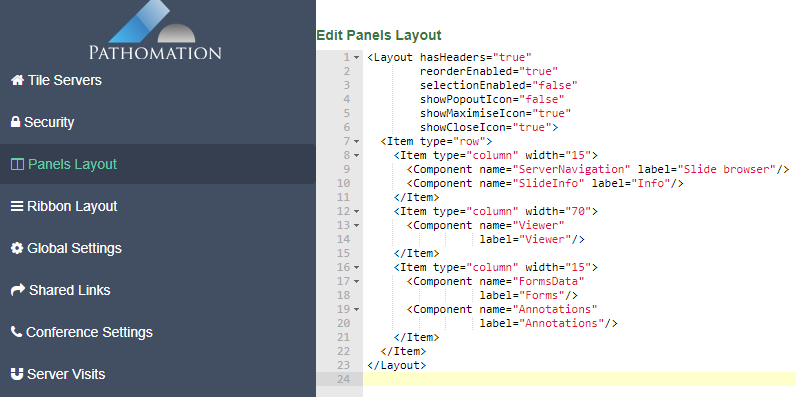
Configuring the panel layout

PMA.studio organizes its content across different panels. The layout of PMA.studio is a lot more powerful and flexible than in PMA.view 1.x.

All panels can be turned on or off via the Configuration tab on the ribbon. In addition, the admin console can be used to pre-determine the layout and panel organization when people first log in.

In its simplest configuration, you’re navigating slides and looking at them one by one:

PMA.studio

You can add various information panels as you see fit to get to something that looks more like this:

PMA.studio

Like with the ribbon customization and pre-defined annotation controls, you can pre-set PMA.studio’s panel layout. Again, you’re looking at XML snippets.

The layout from the latter screenshot is then defined as follows:
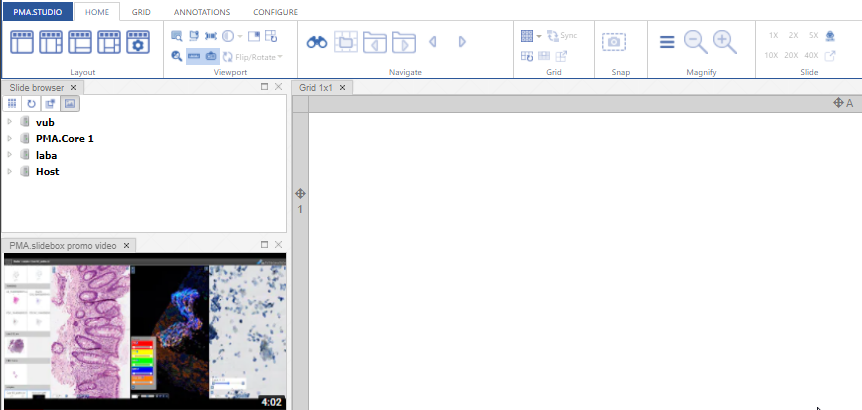
Iframe panels

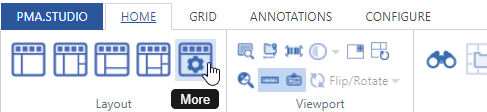
A special type of panel is the iframe-panel. With these panels, you can virtually load any website or page that you want within a pre-defined PMA.studio panel. You can define your own panel through the Layout configuration button on the ribbon:

PMA.studio ribbon

A pop-up dialog appears and let’s you specify the title of the panel, and the URL you want it to load.

PMA.studio custom panel

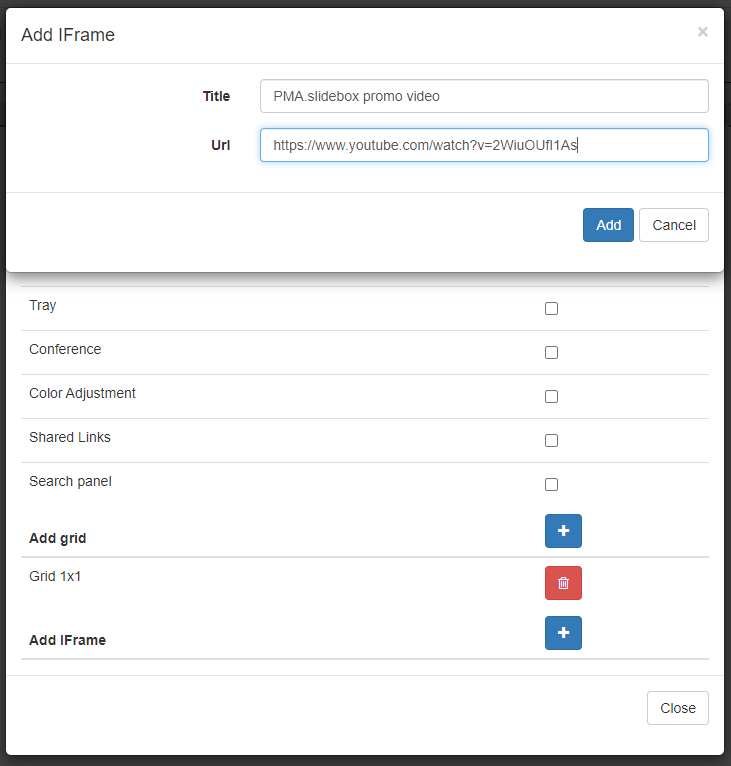
In our example we took  a promotional video for our own PMA.slidebox product (more on that later), but you can put just about anything in there.

The result looks like this:

PMA.studio custom panel

You can pre-define these custom iframe-panels any way you want through the admin console.

<Component name="IFrame" label="Pathomation video" url="https://www.youtube.com/embed/VsiGz8ykuEo"/>

Respective parameters that indicate the current state of the active viewport in PMA.studio are passed along automatically, like this:

http://www.server.com/app/page.php
    ?server=%PATH%TO%PMA%CORE%
    &path=%FULL%PATH%OF%SLIDE%
    &sessionId=%SESSION%ID%

Last but not least: a product pitch

We wrote earlier about PMA.slidebox.

This week, we’ve officially started promoting this product. We updated the landing page for PMA.slidebox, and the first demonstration videos are available through our YouTube channel.

PMA.slidebox

Like with everything we do, we’re very excited about being able to package a ton of useful functionality in nevertheless compact product offering. Do have a look at our demo portal for PMA.slidebox and let us know if this something you, too, are interested in, too!

A look at PMA.view

Architecture

Apart from PMA.start, Pathomation also offers a professional range of products. Yes, professional is a euphemism for “not free”, but we do feel you get quite some value in return. And some of the money flows back to our developers so they can also keep working diligently on improving PMA.start, and the free product offering around it, including our SDKs and software plugin for ImageJ/FIJI.

At the core of it all always sits PMA.core. Even PMA.start runs on top of PMA.core; albeit a restricted version, that only can access local data on your personal system. Hence the name PMA.core.lite. The professional version, PMA.core, can do loads more, including making annotations, capture form meta-data, as well as track user activity in a 21CFR.11 compliant manner. Both PMA.core has been validated conform GAMP 5 guidelines.

In a different article on this blog we explained how big (and why!) these whole slide images get. PMA.core then is responsible for extracting tiles from the original images when the users wants it. These tiles can be extracted via one of our language-specific SDKs, or end-users can use a viewer software built on top of PMA.core, and understand how user (mouse) operations need to be translated into tile requests.

At Pathomation, our viewer software is PMA.view. Like PMA.core, it comes in two flavors: PMA.view and PMA.view.lite. The distinction is made in order to provide better interaction with the respective underlaying versions of PMA.core. One could also say that PMA.start as a product is the combination of PMA.view.lite and PMA.core.lite. PMA.view in turn interacts with (multiple instances of) PMA.core.

As you can suspect, Pathomation also offers other applications next to PMA.view, that are also built on top PMA.core. But that’s the focus of a different post (sneak preview of what we mean through our YouTube channel).

PMA.view features

Below is a screenshot of PMA.view. The main element of the user interface are a ribbon, a central viewing panel for slide visualization, and two side panel which in turn may contain one or more sections.

The content of the ribbon (as well as the number of tabs etc) is completely configurable through an XML file. Similarly, the content and sections of the side panels is configurable through XML configuration files. Editors for all are provided in PMA.view administrative interface. Syntax highlighting and restore options are provided as well.

The central viewport for slide viewing is a Zooming User Interface (ZUI); you navigate slides by panning left and right, up and down, and by zooming in and out. You can use the mouse scrollwheel or drag a rectangle with the mouse while holding down the shift-key (on your keyboard) to zoom in on a specific area of your choosing.

In the left panel you typically see a navigation tree, representing the slides hosted by PMA.core. PMA.view can connect to multiple PMA.core instances simultaneously. This is useful when involved in international collaboration, of even in a situation where you have a central hospital hub with several smaller satellite offices spread throughout a region. Just put a tile server in each location to prevent having to transport (digital or – worse – physical) slides around.

Apart from convenient slide management across multiple sites, PMA.view offers many other features that people have come to expect from modern slide viewers, including:

  • Capture structured or free text meta-data
  • Seamless support for different scanning modalities (brightfield, fluorescence, and z-stacking)
  • Brightness and contrast controls
  • On-slide annotations in arbitrary colors and shapes (rectangle, circle, freehand etc.)
  • Annotation toggling based on type and author

Slide sharing

One of the big selling points of digital pathology is sharing slide content, without the need to physically distribute the slides via regular mail. Apart from the obvious improvement this bring regarding speed, there’s a secondary advantage that you can send slide to multiple parties at the same time. The third advantage is that the slides can’t get lost in the mail or damaged during transport anymore. In return for that of course, we occasionally encounter over-eager spam filters.

Two important impediments that prevent slide sharing however are the following:

  • When I share a slide with you, I have to make sure to specify which file format I’m sharing with you, so you get get the appropriate viewer
  • When I share a slide with you, I have to upload a LOT of data to WeTransfer, Aspera, or a good ole’ fashion FTP site, where you in turn can download… a LOT of data… again.

Pathomation’s PMA.core and PMA.view combo solve both problems for you. PMA.core abstracts any proprietary slide file format to “just” pixels, and PMA.view allows you to share slides with a counter-party in the form of HTML hyperlinks.

How does this work? PMA.view has a dedicated “Share” button on its ribbon to create links that point directly to selected content. There are different kinds of content that you can share:

  • You can share all slides in a selected folder, thus mimicking a patient case
  • You can share an individual slide
  • You can share a pre-selected region of interest within a slide

Share links are always formatted the same, but they can be used in multiple ways. You can:

  • Use links directly as they are. You can share them with your buddies via email, during a Skype chat session, WebEx, GoToMeeting, whatever.
  • Convert links into scannable QR codes. When you’re giving a presentation during a conference, or in a classroom setting, text-based links are cumbersome to present. Ironically, text-based links are not well suited for print media, either, for the same reason: it’s too easy to make a type copying the link character by character. It’s more convenient to present a QR-code then that people can scan with their smartphones or tablets, and immediately view, or convert into the actual text-link for use elsewhere.
  • Embed them into your own web-content. If you still have an actual website, that is, a place on a server somewhere where you deposit your own HTML code, you can now sprinkle live slides throughout the site and have them embedded in an <iframe> tag. Because not everybody knows how these work, PMA.view will give you the necessary HTML code that you can past directly into your own website. You’ll notice that within the HTML snippet, the plain old original link from above resurfaces. And it gets better: Whether you use plain old notepad to make your website in the traditional sense, or you use a CMS like WordPress or Drupal, an LMS like Canvas, Moodle, or Blackboard, or a social media platform: these too boil down to sending HTML code to the browser, so there’s usually a way to use <iframe>s there, too.

Remember the Zooming User Interface (ZUI) terminology we introduced you to earlier? Well, last but not least, when you click on a PMA.view slide-link, you’re essentially instantiating our ZUI. There are no plugins required, nothing to download, it’s just all basic JavaScript and HTML 5. As a consequence, it’s also easy to configure the layout of the ZUI. And that’s what the last set of options at the bottom of the share dialog is about.

How do you want your audience to experience your slide when they go to it? Do you want them to see the barcode? The overview?… It’s all in your hands, and we think this level of control and flexibility is pretty awesome.

Organizing pipelines

So as awesome as we think ourselves to be, there’s always room for improvement, right? So here’s a scenario that a customer of our came across recently:

  • We have a large number of slides that we want to embed throughout various pages of our proprietary customer portal. We like the PMA.view slide embedding <iframe> capability, but it’s really a pain to generate all these links one by one. Because there are so many, it’s also rather tedious making sure that they are ALL clicked on.

Is there a better way? Yes, there is.

When you look at the links that are generated, it’s not rocket science to figure out how they’re built. The customer wanted to have a link to a thumbnail of a slide, which always looks like this:

http://yourserver/view/EmbedThumbnail/{seemingly random charachters}

As well as a link to the actual slide ZUI, which always looks like this:

http://yourserver/view/Embed/{seemingly random charachters}

The character string at the end of these links is a particular slide’s unique identifier (UID). When we switch over to our PHP SDK, we can write just a few lines of code that gets all UIDs from all slides in a particular directory:

<?php
require_once "lib_pathomation.php";
?>
<html><head><title>All thumbnails for all slides</title></head><body>
<?php
$session = connect("http://yourserver/core", "username", "secret");
echo "SessionID for universal viewer account = ".$session."<br>";
foreach (getSlides("rootdir/subdir", $session) as $slide) {
    echo "<h3>$slide</h6>";
    $uid = getUID($slide, $session);
    $thumb = "http://yourserver/view/EmbedThumbnail/$uid";
    echo "<a href='$thumb'><img border=0 src='$thumb' height='50' align='left' /></a>";
    echo "<tt>$thumb</tt><br />";
    echo "<br clear='all'>";
}
?>
</body></html>


Of course, you can modify this script anyway you want to compensate for your particular directory hierarchy and structure.

Then, it was just a matter of simple string concatenation to provide the client with a custom website where they were able to retrieve all of the links to their slides in batch. As the page interact with PMA.core directly at that point,

So, for our client, we figured out how to organize a pipeline to facilitate their content production process. We user our PHP SDK on top of PMA.core to generate links that in turn exploit the slide sharing capabilities of PMA.view. Now that’s cool!

But we still want more

Do you have a scenario that you have difficulties with or want to see optimized? Let us know; we’ll he happy to talk to you.